Scripting OpenAM
This chapter explains how to use scripting to exact fine control over various aspects of OpenAM.
You can use scripts for client-side and server-side authentication, policy conditions, and handling OpenID Connect claims.
This chapter covers the following topics:
For information on managing scripts, see "Managing Scripts" in the Administration Guide and "RESTful Script Management".
The Scripting Environment
This section introduces how OpenAM executes scripts, and covers thread pools and security configuration.
You can use scripts to modify default OpenAM behavior in the following situations, also known as contexts:
- Client-side Authentication
-
Scripts that are executed on the client during authentication.
Client-side scripts must be in JavaScript.
- Server-side Authentication
-
Scripts are included in an authentication module and are executed on the server during authentication.
Scripted authentication modules are an alternative to developing custom authentication modules by using Java as described in "Creating a Custom Authentication Module". A scripted authentication module allows you to customize default authentication behavior by adding Groovy or JavaScript code to the module configuration.
To see an example server-side authentication script, see "Default Server-side Authentication Script".
- Policy Condition
-
Scripts used as conditions within policies.
To see an example policy condition script, see "Default Policy Condition Script".
- OIDC Claims
-
Scripts that gather and populate the claims in a request when issuing an ID token or making a request to the
userinfoendpoint. - OAuth2 Access Token Modification
-
Scripts that add, modify, or remove claims in a stateless (JWT) OAuth 2.0 access token or refresh token when it is issued.
To see an example access token modification script, see "OAuth2 Access Token Modification API Functionality".
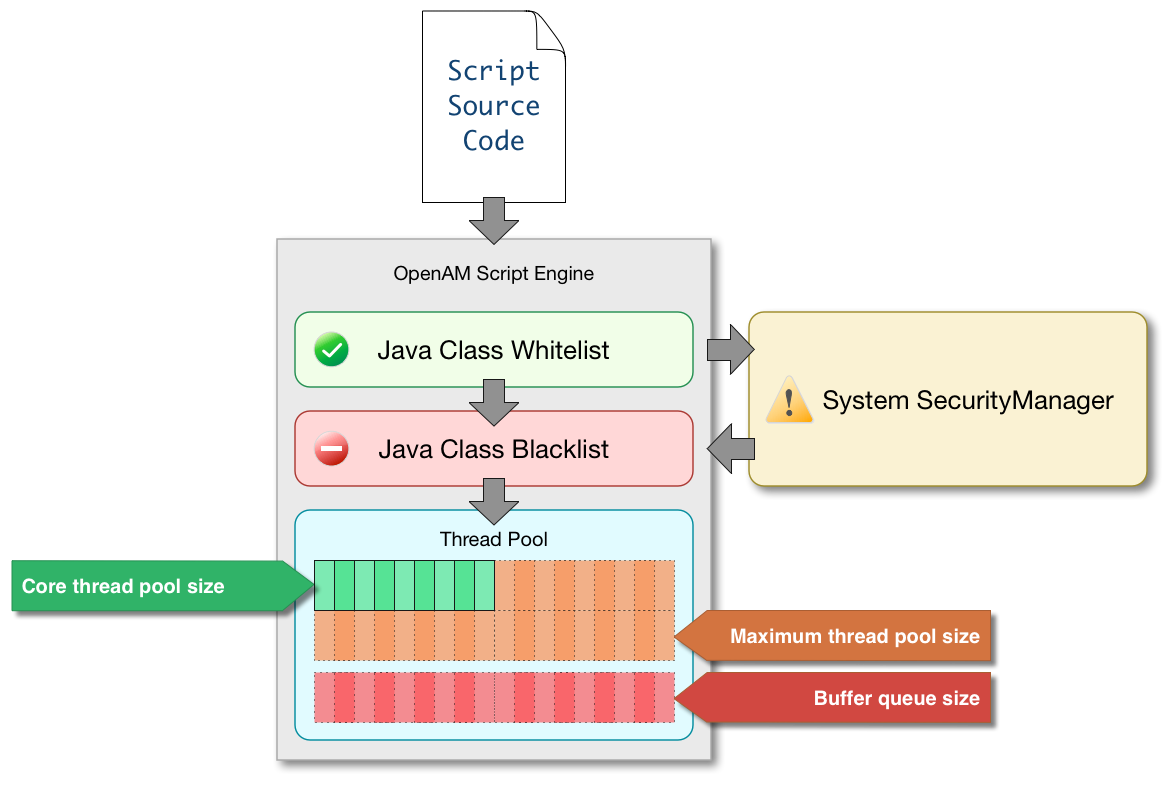
OpenAM implements a configurable scripting engine for each of the context types that are executed on the server.
The scripting engines in OpenAM have two main components: security settings, and the thread pool.
Security
OpenAM scripting engines provide security features for ensuring that malicious Java classes are not directly called. The engines validate scripts by checking all directly-called Java classes against a configurable blacklist and whitelist, and, optionally, against the JVM SecurityManager, if it is configured.
Whitelists and blacklists contain class names that are allowed or denied execution respectively. Specify classes in whitelists and blacklists by name or by using regular expressions.
Classes called by the script are checked against the whitelist first, and must match at least one pattern in the list. The blacklist is applied after the whitelist, and classes matching any pattern are disallowed.
You can also configure the scripting engine to make an additional call to the JVM security manager for each class that is accessed. The security manager throws an exception if a class being called is not allowed to execute.
|
The JVM security manager is deprecated, disabled by default, and cannot be installed at all on recent Java versions. Do not rely on it as your only safeguard: the whitelist and blacklist remain the primary runtime controls. |
For Groovy scripts, the scripting engine additionally rejects compile-time AST (Abstract Syntax Tree) transformation annotations, such as @Grab and @ASTTest. Unlike the whitelist, blacklist, and security manager checks—which apply while a script runs—these annotations execute arbitrary code during script compilation, which occurs as soon as a script is validated or created, before the script is ever run. A script that uses a blocked transform is rejected with a compilation error, and Grape dependency resolution (the @Grab family of annotations) is disabled.
For more information on configuring script engine security, see "Scripting" in the Reference. .Important Points About Script Engine Security
The following points should be considered when configuring the security settings within each script engine:
- The scripting engine only validates directly accessible classes.
-
The security settings only apply to classes that the script directly accesses. If the script calls
Foo.a()and then that method callsBar.b(), the scripting engine will be unable to prevent it. You must consider the whole chain of accessible classes.Access includes actions such as:
-
Importing or loading a class.
-
Accessing any instance of that class. For example, passed as a parameter to the script.
-
Calling a static method on that class.
-
Calling a method on an instance of that class.
-
Accessing a method or field that returns an instance of that class.
-
- Groovy compile-time transforms are blocked.
-
The whitelist, blacklist, and security manager apply only while a script runs. Groovy also supports AST transformation annotations—such as
@Graband@ASTTest—that run arbitrary code at compile time, when a script is validated or created. OpenAM blocks these transforms during compilation so that they cannot be used to bypass the runtime security settings. Benign transforms, such as@Field, remain available. - Potentially dangerous Java classes are blacklisted by default.
-
All Java reflection classes (
java.lang.Class,java.lang.reflect.*) are blacklisted by default to avoid bypassing the security settings.The
java.security.AccessControllerclass is also blacklisted by default to prevent access to thedoPrivileged()methods.You should not remove potentially dangerous Java classes from the blacklist.
- The whitelists and blacklists match class or package names only.
-
The whitelist and blacklist patterns apply only to the exact class or package names involved. The script engine does not know anything about inheritance, so it is best to whitelist known, specific classes.
Thread Pools
Each script is executed in an individual thread. Each scripting engine starts with an initial number of threads available for executing scripts. If no threads are available for execution, OpenAM creates a new thread to execute the script, until the configured maximum number of threads is reached.
If the maximum number of threads is reached, pending script executions are queued in a number of buffer threads, until a thread becomes available for execution. If a created thread has completed script execution and has remained idle for a configured amount of time, OpenAM terminates the thread, shrinking the pool.
For more information on configuring script engine thread pools, see "Scripting" in the Reference.
The Scripting API
Client-side scripts have access only to the user agent API. The functionality provided by each user agent is different, refer to the API provided by your user agent for more information.
Global API Functionality
This section covers functionality available to each of the server-side script types. Global API functionality includes:
Accessing HTTP Services
OpenAM passes an HTTP client object, httpClient, to server-side scripts. Server-side scripts can call HTTP services with the httpClient.get and httpClient.post methods. The methods return an HttpClientResponse object.
| Method | Parameters | Return Type | Description |
|---|---|---|---|
|
`Request Data` (type: `Map`) |
|
Perform an HTTP GET on the specified URI with the specified request data and return the response retrieved. |
|
`Body` (type: `String`) `Request Data` (type: `Map`) |
|
Perform an HTTP POST to the specified URI with the specified body and request data and return the response retrieved. |
The requestData object is a map in which the keys are cookies and headers. OpenAM ignores other keys.
The cookies value, specifying the cookie headers in the request, is a list of maps where the keys are domain, field, and value.
The headers value, specifying the headers in the request, is a list of maps where the keys are field, and value.
An example requestData JavaScript object using GET would be as follows:
var response = httpClient.get("http://example.com:8080/openam/json/users/" + username,
{
    cookies:[
        {
            "domain": ".example.com",
            "field": "iPlanetDirectoryPro",
            "value": "E8cDkvlad83kd....KDodkIEIx*DLEDLK...JKD09d"
        }
    ],
    headers:[
        {
            "field": "Content-type",
            "value": "application/json"
        }
    ]
});
An example requestData JavaScript object using POST follows:
var response = httpClient.post("http://example.com:8080/openam/json/authenticate","{
    "authId": "eyAiYWxnIjogIkhTMjU2IiwgInR5cCI6ICJqd3QiIH0.eyAib3RrIjogIm03ODVzN2x
    sbnR1bjZvbGZ1MHZhOGVtYTQxIiwgInNlc3Npb25JZCI6ICJBUUlDNXdNMkxZNFNmY3lEeDY3QnB
    PdzJtRU9rUzNpLWhfNDdRWlMwNHBEN1ppdy4qQUFKVFNRQUNNREVBQWxOTEFCUXROak15TURjNU1
    UZzROVFUwTXpnNE5qRTNNQS4uKiIsICJyZWFsbSI6ICJkYz1vcGVuYW0sZGM9Zm9yZ2Vyb2NrLGR
    jPW9yZyIgfQ.VDRqaekQuXBm2lNI29hfwVADLxjepezuO0241VNDsIM",
    "template": "",
    "stage": "DataStore1",
    "callbacks": [
        {
            "type": "NameCallback",
            "output": [
                {
                    "name": "prompt",
                    "value": "User Name:"
                }
            ],
            "input": [
                {
                    "name": "IDToken1",
                    "value": "demo"
                }
            ]
        },
        {
            "type": "PasswordCallback",
            "output": [
                {
                    "name": "prompt",
                    "value": "Password:"
                }
            ],
            "input": [
                {
                    "name": "IDToken2",
                    "value": "changeit"
                }
            ]
        }
    ]
    }",
    {
        cookies:[
        ],
        headers:[
            {
                "field": "Content-Type",
                "value": "application/json"
            }
        ]
});|
To get the form data, you can access the |
HTTP client requests are synchronous, blocking until they return. You can, however, set a global timeout for server-side scripts. For details, see "Hints for the Scripted Authentication Module" in the Administration Guide.
Server-side scripts can access response data by using the methods listed in the table below.
| Method | Parameters | Return Type | Description |
|---|---|---|---|
|
|
|
Get the cookies for the returned response, if any exist. |
|
|
|
Get the entity of the returned response. |
|
|
|
Get the headers for the returned response, if any exist. |
|
|
|
Get the reason phrase of the returned response. |
|
|
|
Get the status code of the returned response. |
|
|
|
Indicate whether the returned response had any cookies. |
|
|
|
Indicate whether the returned response had any headers. |
Debug Logging
Server-side scripts can write messages to OpenAM debug logs by using the logger object.
OpenAM does not log debug messages from scripts by default. You can configure OpenAM to log such messages by setting the debug log level for the amScript service. For details, see "Debug Logging By Service" in the Administration Guide.
The following table lists the logger methods.
| Method | Parameters | Return Type | Description |
|---|---|---|---|
|
|
|
Write Error Message to OpenAM debug logs if ERROR level logging is enabled. |
|
|
|
Return |
|
|
|
Write Message to OpenAM debug logs if MESSAGE level logging is enabled. |
|
|
|
Return |
|
|
|
Write Warning Message to OpenAM debug logs if WARNING level logging is enabled. |
|
|
|
Return |
Authentication API Functionality
This section covers the available functionality when Scripting authentication modules use client-side and server-side authentication script types. Authentication API functionality includes:
Accessing Authentication State
OpenAM passes authState and sharedState objects to server-side scripts in order for the scripts to access authentication state.
Server-side scripts can access the current authentication state through the authState object.
The authState value is SUCCESS if the authentication is currently successful, or FAILED if authentication has failed. Server-side scripts must set a value for authState before completing.
If an earlier authentication module in the authentication chain has set the login name of the user, server-side scripts can access the login name through username.
The following authentication modules set the login name of the user:
-
Anonymous
-
Certificate
-
Data Store
-
Federation
-
HTTP Basic
-
JDBC
-
LDAP
-
Membership
-
RADIUS
-
SecurID,
-
Windows Desktop SSO
-
Windows NT
Accessing Profile Data
Server-side authentication scripts can access profile data through the methods of the idRepository object.
| Method | Parameters | Return Type | Description |
|---|---|---|---|
|
`Attribute Name` (type: `String`) |
|
Return the values of the named attribute for the named user. |
|
`Attribute Name` (type: `String`) `Attribute Values` (type: `Array`) |
|
Set the named attribute as specified by the attribute value for the named user, and persist the result in the user’s profile. |
|
`Attribute Name` (type: `String`) `Attribute Value` (type: `String`) |
|
Add an attribute value to the list of attribute values associated with the attribute name for a particular user. |
Accessing Client-Side Script Output Data
Client-side scripts add data they gather into a String object named clientScriptOutputData. Client-side scripts then cause the user-agent automatically to return the data to OpenAM by HTTP POST of a self-submitting form.
Accessing Request Data
Server-side scripts can get access to the login request by using the methods of the requestData object.
The following table lists the methods of the requestData object. Note that this object differs from the client-side requestData object (see "HTTP Client Methods") and contains information about the original authentication request made by the user.
| Method | Parameters | Return Type | Description |
|---|---|---|---|
|
|
|
Return the String value of the named request header, or |
|
|
|
Return the array of String values of the named request header, or |
|
|
|
Return the String value of the named request parameter, or |
|
|
|
Return the array of String values of the named request parameter, or |
Authorization API Functionality
This section covers functionality available when scripting authorization using the policy condition script context type.
Accessing Authorization State
Server-side scripts can access the current authorization state through the following objects:
| Object | Type | Description |
|---|---|---|
|
|
Return |
|
|
Describe the environment passed from the client making the authorization request. For example, the following shows a simple `environment` map with a single entry: |
|
|
Specify the URI of the resource to which authorization is being requested. |
|
|
Specify the user ID of the subject that is requesting authorization. |
Accessing Profile Data
Server-side authorization scripts can access profile data of the subject of the authorization request through the methods of the identity object.
|
To access the profile data of the subject, they must be logged in and their SSO token must be available. |
| Method | Parameters | Return Type | Description | ||
|---|---|---|---|---|---|
|
|
|
Return the values of the named attribute for the subject of the authorization request. |
||
|
`Attribute Values` (type: `Array`) |
|
Set the named attribute to the values specified by the attribute value for the subject of the authorization request. |
||
|
`Attribute Value` (type: `String`) |
|
Add an attribute value to the list of attribute values associated with the attribute name for the subject of the authorization request. |
||
|
None |
|
Commit any changes to the identity repository.
|
Accessing Session Data
Server-side authorization scripts can access session data of the subject of the authorization request through the methods of the session object.
|
To access the session data of the subject, they must be logged in and their SSO token must be available. |
| Method | Parameters | Return Type | Description |
|---|---|---|---|
|
|
|
Retrieve properties from the session associated with the subject of the authorization request. For example, |
Setting Authorization Responses
Server-side authorization scripts can return information in the response to an authorization request.
| Method | Parameters | Return Type | Description |
|---|---|---|---|
|
`Attribute Values` (type: `Array`) |
|
Add an attribute to the response to the authorization request. |
|
`Advice Values` (type: `Array`) |
|
Add advice key-value pairs to the response to a failing authorization request. |
|
|
|
Add a time-to-live value to the response to a successful authorization, after which the decision is no longer valid. |
OIDC Claims API Functionality
This section covers functionality available when scripting OIDC claim handling using the OIDC claims script context type.
Accessing OpenID Connect Requests
Server-side scripts can access the OpenID Connect request through the following objects:
| Object | Type | Description |
|---|---|---|
|
|
Contains a set of the requested scopes. For example: |
|
|
Contains a representation of the identity of the resource owner. For more details, see the `com.sun.identity.idm.AMIdentity` class in the link:../apidocs/index.html?com/sun/identity/idm/AMIdentity.html[OpenAM Javadoc, window=\_top]. |
|
|
Contains a representation of the user’s session object if the request contained a session cookie. For more details, see the `com.iplanet.sso.SSOToken` class in the link:../apidocs/index.html?com/iplanet/sso/SSOToken.html[OpenAM Javadoc, window=\_top]. |
|
|
Contains a map of the claims the server provides by default. For example: |
|
|
Contains requested claims if the For more information see link:http://openid.net/specs/openid-connect-core-1_0.html#ClaimsParameter["Requesting Claims using the "claims" Request Parameter", window=\_blank] in the __OpenID Connect Core 1.0__ specification. Example: |
OAuth2 Access Token Modification API Functionality
This section covers functionality available when scripting OAuth 2.0 access token modification using the OAUTH2_ACCESS_TOKEN_MODIFICATION script context type.
The script is executed when OpenAM issues a stateless (JWT) OAuth 2.0 access token or refresh token. Any claims the script adds, modifies, or removes are merged into the token payload before it is signed. This lets you embed custom claims (such as acr, amr, roles, or profile attributes) directly into the access token, without an additional call to the /oauth2/tokeninfo endpoint.
|
The script is only invoked when Use Stateless Access & Refresh Tokens is enabled in the OAuth2 Provider service. Stateful tokens are opaque and do not carry claims. To preserve custom claims across the refresh cycle, the script runs both when issuing the access token and when issuing the refresh token. |
| Object | Type | Description |
|---|---|---|
|
|
A mutable view of the token being issued. Use the following methods to modify the token payload:
|
|
|
Contains the set of scopes granted to the token. For example: |
|
|
Contains a representation of the identity of the resource owner, when it can be resolved. May be For more details, see the `com.sun.identity.idm.AMIdentity` class in the link:../apidocs/index.html?com/sun/identity/idm/AMIdentity.html[OpenAM Javadoc, window=\_top]. |
|
|
Contains a representation of the user’s session object if the request contained a valid session. May be For more details, see the `com.iplanet.sso.SSOToken` class in the link:../apidocs/index.html?com/iplanet/sso/SSOToken.html[OpenAM Javadoc, window=\_top]. |
|
|
Contains selected properties of the OAuth 2.0 request, such as |
|
|
Contains the For more details, see the `com.sun.identity.shared.debug.Debug` class in the link:../apidocs/index.html?com/sun/identity/shared/debug/Debug.html[OpenAM Javadoc, window=\_top]. |
The script does not need to return a value; changes applied to the accessToken object are merged into the issued token. For example, the following Groovy fragment copies the authentication context class reference into the token and adds a custom claim:
def acr = accessToken.getField("acr")
if (acr != null) {
    accessToken.setField("acr", acr)
}

if (identity != null) {
    def mail = identity.getAttribute("mail")
    if (mail != null && !mail.isEmpty()) {
        accessToken.setField("email", mail.iterator().next())
    }
}
Using the Default Scripts
This section covers the default scripts provided in OpenAM. These scripts act as templates for creating your own scripts. They are global and can be used in any realm, and cannot be deleted.
|
Editing a default script will affect every authentication module, policy condition, or OIDC claim configuration that uses the script. |
Default Server-side Authentication Script
This section demonstrates how to use the default server-side authentication script in a Scripted Authentication module.
The default server-side authentication script only authenticates a subject when the current time on the OpenAM server is between 09:00 and 17:00. The script also uses the logger and httpClient functionality provided in the scripting API.
To examine the contents of the default server-side authentication script in the OpenAM console browse to Realms > Top Level Realm > Scripts, and then click Scripted Module - Server Side.
For more information on the functions available for use in server-side authentication scripts, see "The Scripting API".
Preparing OpenAM
OpenAM requires a small amount of configuration before trying the example server-side authentication script. You must first create a Scripted authentication module, and then include it in an authentication chain, which can then be used when logging in to OpenAM.
The procedures in this section are:
In this procedure create a Scripted Authentication module, and link it to the default server-side authentication script.
-
Log in as an OpenAM administrator, for example
amadmin. -
Click Realms > Top Level Realm > Authentication > Modules.
-
On the Authentication Modules page, click Add Module.
-
On the New Module page, enter a module name, such as
myScriptedAuthModule, in the Type drop-down menu, selectScripted Module, and then click Create. -
On the module configuration page:
-
Uncheck the Client-side Script Enabled checkbox.
-
In the Server-side Script drop-down menu, select
Scripted Module - Server Side. -
Click Save Changes.
-
In this procedure create an authentication chain that uses a Data Store authentication module and the Scripted authentication module created in the previous procedure.
-
Log in as an OpenAM administrator, for example
amadmin. -
Click Realms > Top Level Realm > Authentication > Chains.
-
On the Authentication Chains page, click Add Chain.
-
On the Add Chain page, enter a name, such as
myScriptedChain, and then click Create. -
On the Edit Chain tab, click Add a Module.
-
In the New Module dialog box:
-
In the Select Module drop-down menu, select
DataStore. -
In the Select Criteria drop-down menu, select
Required. -
Click OK.
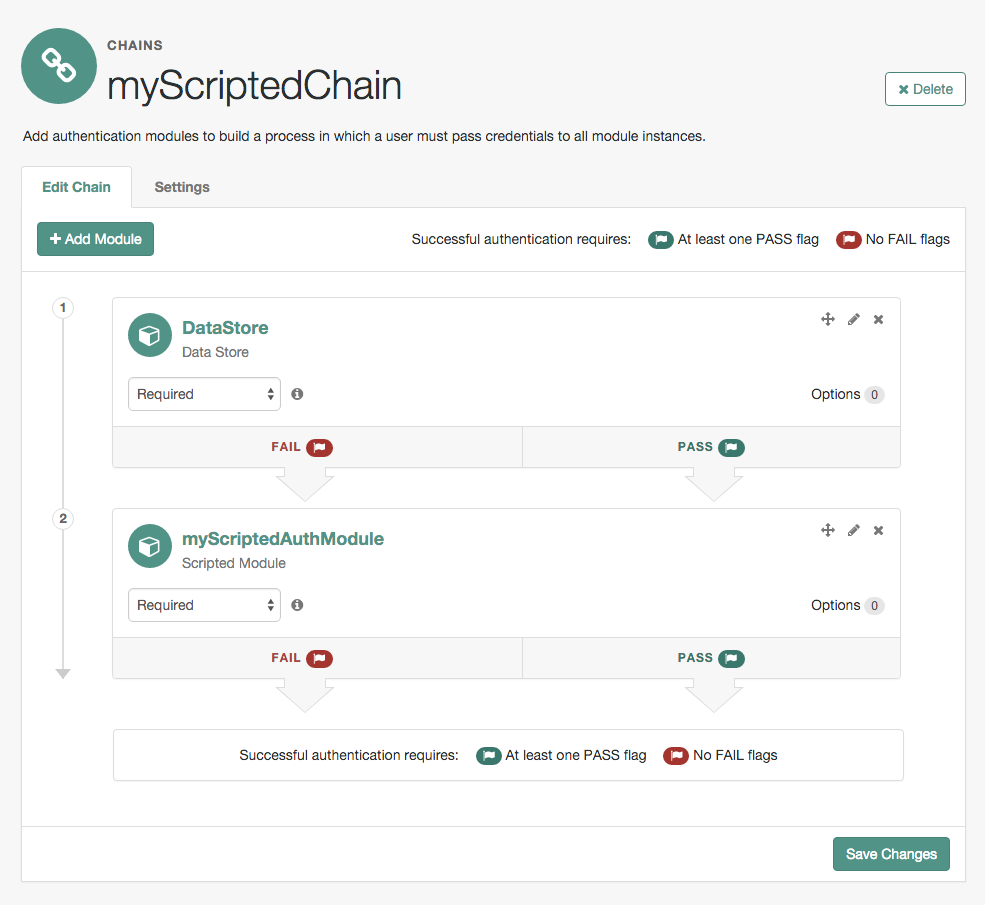
The Data Store authentication module checks the user credentials, whereas the Scripted authentication module does not check credentials, but instead only checks that the authentication request is processed during working hours. Without the Data Store module, the username in the Scripted authentication module cannot be determined. Therefore, do not configure the Scripted authentication module (server-side script) as the first module in an authentication chain, because it needs a username.
-
-
On the Edit Chain tab, click Add Module.
-
In the New Module dialog box:
-
In the Select Module drop-down menu, select the Scripted Module from the previous procedure, for example
myScriptedAuthModule. -
In the Select Criteria drop-down menu, select
Required. -
Click OK.
The resulting chain resembles the following:
-
-
On the Edit Chain tab, click Save Changes.
Trying the Default Server-side Authentication Script
This section shows how to log in using an authentication chain that contains a Scripted authentication module, which in turn uses the default server-side authentication script.
-
Log out of OpenAM.
-
In a browser, navigate to the OpenAM login URL, and specify the authentication chain created in the previous procedure as the value of the
servicequery parameter.For example:
https://openam.example.com:8443/openam/XUI/#login/&service=myScriptedChain -
Log in as user
demowith passwordchangeit.If login is successful, the user profile page appears. The script will also output messages, such as the following in the
debug/Authenticationlog file:amScript:05/08/2015 11:31:21:835 AM CEST: Thread[pool-19-thread-5,5,main] Starting server-side JavaScript amScript:05/08/2015 11:31:21:837 AM CEST: Thread[pool-19-thread-5,5,main] User: demo amScript:05/08/2015 11:31:21:837 AM CEST: Thread[pool-19-thread-5,5,main] Current time: 11 amScript:05/08/2015 11:31:21:837 AM CEST: Thread[pool-19-thread-5,5,main] Authentication allowed!The default server-side authentication script outputs log messages at the
messageanderrorlevel. OpenAM does not log debug messages from scripts by default. You can configure OpenAM to log such messages by setting the debug log level for theamScriptservice. For details, see "Debug Logging By Service" in the Administration Guide. -
(Optional) To test that the script is being used as part of the login process, edit the script to alter the times when authentication is allowed:
-
Log out the
demouser. -
Log in as an OpenAM administrator, for example
amadmin. -
Click Realms > Top Level Realm > Scripts > Scripted Module - Server Side.
-
In the script, swap the values for
START_TIMEandEND_TIME, for example:var START_TIME = 17; var END_TIME = 9; // -
Click Save.
-
Repeat steps 1, 2, and 3 above, logging into the module as the
demouser as before. The authentication result will be the opposite of the previous result, as the allowed times have inverted.
-
Default Policy Condition Script
This section demonstrates how to use the sample policy condition script as part of an authorization policy. To examine the contents of the sample policy condition script in the OpenAM console browse to Realms > Top Level Realm > Scripts, and then click Scripted Policy Condition.
The default policy condition script demonstrates how to access a user’s profile information, use that information in HTTP calls, and make a policy decision based on the outcome.
For more information on the functions available for use in policy condition scripts, see "The Scripting API".
Preparing OpenAM
OpenAM requires a small amount of configuration before trying the default policy condition script. The default policy condition script requires that the subject of the policy has an address in their profile. The script compares the address to the country in the resource URL and to the country from which the request originated, as determined by an external GeoIP web service. The demo user also requires access to evaluate policies.
The procedures in this section are:
In this procedure, add an address value to the demo user’s profile. The default policy condition script uses the address when performing policy evaluation.
-
Log in as an OpenAM administrator, for example
amadmin. -
Click Realms > Top Level Realm > Subjects.
-
On the User tab, click the
demouser. -
In Home Address, enter a valid address. For example:
201 Mission St, Suite 2900, San Francisco, CA 94105 -
Click Save.
In this procedure, add the demo user to a group and assign the privilege required to perform policy evaluations.
-
Log in as an OpenAM administrator, for example
amadmin. -
Click Realms > Top Level Realm > Subjects.
-
On the Group tab, click New, enter an ID for the group, such as
policyEval, and then click OK. -
On the User tab:
-
Click the
demouser. -
Click the Group tab.
-
In the Available box, select the group created in step 3, and then click Add.
-
Click Save.
-
-
Click Realms > Top Level Realm > Privileges.
-
Click the group created in step 3, for example
policyEval. -
On the Privileges page, select
Read and write access to all realm and policy properties. -
Click Save.
In this procedure, create a policy that uses the default policy condition script. Policy evaluations can then be performed to test the script functionality.
-
Log in as an OpenAM administrator, for example
amadmin. -
Click Realms > Top Level Realm > Authorization > Policy Sets.
-
On the Policy Sets page, select
Default Policy Set. -
On the Default Policy Set page, click Add a Policy.
-
Define the policy as follows:
-
Enter a name for the policy.
-
Define resources to which the policy applies:
-
Select
URLfrom the Resource Type drop down list. -
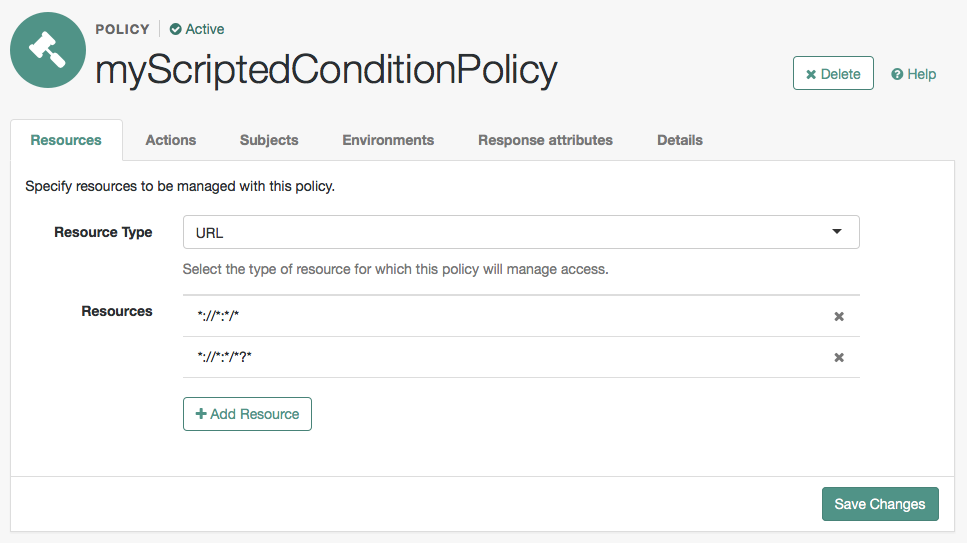
Select the resource pattern
://:*/*from the Resources drop down list. -
Click Add.
The
://:*/*resource appears in the Resources field. -
Click Add Resource to add a second resource to the policy.
-
Select the resource pattern
://:*/?from the Resources drop down list. -
Click Add.
The
://:*/?resource appears along with the://:*/*resource in the Resources field. -
Click Create to create the policy.
The Resources tab appears as follows:
-
-
Specify actions to which the policy applies:
-
Select the Actions tab.
-
Select GET from the Add an Action drop down list.
-
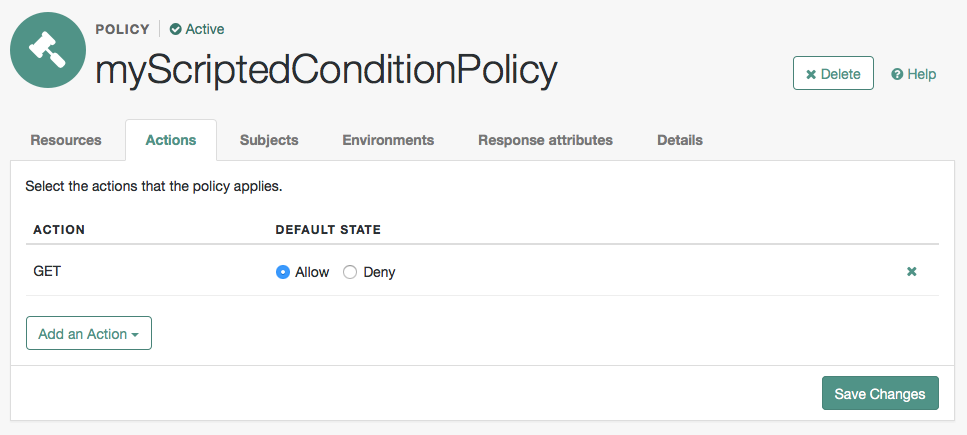
The GET action appears in the list of actions. The default state for the GET action is Allow.
The Actions tab appears as follows:
-
Click Save Changes.
-
-
Configure subjects to which the policy applies:
-
Select the Subjects tab.
-
Click the edit icon—the pencil.
-
Select Authenticated Users from the Type drop down list.
-
Click the OK icon—the check mark.
The Subjects tab appears as follows:

-
Click Save Changes.
-
-
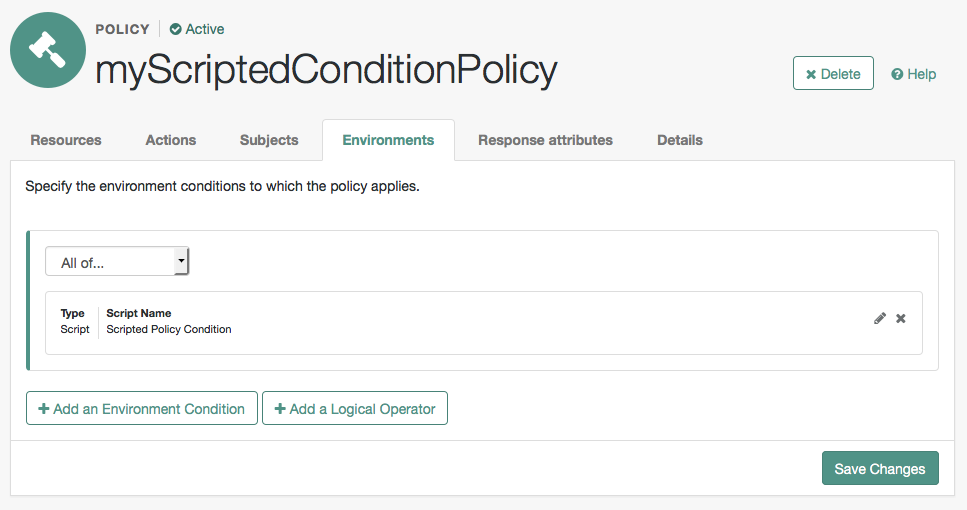
Configure environments in which the policy applies:
-
Select the Environments tab.
-
Click Add an Environment Condition.
-
Select Script from the Type drop down list.
-
Select Scripted Policy Condition from the Script Name drop down list.
-
Click the OK icon—the check mark.
The Environments tab appears as follows:
-
Click Save Changes.
-
-
No additional configuration is required in the Response Attributes or Details tabs.
-
The default policy condition script writes to the debug logs at the message level. Message-level debug logging is not enabled for policy evaluation by default.
This section shows how to enable message-level debug logging for policy evaluation, so that logger output from the default policy condition script can be viewed in the Entitlement debug log.
-
Log in as an OpenAM administrator, for example
amadmin. -
Visit the
Debug.jsppage, for example:https://openam.example.com:8443/openam/Debug.jsp. -
In the Debug instances drop-down, select
Entitlement. -
In the Level drop-down, choose the debug level required. In this example, select
Message.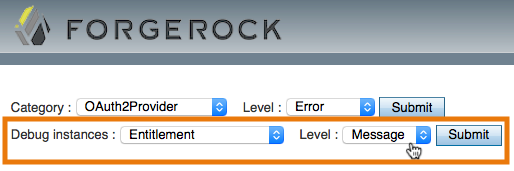
-
Click Submit, and on the summary page that appears, click Confirm.
Message-level debug logging is now enabled for policy evaluation.
Trying the Default Policy Condition Script
This section demonstrates using a policy that contains the default policy condition script.
To evaluate against a policy, you must first obtain an SSO token for the subject performing the evaluation, in this case the demo user. You can then make a call to the policies?_action=evaluate endpoint, including some environment information, which the policy uses to make an authorization decision.
-
Obtain an SSO Token for the
demouser:curl \ --request POST \ --header "X-OpenAM-Username: demo" \ --header "X-OpenAM-Password: changeit" \ https://openam.example.com:8443/openam/json/authenticate { "tokenId": "AQIC5wM2...", "successUrl": "/openam/console" } -
Send an evaluation request to the
policiesendpoint, using the SSO token of thedemouser in theiPlanetDirectoryProheader.In the JSON data, set the
subjectproperty to also be the SSO token of thedemouser. In theresourcesproperty, include a URL that resides on a server in the same country as the address set for thedemouser. In theenvironmentproperty, include an IP address that is also based in the same country as the user and the resource. The example below uses the ForgeRock Community web site URL and an IP address from a ForgeRock office, both located in the United States:curl \ --request POST \ --header "Content-Type: application/json" \ --header "iPlanetDirectoryPro: AQIC5wM2..." \ --data '{ "resources": [ "http://www.forgerock.org:80/index.html" ], "application": "iPlanetAMWebAgentService", "subject": { "ssoToken": "AQIC5wM2..."}, "environment": { "IP": [ "38.99.39.210" ] } }' \ https://openam.example.com:8443/openam/json/policies?_action=evaluate [ { "advices": {}, "ttl": 9223372036854775807, "resource": "http://www.forgerock.org:80/index.html", "actions": { "POST": true, "GET": true }, "attributes": { "countryOfOrigin": [ "United States" ] } } ]If the country in the subject’s profile matches the country determined from the source IP in the environment and the country determined from the resource URL, then OpenAM returns a list of actions available. The script will also add an attribute to the response called
countryOfOriginwith the country as the value.If the countries do not match, no actions are returned. In the following example, the resource URL is based in France, while the IP and user’s address in the profile are based in the United States:
curl -X POST \
-H "Content-Type: application/json" \
-H "iPlanetDirectoryPro: AQIC5wM2..." \
-d '{
    "resources": [
        "http://www.forgerock.fr:80/index.html"
    ],
    "application": "iPlanetAMWebAgentService",
    "subject": { "ssoToken": "AQIC5wM2..."},
    "environment": {
        "IP": [
            "38.99.39.210"
        ]
    }
}' \
'https://openam.example.com:8443/openam/json/policies?_action=evaluate'
[
    {
        "advices": {},
        "ttl": 9223372036854775807,
        "resource": "http://www.forgerock.fr:80/index.html",
        "actions": {},
        "attributes": {}
    }
]
Default OIDC Claims Script
This section demonstrates how to use the default OIDC claims script to return the profile attributes of a user in response to an OpenID Connect request for the profile scope.
The default OIDC claims script maps the following claims to the profile scope:
-
zoneinfo
-
family_name
-
locale
-
name
To examine the contents of the default OIDC claims script in the OpenAM console browse to Realms > Top Level Realm > Scripts, and then click OIDC Claims Script.
For more information on the functions available for use in OIDC claim scripts, see "The Scripting API".
Preparing OpenAM
OpenAM requires a small amount of configuration before trying the example OIDC claims script. You must first create an OAuth2 provider with OpenID Connect settings, and register an OpenID Connect client, before you can authenticate to the client using a web browser.
The procedures in this section are:
Follow the steps in this procedure to create an OpenID Connect provider service by using the wizard.
-
Log in to OpenAM as an administrator, for example
amadmin. -
Click Realms > Top Level Realm > Configure OAuth Provider > Configure OpenID Connect.
-
On the Configure OpenID Connect page, accept the default values and then click Create.
-
Navigate to Realms > Top Level Realm > Services, click OAuth2 Provider, and verify that the value for OIDC Claims Script is the default script,
OIDC Claims Script.
For a more detailed explanation and example of creating an OpenID Connect provider service, see "Configuring OpenAM As OpenID Connect Provider" in the Administration Guide.
Follow the steps in this procedure to create an OpenID Connect client agent profile.
-
Log in to OpenAM as an administrator, for example
amadmin. -
Click Realms > Top Level Realm > Agents > OAuth 2.0/OpenID Connect Client.
-
In the Agent table, click New.
-
Enter a name for the client, such as
oidcTest, provide a password, and then click Create. -
On the OAuth 2.0/OpenID Connect Client page, click the agent name to configure the agent.
-
On the edit client page:
-
In Redirection URIs, enter an example URI such as
http://www.example.com. -
In Scope(s), enter both
profileandopenid.The
profilescope will return details about the subject such as given name and timezone. Theopenidscope indicates this is an OpenID Connect client. -
In Display name, enter the name of the client as it will be displayed on the consent page, for example
OIDC Claims Script Client.
-
-
Save your work.
For a more detailed explanation and examples of registering an OpenID Connect client, see "Registering OpenID Connect Relying Parties" and "Configuring OAuth 2.0 and OpenID Connect 1.0 Clients" in the Administration Guide.
Trying the Default OIDC Claims Script
This section shows how to authenticate to a registered OpenID Connect client and request scopes from OpenAM, which in turn uses the default OIDC Claims script to populate the scope with claims and profile values.
-
Log out of OpenAM.
-
In an Internet browser, navigate to the OpenAM OAuth 2.0 authorization endpoint,
/oauth2/authorize, and specify the following query parameters, with the values you configured in the agent profile:Query parameters for OpenID Connect Authorization to an Agent Profile Query Parameter Agent Profile Property Value client_idName of the agent, for example
oidcTest.redirect_uriRedirection URIs, for example
http://www.example.com.response_typeResponse Types, for example
code.scopeScope(s), for example
openid profile.For example:
http://openam.example.com:8080/openam/oauth2/authorize?client_id=oidcTest&redirect_uri=http://www.example.com&response_type=code&scope=openid profile -
Log in to OpenAM as
demo, with passwordchangeit. -
On the consent page, expand the panel labelled Your personal information to see the claim values the default OIDC script has populated into the requested
profilescope.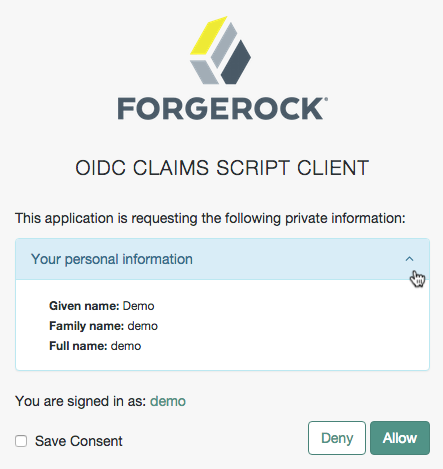
-
Click Allow to be redirected to the Redirection URI specified in the agent profile. The authorization code is appended to the redirection URI as the value of the
codequery parameter.