Connecting to External Resources
This chapter describes how to connect to external resources such as LDAP, Active Directory, flat files, and others. Configurations shown here are simplified to show essential aspects. Not all resources support all OpenIDM operations; however, the resources shown here support most of the CRUD operations, and also reconciliation and LiveSync.
In OpenIDM, resources are external systems, databases, directory servers, and other sources of identity data that are managed and audited by the identity management system. To connect to resources, OpenIDM loads the Identity Connector Framework, OpenICF. OpenICF aims to avoid the need to install agents to access resources, instead using the resources' native protocols. For example, OpenICF connects to database resources using the database’s Java connection libraries or JDBC driver. It connects to directory servers over LDAP. It connects to UNIX systems by using ssh.
About OpenIDM and OpenICF
OpenICF provides a common interface to allow identity services access to the resources that contain user information. OpenIDM loads the OpenICF API as one of its OSGi modules. OpenICF uses connectors to separate the OpenIDM implementation from the dependencies of the resource to which OpenIDM is connecting. A specific connector is required for each remote resource. Connectors can run either locally or remotely.
Local connectors are loaded by OpenICF as regular bundles in the OSGi container. Remote connectors must be executed on a remote connector server. Most connectors can be run locally. However, a remote connector server is required when access libraries that cannot be included as part of the OpenIDM process are needed. If a resource, such as Microsoft Active Directory, does not provide a connection library that can be included inside the Java Virtual Machine, OpenICF can use the native .dll with a remote .NET connector server. In other words, OpenICF connects to Active Directory through a remote connector server that is implemented as a .NET service.
Connections to remote connector servers are configured in a single connector info provider configuration file, located in your project’s conf/ directory.
Connectors themselves are configured through provisioner files. One provisioner file must exist for each connector. Provisioner files are named provisioner.openicf-name where name corresponds to the name of the connector, and are also located in the conf/ directory.
A number of sample connector configurations are available in the openidm/samples/provisioners directory. To use these connectors, edit the configuration files as required, and copy them to your project’s conf/ directory.
The following figure shows how OpenIDM connects to resources by using connectors and remote connector servers. The figure shows one local connector (LDAP) and two remote connectors (Scripted SQL and PowerShell). In this example, the remote Scripted SQL connector uses a remote Java connector server. The remote PowerShell connector always requires a remote .NET connector server.
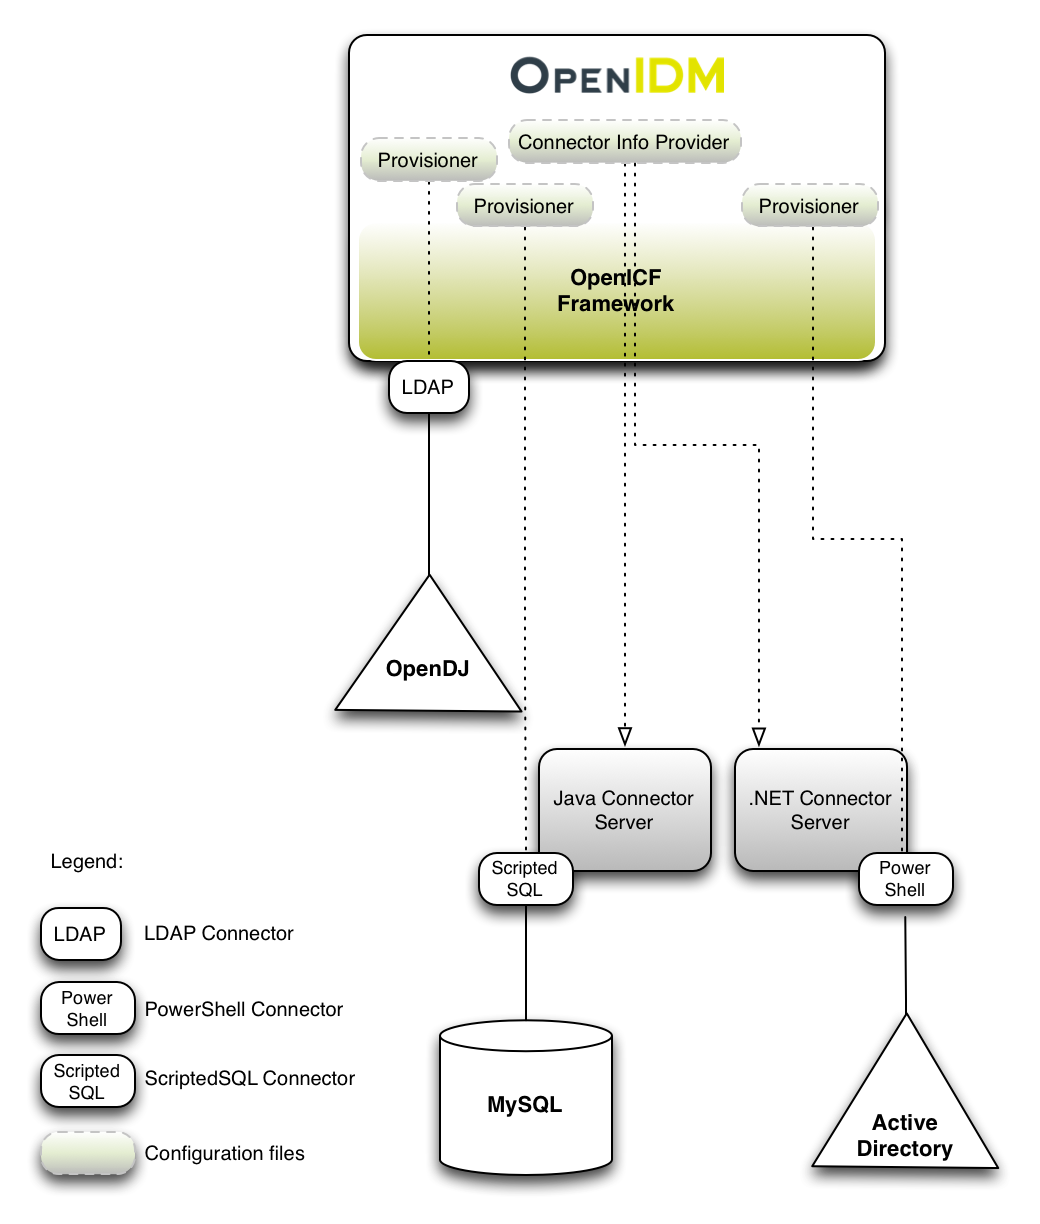
|
Connectors that use the .NET framework must run remotely. Java connectors can be run locally or remotely. You might run a Java connector remotely for security reasons (firewall constraints), for geographical reasons, or if the JVM version that is required by the connector conflicts with the JVM version that is required by OpenIDM. |
Accessing Remote Connectors
When you configure a remote connector, you use the connector info provider service to connect through a remote connector server. The connector info provider service configuration is stored in the file project-dir/conf/provisioner.openicf.connectorinfoprovider.json. A sample configuration file is provided in the openidm/samples/provisioners/ directory. To use this sample configuration, edit the file as required, and copy it to your project’s conf/ directory.
The sample connector info provider configuration is as follows:
{
   "remoteConnectorServers" :
      [
         {
            "name" : "dotnet",
            "host" : "127.0.0.1",
            "port" : 8759,
            "useSSL" : false,
            "timeout" : 0,
            "protocol" : "websocket",
            "key" : "Passw0rd"
         }
      ]
}
You can configure the following remote connector server properties:
name-
string, required
The name of the remote connector server object. This name is used to identify the remote connector server in the list of connector reference objects.
host-
string, required
The remote host to connect to.
port-
integer, optional
The remote port to connect to. The default remote port is 8759.
heartbeatInterval-
integer, optional
The interval, in seconds, at which heartbeat packets are transmitted. If the connector server is unreachable based on this heartbeat interval, all services that use the connector server are made unavailable until the connector server can be reached again. The default interval is 60 seconds.
useSSL-
boolean, optional
Specifies whether to connect to the connector server over SSL. The default value is
false. timeout-
integer, optional
Specifies the timeout (in milliseconds) to use for the connection. The default value is
0, which means that there is no timeout. protocol-
string
Version 1.5.0.0 of the OpenICF framework supports a new communication protocol with remote connector servers. This protocol is enabled by default, and its value is
websocketin the default configuration.For compatibility reasons, you might want to enable the legacy protocol for specific remote connectors. For example, if you deploy the connector server on a Java 5 or 6 JVM, you must use the old protocol. In this case, remove the
protocolproperty from the connector server configuration.For the .NET connector server, the service with the new protocol listens on port 8759 and the service with the legacy protocol listens on port 8760 by default.
For the Java connector server, the service listens on port 8759 by default, for both the new and legacy protocols. The new protocol runs by default. To run the service with the legacy protocol, you must change the main class that is executed in the
ConnectorServer.shorConnectorServer.batfile. The class that starts the websocket protocol isMAIN_CLASS=org.forgerock.openicf.framework.server.Main. The class that starts the legacy protocol isMAIN_CLASS=org.identityconnectors.framework.server.Main. To change the port on which the Java connector server listens, change theconnectorserver.portproperty in theopenicf/conf/ConnectorServer.propertiesfile.Currently, the new, default protocol has specific known issues. You should therefore run the 1.5 .NET Connector Server in legacy mode, with the old protocol, as described in "Running the .NET Connector Server in Legacy Mode".
key-
string, required
The secret key, or password, to use to authenticate to the remote connector server.
To run remotely, the connector .jar itself must be copied to the openicf/bundles directory, on the remote machine.
The following example provides a configuration for reconciling managed users with objects in a remote CSV file.
This example demonstrates reconciliation of users stored in a CSV file on a remote machine. The remote Java Connector Server enables OpenIDM to synchronize the internal OpenIDM repository with the remote CSV repository.
The example assumes that a remote Java Connector Server is installed on a host named remote-host. For instructions on setting up the remote Java Connector Server, see "Installing a Remote Java Connector Server for Unix/Linux" or "Installing a Remote Java Connector Server for Windows".
This example assumes that the Java Connector Server is running on the machine named remote-host. The example uses the small CSV data set provided with the Getting Started sample (hr.csv). The CSV connector runs as a remote connector, that is, on the remote host on which the Java Connector Server is installed. Before you start, copy the sample data file, and the CSV connector itself over to the remote machine.
-
Shut down the remote connector server, if it is running. In the connector server terminal window, type
q:q INFO: Stopped listener bound to [0.0.0.0:8759] May 30, 2016 12:33:24 PM INFO o.f.o.f.server.ConnectorServer: Server is shutting down org.forgerock.openicf.framework.server.ConnectorServer@171ba877 -
Copy the CSV data file from the Getting Started sample (
/path/to/openidm/samples/getting-started/data/hr.csv) to an accessible location on the machine that hosts the remote Java Connector Server. For example:$ cd /path/to/openidm/samples/getting-started/data/ $ scp hr.csv testuser@remote-host:/home/testuser/csv-sample/data/ Password:******** hr.csv 100% 651 0.6KB/s 00:00 -
Copy the CSV connector .jar from the OpenIDM installation to the
openicf/bundlesdirectory on the remote host:$ cd path/to/openidm $ scp connectors/csvfile-connector-1.5.1.4.jar testuser@remote-host:/path/to/openicf/bundles/ Password:******** csvfile-connector-1.5.1.4.jar 100% 40KB 39.8KB/s 00:00 -
The CSV connector depends on the Super CSV library, that is bundled with OpenIDM. Copy the Super CSV library
super-csv-2.4.0.jarfrom theopenicf/bundledirectory to theopenicf/libdirectory on the remote server:$ cd path/to/openidm $ scp bundle/super-csv-2.4.0.jar testuser@remote-host:/path/to/openicf/lib/ Password:******** super-csv-2.4.0.jar 100% 96KB 95.8KB/s 00:00 -
On the remote host, restart the Connector Server so that it picks up the new CSV connector and its dependent libraries:
$ cd /path/to/openicf
$ bin/ConnectorServer.sh /run
...
May 30, 2016 3:58:29 PM INFO  o.i.f.i.a.l.LocalConnectorInfoManagerImpl: Add ConnectorInfo ConnectorKey(
 bundleName=org.openidentityplatform.openicf.connectors.csvfile-connector bundleVersion=1.5.1.4
 connectorName=org.forgerock.openicf.csvfile.CSVFileConnector ) to Local Connector Info Manager from
 file:/path/to/openicf/bundles/csvfile-connector-1.5.1.4.jar
May 30, 2016 3:58:30 PM org.glassfish.grizzly.http.server.NetworkListener start
INFO: Started listener bound to [0.0.0.0:8759]
May 30, 2016 3:58:30 PM org.glassfish.grizzly.http.server.HttpServer start
INFO: [OpenICF Connector Server] Started.
May 30, 2016 3:58:30 PM INFO  o.f.openicf.framework.server.Main: ConnectorServer
 listening on: ServerListener[0.0.0.0:8759 - plain]
The connector server logs are noisy by default. You should, however, notice the addition of the CSV connector.
Before you start, copy the following files to your /path/to/openidm/conf directory:
-
A customised mapping file required for this example.
-
/openidm/samples/provisioners/provisioner.openicf.connectorinfoprovider.jsonThe sample connector server configuration file. -
/openidm/samples/provisioners/provisioner.openicf-csv.jsonThe sample connector configuration file.
-
Edit the remote connector server configuration file (
provisioner.openicf.connectorinfoprovider.json) to match your network setup.The following example indicates that the Java connector server is running on the host
remote-host, listening on the default port, and configured with a secret key ofPassw0rd:{ "remoteConnectorServers" : [ { "name" : "csv", "host" : "remote-host", "port" : 8759, "useSSL" : false, "timeout" : 0, "protocol" : "websocket", "key" : "Passw0rd" } ] }The
namethat you set in this file will be referenced in theconnectorHostRefproperty of the connector configuration, in the next step.The
keythat you specify here must match the password that you set when you installed the Java connector server. -
Edit the CSV connector configuration file (
provisioner.openicf-csv.json) as follows:{ "name" : "csvfile", "connectorRef" : { "connectorHostRef" : "csv", "bundleName" : "org.openidentityplatform.openicf.connectors.csvfile-connector", "bundleVersion" : "[1.5.1.4,2)", "connectorName" : "org.forgerock.openicf.csvfile.CSVFileConnector" }, ... "configurationProperties" : { "csvFile" : "/home/testuser/csv-sample/data/hr.csv" }, }
-
-
The
connectorHostRefproperty indicates which remote connector server to use, and refers to thenameproperty you specified in theprovisioner.openicf.connectorinfoprovider.jsonfile. -
The
bundleVersion : 1.5.1.4must be exactly the same as the version of the CSV connector that you are using. If you specify a range here, the CSV connector version must be included in this range. -
The
csvFileproperty must specify the absolute path to the CSV data file that you copied to the remote host on which the Java Connector Server is running.-
Start OpenIDM:
$ cd /path/to/openidm $ ./startup.sh -
Verify that OpenIDM can reach the remote connector server and that the CSV connector has been configured correctly:
$ curl \
 --header "X-OpenIDM-Username: openidm-admin" \
 --header "X-OpenIDM-Password: openidm-admin" \
 --request POST \
 "http://localhost:8080/openidm/system?_action=test"
[
  {
    "name": "csv",
    "enabled": true,
    "config": "config/provisioner.openicf/csv",
    "objectTypes": [
      "__ALL__",
      "account"
    ],
    "connectorRef": {
      "bundleName": "org.openidentityplatform.openicf.connectors.csvfile-connector",
      "connectorName": "org.forgerock.openicf.csvfile.CSVFileConnector",
      "bundleVersion": "[1.5.1.4,2)"
    },
    "displayName": "CSV File Connector",
    "ok": true
  }
]
The connector must return
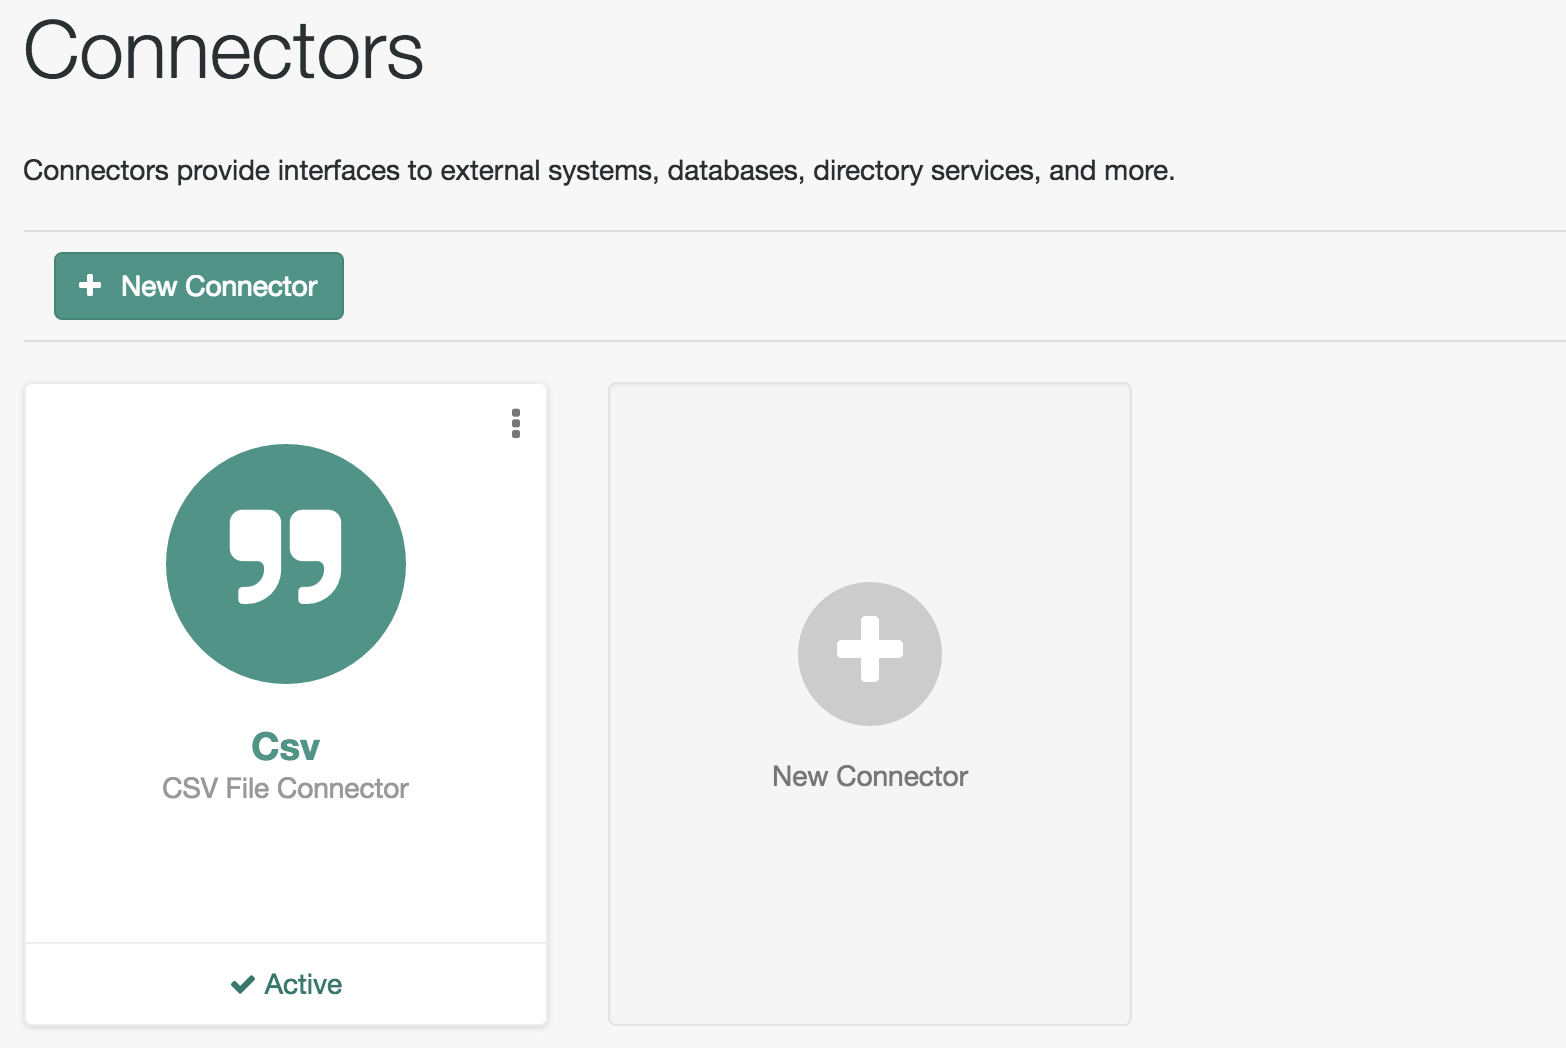
"ok": true.Alternatively, use the Admin UI to verify that OpenIDM can reach the remote connector server and that the CSV connector is active. Log in to the Admin UI (
https://localhost:8443/openidm/admin) and select Configure > Connectors. The CSV connector should be listed on the Connectors page, and its status should be Active.
-
-
To test that the connector has been configured correctly, run a reconciliation operation as follows:
-
Select Configure > Mappings and click the systemCsvAccounts_managedUser mapping.
-
Click Reconcile Now.
If the reconciliation is successful, the three users from the remote CSV file should have been added to the managed user repository.
+ To check this, select Manage > User.
-
Configuring Failover Between Remote Connector Servers
Starting with OpenIDM 4.5.0 you can specify a list of remote connector servers that the connector can target, to prevent the connector server from being a single point of failure. This failover configuration is included in your project’s conf/provisioner.openicf.connectorinfoprovider.json file. The connector attempts to contact the first connector server in the list. If that connector server is down, it proceeds to the next connector server.
The following sample configuration defines two remote connector servers, on hosts remote-host-1 and remote-host-2. These servers are listed, by their name property in a group, specified in the remoteConnectorServersGroups property. You can configure multiple servers per group, and multiple groups in a single remote connector server configuration file.
{
    "connectorsLocation" : "connectors",
    "remoteConnectorServers" : [
        {
            "name" : "dotnet1",
            "host" : "remote-host-1",
            "port" : 8759,
            "protocol" : "websocket",
            "useSSL" : false,
            "timeout" : 0,
            "key" : "password"
        },
        {
            "name" : "dotnet2",
            "host" : "remote-host-2",
            "port" : 8759,
            "protocol" : "websocket",
            "useSSL" : false,
            "timeout" : 0,
            "key" : "password"
         }
    ],
    "remoteConnectorServersGroups" : [
        {
            "name" : "dotnet-ha",
            "algorithm" : "failover",
            "serversList" : [
                {"name": "dotnet1"},
                {"name": "dotnet2"}
            ]
        }
    ]
}
The algorithm can be either failover or roundrobin. If the algorithm is failover, requests are always sent to the first connector server in the list, unless it is unavailable, in which case requests are sent to the next connector server in the list. If the algorithm is roundrobin, requests are distributed equally between the connector servers in the list, in the order in which they are received.
Your connector configuration file (provisioner.openicf-connector-name.json) references the remote connector server group, rather than a single remote connector server. For example, the following excerpt of a PowerShell connector configuration file references the dotnet-ha connector server group from the previous configuration:
{
  "connectorRef" : {
    "bundleName" : "MsPowerShell.Connector",
    "connectorName" : "Org.ForgeRock.OpenICF.Connectors.MsPowerShell.MsPowerShellConnector",
    "connectorHostRef" : "dotnet-ha",
    "bundleVersion" : "${openicf.powershell.version}"
  },
...|
Failover is not supported between connector servers that are running in legacy mode. Therefore, the configuration of each connector server that is part of the failover group must have the |
Configuring Connectors
Connectors are configured through the OpenICF provisioner service. Each connector configuration is stored in a file in your project’s conf/ directory, and accessible over REST at the openidm/conf endpoint. Configuration files are named project-dir/conf/provisioner.openicf-name where name corresponds to the name of the connector. A number of sample connector configurations are available in the openidm/samples/provisioners directory. To use these connector configurations, edit the configuration files as required, and copy them to your project’s conf directory.
If you are creating your own connector configuration files, do not include additional dash characters ( - ) in the connector name, as this might cause problems with the OSGi parser. For example, the name provisioner.openicf-hrdb.json is fine. The name provisioner.openicf-hr-db.json is not.
The following example shows a connector configuration for an XML file resource:
{
 "name"                      : "xml",
 "connectorRef"              : connector-ref-object,
 "producerBufferSize"        : integer,
 "connectorPoolingSupported" : boolean, true/false,
 "poolConfigOption"          : pool-config-option-object,
 "operationTimeout"          : operation-timeout-object,
 "configurationProperties"   : configuration-properties-object,
 "syncFailureHandler"        : sync-failure-handler-object,
 "resultsHandlerConfig"      : results-handler-config-object,
 "objectTypes"               : object-types-object,
 "operationOptions"          : operation-options-object
}
The name property specifies the name of the system to which you are connecting. This name must be alphanumeric.
Setting the Connector Reference Properties
The following example shows a connector reference object:
{
  "bundleName"       : "org.openidentityplatform.openicf.connectors.xml-connector",
  "bundleVersion"    : "[1.1.0.3,2)",
  "connectorName"    : "org.forgerock.openicf.connectors.xml.XMLConnector",
  "connectorHostRef" : "host"
}bundleName-
string, required
The
ConnectorBundle-Nameof the OpenICF connector. bundleVersion-
string, required
The
ConnectorBundle-Versionof the OpenICF connector. The value can be a single version (such as`1.4.0.0`) or a range of versions, which enables you to support multiple connector versions in a single project.You can specify a range of versions as follows:
-
[1.1.0.0,1.4.0.0]indicates that all connector versions from 1.1 to 1.4, inclusive, are supported. -
[1.1.0.0,1.4.0.0)indicates that all connector versions from 1.1 to 1.4, including 1.1 but excluding 1.4, are supported. -
(1.1.0.0,1.4.0.0]indicates that all connector versions from 1.1 to 1.4, excluding 1.1 but including 1.4, are supported. -
(1.1.0.0,1.4.0.0)indicates that all connector versions from 1.1 to 1.4, exclusive, are supported.
When a range of versions is specified, OpenIDM uses the latest connector that is available within that range. If your project requires a specific connector version, you must explicitly state the version in your connector configuration file, or constrain the range to address only the version that you need.
-
connectorName-
string, required
The connector implementation class name.
connectorHostRef-
string, optional
If the connector runs remotely, the value of this field must match the
namefield of theRemoteConnectorServersobject in the connector server configuration file (provisioner.openicf.connectorinfoprovider.json). For example:... "remoteConnectorServers" : [ { "name" : "dotnet", ...If the connector runs locally, the value of this field can be one of the following:
-
If the connector .jar is installed in
openidm/connectors/, the value must be"#LOCAL". This is currently the default, and recommended location. -
If the connector .jar is installed in
openidm/bundle/(not recommended), the value must be"osgi:service/org.forgerock.openicf.framework.api.osgi.ConnectorManager".
-
Setting the Pool Configuration
The poolConfigOption specifies the pool configuration for poolable connectors only (connectors that have "connectorPoolingSupported" : true). Non-poolable connectors ignore this parameter.
The following example shows a pool configuration option object for a poolable connector:
{
  "maxObjects"                 : 10,
  "maxIdle"                    : 10,
  "maxWait"                    : 150000,
  "minEvictableIdleTimeMillis" : 120000,
  "minIdle"                    : 1
}maxObjects-
The maximum number of idle and active instances of the connector.
maxIdle-
The maximum number of idle instances of the connector.
maxWait-
The maximum time, in milliseconds, that the pool waits for an object before timing out. A value of
0means that there is no timeout. minEvictableIdleTimeMillis-
The maximum time, in milliseconds, that an object can be idle before it is removed. A value of
0means that there is no idle timeout. minIdle-
The minimum number of idle instances of the connector.
Setting the Operation Timeouts
The operation timeout property enables you to configure timeout values per operation type. By default, no timeout is configured for any operation type. A sample configuration follows:
{
  "CREATE"              : -1,
  "TEST"                : -1,
  "AUTHENTICATE"        : -1,
  "SEARCH"              : -1,
  "VALIDATE"            : -1,
  "GET"                 : -1,
  "UPDATE"              : -1,
  "DELETE"              : -1,
  "SCRIPT_ON_CONNECTOR" : -1,
  "SCRIPT_ON_RESOURCE"  : -1,
  "SYNC"                : -1,
  "SCHEMA"              : -1
}- operation-name
-
Timeout in milliseconds
A value of
-1disables the timeout.
Setting the Connection Configuration
The configurationProperties object specifies the configuration for the connection between the connector and the resource, and is therefore resource specific.
The following example shows a configuration properties object for the default XML sample resource connector:
"configurationProperties" : {
    "xsdIcfFilePath" : "&{launcher.project.location}/data/resource-schema-1.xsd",
    "xsdFilePath" : "&{launcher.project.location}/data/resource-schema-extension.xsd",
    "xmlFilePath" : "&{launcher.project.location}/data/xmlConnectorData.xml"
}- property
-
Individual properties depend on the type of connector.
Setting the Synchronization Failure Configuration
The syncFailureHandler object specifies what should happen if a LiveSync operation reports a failure for an operation. The following example shows a synchronization failure configuration:
{
    "maxRetries" : 5,
    "postRetryAction" : "logged-ignore"
}maxRetries-
positive integer or
-1, requiredThe number of attempts that OpenIDM should make to process a failed modification. A value of zero indicates that failed modifications should not be reattempted. In this case, the post retry action is executed immediately when a LiveSync operation fails. A value of -1 (or omitting the
maxRetriesproperty, or the entiresyncFailureHandlerobject) indicates that failed modifications should be retried an infinite number of times. In this case, no post retry action is executed. postRetryAction-
string, required
The action that should be taken if the synchronization operation fails after the specified number of attempts. The post retry action can be one of the following:
-
logged-ignoreindicates that OpenIDM should ignore the failed modification, and log its occurrence. -
dead-letter-queueindicates that OpenIDM should save the details of the failed modification in a table in the repository (accessible over REST atrepo/synchronisation/deadLetterQueue/provisioner-name). -
scriptspecifies a custom script that should be executed when the maximum number of retries has been reached.
For more information, see "Configuring the LiveSync Retry Policy".
-
Configuring How Results Are Handled
The resultsHandlerConfig object specifies how OpenICF returns results. These configuration properties depend on the connector type and on the interfaces that are implemented by that connector type. For information the interfaces that each connector supports, see the OpenICF Connector Configuration Reference.
The following example shows a results handler configuration object:
{
    "enableNormalizingResultsHandler" : true,
    "enableFilteredResultsHandler" : false,
    "enableCaseInsensitiveFilter" : false,
    "enableAttributesToGetSearchResultsHandler" : false
}enableNormalizingResultsHandler-
boolean
If the connector implements the attribute normalizer interface, you can enable this interface by setting this configuration property to
true. If the connector does not implement the attribute normalizer interface, the value of this property has no effect. enableFilteredResultsHandler-
boolean
If the connector uses the filtering and search capabilities of the remote connected system, you can set this property to
false. If the connector does not use the remote system’s filtering and search capabilities (for example, the CSV file connector), you must set this property totrue, otherwise the connector performs an additional, case-sensitive search, which can cause problems. enableCaseInsensitiveFilter-
boolean
By default, the filtered results handler (described previously) is case-sensitive. If the filtered results handler is enabled, you can use this property to enable case-insensitive filtering. If you do not enable case-insensitive filtering, a search will not return results unless the case matches exactly. For example, a search for
lastName = "Jensen"will not match a stored user withlastName : jensen. enableAttributesToGetSearchResultsHandler-
boolean
By default, OpenIDM determines which attributes should be retrieved in a search. If the
enableAttributesToGetSearchResultsHandlerproperty is set totruethe OpenICF framework removes all attributes from the READ/QUERY response, except for those that are specifically requested. For performance reasons, you should set this property tofalsefor local connectors and totruefor remote connectors.
Specifying the Supported Object Types
The object-types configuration specifies the objects (user, group, and so on) that are supported by the connector. The property names set here define the objectType that is used in the URI. For example:
system/systemName/objectTypeThis configuration is based on the JSON Schema with the extensions described in the following section.
Attribute names that start or end with are regarded as special attributes by OpenICF. The purpose of the special attributes in OpenICF is to enable someone who is developing a new__ connector to create a contract regarding how a property can be referenced, regardless of the application that is using the connector. In this way, the connector can map specific object information between an arbitrary application and the resource, without knowing how that information is referenced in the application.
These attributes have no specific meaning in the context of OpenIDM, although some of the connectors that are bundled with OpenIDM use these attributes. The generic LDAP connector, for example, can be used with OpenDJ, Active Directory, OpenLDAP, and other LDAP directories. Each of these directories might use a different attribute name to represent the same type of information. For example, Active Directory uses unicodePassword and OpenDJ uses userPassword to represent the same thing, a user’s password. The LDAP connector uses the special OpenICF PASSWORD attribute to abstract that difference. In the same way, the LDAP connector maps the NAME attribute to an LDAP dn.
The OpenICF UID is a special case. The UID must not be included in the OpenIDM configuration or in any update or create operation. This attribute denotes the unique identity attribute of an object and OpenIDM always maps it to the _id of the object.
The following excerpt shows the configuration of an account object type:
{
  "account" :
  {
    "$schema" : "http://json-schema.org/draft-03/schema",
    "id" : "__ACCOUNT__",
    "type" : "object",
    "nativeType" : "__ACCOUNT__",
    "properties" :
    {
      "name" :
      {
        "type" : "string",
        "nativeName" : "__NAME__",
        "nativeType" : "JAVA_TYPE_PRIMITIVE_LONG",
        "flags" :
        [
          "NOT_CREATABLE",
          "NOT_UPDATEABLE",
          "NOT_READABLE",
          "NOT_RETURNED_BY_DEFAULT"
        ]
      },
      "groups" :
      {
        "type" : "array",
        "items" :
        {
          "type" : "string",
          "nativeType" : "string"
        },
        "nativeName" : "__GROUPS__",
        "nativeType" : "string",
        "flags" :
        [
          "NOT_RETURNED_BY_DEFAULT"
        ]
      },
      "givenName" : {
         "type" : "string",
         "nativeName" : "givenName",
         "nativeType" : "string"
         },
    }
  }
}
OpenICF supports an ALL object type that ensures that objects of every type are included in a synchronization operation. The primary purpose of this object type is to prevent synchronization errors when multiple changes affect more than one object type.
For example, imagine a deployment synchronizing two external systems. On system A, the administrator creates a user, jdoe, then adds the user to a group, engineers. When these changes are synchronized to system B, if the GROUPS object type is synchronized first, the synchronization will fail, because the group contains a user that does not yet exist on system B. Synchronizing the ALL object type ensures that user jdoe is created on the external system before he is added to the group engineers.
The ALL object type is assumed by default - you do not need to declare it in your provisioner configuration file. If it is not declared, the object type is named ALL. If you want to map a different name for this object type, declare it in your provisioner configuration. The following excerpt from a sample provisioner configuration uses the name allobjects:
"objectTypes": {
    "allobjects": {
        "$schema": "http://json-schema.org/draft-03/schema",
        "id": "__ALL__",
        "type": "object",
        "nativeType": "__ALL__"
    },
...
A LiveSync operation invoked with no object type assumes an object type of ALL. For example, the following call invokes a LiveSync operation on all defined object types in an LDAP system:
$ curl \
 --header "X-OpenIDM-Username: openidm-admin" \
 --header "X-OpenIDM-Password: openidm-admin" \
 --request POST \
"http://localhost:8080/openidm/system/ldap?_action=liveSync"|
Using the LDAP servers that use timestamps by default (such as Active Directory GCs and OpenLDAP) can use the |
Extending the Object Type Configuration
nativeType-
string, optional
The native OpenICF object type.
The list of supported native object types is dependent on the resource, or on the connector. For example, an LDAP connector might have object types such as
ACCOUNTandGROUP.
Extending the Property Type Configuration
nativeType-
string, optional
The native OpenICF attribute type.
The following native types are supported:
JAVA_TYPE_BIGDECIMAL
JAVA_TYPE_BIGINTEGER
JAVA_TYPE_BYTE
JAVA_TYPE_BYTE_ARRAY
JAVA_TYPE_CHAR
JAVA_TYPE_CHARACTER
JAVA_TYPE_DATE
JAVA_TYPE_DOUBLE
JAVA_TYPE_FILE
JAVA_TYPE_FLOAT
JAVA_TYPE_GUARDEDBYTEARRAY
JAVA_TYPE_GUARDEDSTRING
JAVA_TYPE_INT
JAVA_TYPE_INTEGER
JAVA_TYPE_LONG
JAVA_TYPE_OBJECT
JAVA_TYPE_PRIMITIVE_BOOLEAN
JAVA_TYPE_PRIMITIVE_BYTE
JAVA_TYPE_PRIMITIVE_DOUBLE
JAVA_TYPE_PRIMITIVE_FLOAT
JAVA_TYPE_PRIMITIVE_LONG
JAVA_TYPE_STRING
The
JAVA_TYPE_DATEproperty is deprecated. Functionality may be removed in a future release. This property-level extension is an alias forstring. Any dates assigned to this extension should be formatted per ISO 8601. nativeName-
string, optional
The native OpenICF attribute name.
flags-
string, optional
The native OpenICF attribute flags. OpenICF supports the following attribute flags:
-
MULTIVALUED- specifies that the property can be multivalued. This flag sets thetypeof the attribute as follows:"type" : "array"If the attribute type is
array, an additionalitemsfield specifies the supported type for the objects in the array. For example:"groups" : { "type" : "array", "items" : { "type" : "string", "nativeType" : "string" }, .... -
NOT_CREATABLE,NOT_READABLE,NOT_RETURNED_BY_DEFAULT,NOT_UPDATEABLEIn some cases, the connector might not support manipulating an attribute because the attribute can only be changed directly on the remote system. For example, if the
nameattribute of an account can only be created by Active Directory, and never changed by OpenIDM, you would addNOT_CREATABLEandNOT_UPDATEABLEto the provisioner configuration for that attribute.Certain attributes such as LDAP groups or other calculated attributes might be expensive to read. You might want to avoid returning these attributes in a default read of the object, unless they are explicitly requested. In this case, you would add the
NOT_RETURNED_BY_DEFAULTflag to the provisioner configuration for that attribute. -
REQUIRED- specifies that the property is required in create operations. This flag sets therequiredproperty of an attribute as follows:"required" : true
-
|
Do not use the dash character ( |
Configuring the Operation Options
The operationOptions object enables you to deny specific operations on a resource. For example, you can use this configuration object to deny CREATE and DELETE operations on a read-only resource to avoid OpenIDM accidentally updating the resource during a synchronization operation.
The following example defines the options for the "SYNC" operation:
"operationOptions" : {
  {
    "SYNC" :
    {
      "denied" : true,
      "onDeny" : "DO_NOTHING",
      "objectFeatures" :
      {
        "__ACCOUNT__" :
        {
          "denied" : true,
          "onDeny" : "THROW_EXCEPTION",
          "operationOptionInfo" :
          {
            "$schema" : "http://json-schema.org/draft-03/schema",
            "id" : "FIX_ME",
            "type" : "object",
            "properties" :
            {
              "_OperationOption-float" :
              {
                 "type" : "number",
                 "nativeType" : "JAVA_TYPE_PRIMITIVE_FLOAT"
              }
            }
          }
        },
        "__GROUP__" :
        {
          "denied" : false,
          "onDeny" : "DO_NOTHING"
        }
      }
    }
  }
...
The OpenICF Framework supports the following operations:
-
AUTHENTICATE: AuthenticationApiOp -
CREATE: CreateApiOp -
DELETE: DeleteApiOp -
GET: GetApiOp -
RESOLVEUSERNAME: ResolveUsernameApiOp -
SCHEMA: SchemaApiOp -
SCRIPT_ON_CONNECTOR: ScriptOnConnectorApiOp -
SCRIPT_ON_RESOURCE: ScriptOnResourceApiOp -
SEARCH: SearchApiOp -
SYNC: SyncApiOp -
TEST: TestApiOp -
UPDATE: UpdateApiOp -
VALIDATE: ValidateApiOp
The operationOptions object has the following configurable properties:
denied-
boolean, optional
This property prevents operation execution if the value is
true. onDeny-
string, optional
If
deniedistrue, then the service uses this value. Default value:DO_NOTHING.-
DO_NOTHING: On operation the service does nothing. -
THROW_EXCEPTION: On operation the service throws aForbiddenExceptionexception.
-
Installing and Configuring Remote Connector Servers
Connectors that use the .NET framework must run remotely. Java connectors can run locally or remotely. Connectors that run remotely require a connector server to enable OpenIDM to access the connector.
This section describes the steps to install a .NET connector server and a remote Java Connector Server.
Installing and Configuring a .NET Connector Server
A .NET connector server is useful when an application is written in Java, but a connector bundle is written using C#. Because a Java application (for example, a J2EE application) cannot load C# classes, you must deploy the C# bundles under a .NET connector server. The Java application can communicate with the C# connector server over the network, and the C# connector server acts as a proxy to provide access to the C# bundles that are deployed within the C# connector server, to any authenticated application.
By default, the connector server outputs log messages to a file named connectorserver.log, in the C:\path\to\openicf directory. To change the location of the log file set the initializeData parameter in the configuration file, before you install the connector server. For example, the following excerpt sets the log directory to C:\openicf\logs\connectorserver.log:
<add name="file"
   type="System.Diagnostics.TextWriterTraceListener"
   initializeData="C:\openicf\logs\connectorserver.log"
   traceOutputOptions="DateTime">
     <filter type="System.Diagnostics.EventTypeFilter" initializeData="Information"/>
</add>|
Version 1.5 of the .NET connector server includes a new communication protocol that is enabled by default. Currently the new protocol has specific known stability issues. You should therefore run the 1.5 .NET connector server in legacy mode, with the old protocol, as described in "Running the .NET Connector Server in Legacy Mode". |
-
Download the OpenICF .NET Connector Server from the linkhttps://github.com/OpenIdentityPlatform/OpenICF.Net/releases[GitHub, window=\_blank].
The .NET connector server is distributed in two formats. The
.msifile is a wizard that installs the Connector Server as a Windows Service. The.zipfile is simply a bundle of all the files required to run the Connector Server.-
If you do not want to run the Connector Server as a Windows service, download and extract the
.zipfile, then move on to "Configuring the .NET Connector Server". -
If you have deployed the
.zipfile and then decide to run the Connector Server as a service, install the service manually with the following command:.\ConnectorServerService.exe /install /serviceName service-nameThen proceed to "Configuring the .NET Connector Server".
-
To install the Connector Server as a Windows service automatically, follow the remaining steps in this section.
-
-
Execute the
openicf-zip-1.5.0.1-dotnet.msiinstallation file and complete the wizard.You must run the wizard as a user who has permissions to start and stop a Windows service, otherwise the service will not start.
When you choose the Setup Type, select Typical unless you require backward compatibility with the 1.4.0.0 connector server. If you need backward compatibility, select Custom, and install the Legacy Connector Service.
When the wizard has completed, the Connector Server is installed as a Windows Service.
-
Open the Microsoft Services Console and make sure that the Connector Server is listed there.
The name of the service is
OpenICF Connector Server, by default.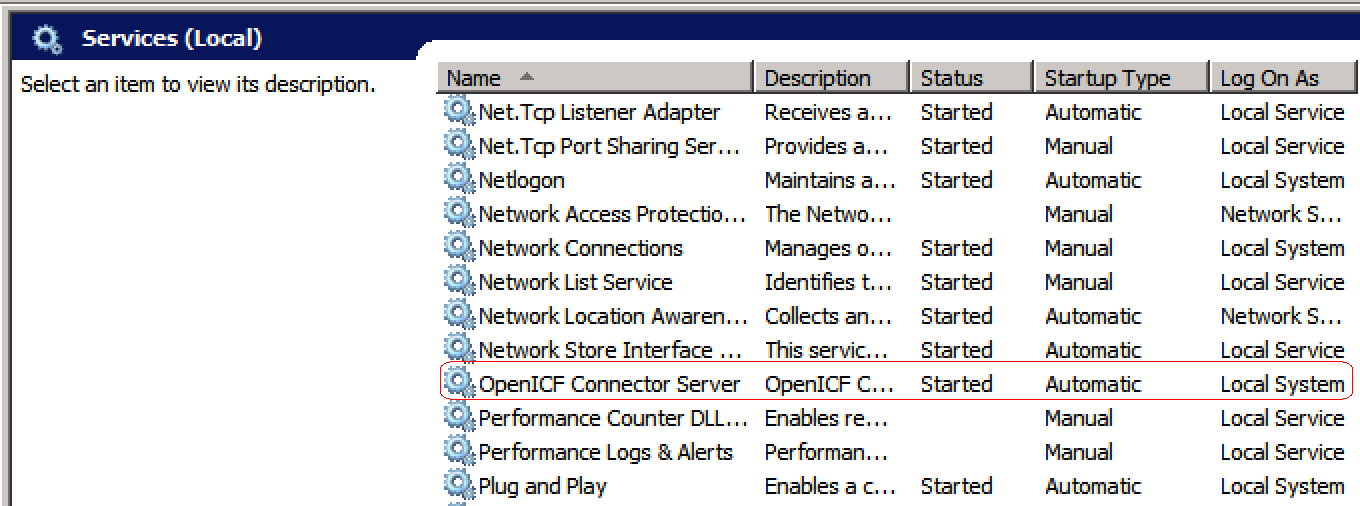
-
If you are installing the .NET Connector Server from the
.msidistribution, select Custom for the Setup Type, and install the Legacy Connector Service. -
If you are installing the .NET Connector Server from the
.zipdistribution, launch the Connector Server by running theConnectorServer.execommand, and not theConnectorServerService.execommand. -
Adjust the
portparameter in your OpenIDM remote connector server configuration file. In legacy mode, the connector server listens on port8760by default. -
Remove the
"protocol" : "websocket",from your OpenIDM remote connector server configuration file to specify that the connector server should use the legacy protocol. -
In the commands shown in "Configuring the .NET Connector Server", replace
ConnectorServerService.exewithConnectorServer.exe.
After you have installed the .NET Connector Server, as described in the previous section, follow these steps to configure the Connector Server:
-
Make sure that the Connector Server is not currently running. If it is running, use the Microsoft Services Console to stop it.
-
At the command prompt, change to the directory where the Connector Server was installed:
c:\> cd "c:\Program Files (x86)\ForgeRock\OpenICF" -
Run the
ConnectorServerService /setkeycommand to set a secret key for the Connector Server. The key can be any string value. This example sets the secret key toPassw0rd:ConnectorServerService /setkey Passw0rd Key has been successfully updated.This key is used by clients connecting to the Connector Server. The key that you set here must also be set in the OpenIDM connector info provider configuration file (
conf/provisioner.openicf.connectorinfoprovider.json). For more information, see "Configuring OpenIDM to Connect to the .NET Connector Server". -
Edit the Connector Server configuration.
The Connector Server configuration is saved in a file named
ConnectorServerService.exe.Config(in the directory in which the Connector Server is installed).Check and edit this file, as necessary, to reflect your installation. Specifically, verify that the
baseAddressreflects the host and port on which the connector server is installed:<system.serviceModel> <services> <service name="Org.ForgeRock.OpenICF.Framework.Service.WcfServiceLibrary.WcfWebsocket"> <host> <baseAddresses> <add baseAddress="http://0.0.0.0:8759/openicf" /> </baseAddresses> <host> </service> </services> </system.serviceModel>The
baseAddressspecifies the host and port on which the Connector Server listens, and is set tohttp://0.0.0.0:8759/openicfby default. If you set a host value other than the default0.0.0.0, connections from all IP addresses other than the one specified are denied.If Windows firewall is enabled, you must create an inbound port rule to open the TCP port for the connector server (8759 by default). If you do not open the TCP port, OpenIDM will be unable to contact the Connector Server. For more information, see the Microsoft documentation on creating an inbound port rule.
-
Optionally, configure the Connector Server to use SSL:
-
Use an existing CA certificate, or use the
makecertutility to create an exportable self-signed Root CA Certificate:c:\"Program Files (x86)"\"Windows Kits"\8.1\bin\x64\makecert.exe ^ -pe -r -sky signature -cy authority -a sha1 -n "CN=Dev Certification Authority" ^ -ss Root -sr LocalMachine -sk RootCA signroot.cer -
Create an exportable server authentication certificate:
c:\"Program Files (x86)"\"Windows Kits"\8.1\bin\x64\makecert.exe ^ -pe -sky exchange -cy end -n "CN=localhost" -b 01/01/2015 -e 01/01/2050 -eku 1.3.6.1.5.5.7.3.1 ^ -ir LocalMachine -is Root -ic signroot.cer -ss My -sr localMachine -sk server ^ -sp "Microsoft RSA SChannel Cryptographic Provider" -sy 12 server.cer -
Retrieve and set the certificate thumbprint:
c:\Program Files (x86)\ForgeRock\OpenICF>ConnectorServerService.exe /setCertificate Select certificate you want to use: Index Issued To Thumbprint ----- --------- ------------------------- 0) localhost 4D01BE385BF079DD4B9C5A416E7B535904855E0A Certificate Thumbprint has been successfully updated to 4D01BE385BF079DD4B9C5A416E7B535904855E0A. -
Bind the certificate to the Connector Server port. For example:
netsh http add sslcert ipport=0.0.0.0:8759 ^ certhash=4D01BE385BF079DD4B9C5A416E7B535904855E0A ^ appid={bca0631d-cab1-48c8-bd2a-eb049d7d3c55} -
Execute Service as a non-administrative user:
netsh http add urlacl url=https://+:8759/ user=EVERYONE -
Change the Connector Server configuration to use HTTPS and not HTTP:
<add baseAddress="https://0.0.0.0:8759/openicf" />
-
-
Check the trace settings, in the same Connector Server configuration file, under the
system.diagnosticsitem:<system.diagnostics> <trace autoflush="true" indentsize="4"> <listeners> <remove name="Default" /> <add name="console" /> <add name="file" /> </listeners> </trace> <sources> <source name="ConnectorServer" switchName="switch1"> <listeners> <remove name="Default" /> <add name="file" /> </listeners> </source> </sources> <switches> <add name="switch1" value="Information" /> </switches> <sharedListeners> <add name="console" type="System.Diagnostics.ConsoleTraceListener" /> <add name="file" type="System.Diagnostics.TextWriterTraceListener" initializeData="logs\ConnectorServerService.log" traceOutputOptions="DateTime"> <filter type="System.Diagnostics.EventTypeFilter" initializeData="Information" /> </add> </sharedListeners> </system.diagnostics>The Connector Server uses the standard .NET trace mechanism. For more information about tracing options, see Microsoft’s .NET documentation for
System.Diagnostics.The default trace settings are a good starting point. For less tracing, set the EventTypeFilter’s
initializeDatatoWarningorError. For very verbose logging set the value toVerboseorAll. The logging level has a direct effect on the performance of the Connector Servers, so take care when setting this level.
Start the .NET Connector Server in one of the following ways:
-
Start the server as a Windows service, by using the Microsoft Services Console.
Locate the connector server service (
OpenICF Connector Server), and clickStart the serviceorRestart the service.The service is executed with the credentials of the "run as" user (
System, by default). -
Start the server as a Windows service, by using the command line.
In the Windows Command Prompt, run the following command:
net start ConnectorServerServiceTo stop the service in this manner, run the following command:
net stop ConnectorServerService -
Start the server without using Windows services.
In the Windows Command Prompt, change directory to the location where the Connector Server was installed. The default location is
c:\> cd "c:\Program Files (x86)\ForgeRock\OpenICF".Start the server with the following command:
ConnectorServerService.exe /runNote that this command starts the Connector Server with the credentials of the current user. It does not start the server as a Windows service.
The connector info provider service configures one or more remote connector servers to which OpenIDM can connect. The connector info provider configuration is stored in a file named project-dir/conf/provisioner.openicf.connectorinfoprovider.json. A sample connector info provider configuration file is located in openidm/samples/provisioners/.
To configure OpenIDM to use the remote .NET connector server, follow these steps:
-
Start OpenIDM, if it is not already running.
-
Copy the sample connector info provider configuration file to your project’s
conf/directory:$ cd /path/to/openidm $ cp samples/provisioners/provisioner.openicf.connectorinfoprovider.json project-dir/conf/ -
Edit the connector info provider configuration, specifying the details of the remote connector server:
"remoteConnectorServers" : [
    {
        "name" : "dotnet",
        "host" : "192.0.2.0",
        "port" : 8759,
        "useSSL" : false,
        "timeout" : 0,
        "protocol" : "websocket",
        "key" : "Passw0rd"
    }
Configurable properties are as follows:
name-
Specifies the name of the connection to the .NET connector server. The name can be any string. This name is referenced in the
connectorHostRefproperty of the connector configuration file (provisioner.openicf-ad.json). host-
Specifies the IP address of the host on which the Connector Server is installed.
port-
Specifies the port on which the Connector Server listens. This property matches the
connectorserver.portproperty in theConnectorServerService.exe.configfile.For more information, see "Configuring the .NET Connector Server".
useSSL-
Specifies whether the connection to the Connector Server should be secured. This property matches the
"connectorserver.usessl"property in theConnectorServerService.exe.configfile. timeout-
Specifies the length of time, in seconds, that OpenIDM should attempt to connect to the Connector Server before abandoning the attempt. To disable the timeout, set the value of this property to
0. protocol-
Version 1.5.0.0 of the OpenICF framework supports a new communication protocol with remote connector servers. This protocol is enabled by default, and its value is
websocketin the default configuration.Currently, the new, default protocol has specific known issues. You should therefore run the 1.5 .NET Connector Server in legacy mode, with the old protocol, as described in "Running the .NET Connector Server in Legacy Mode".
key-
Specifies the connector server key. This property matches the
keyproperty in theConnectorServerService.exe.configfile. For more information, see "Configuring the .NET Connector Server".The string value that you enter here is encrypted as soon as the file is saved.
Installing and Configuring a Remote Java Connector Server
In certain situations, it might be necessary to set up a remote Java Connector Server. This section provides instructions for setting up a remote Java Connector Server on Unix/Linux and Windows.
-
Download the OpenICF Java Connector Server from the GitHub.
-
Change to the appropriate directory and unpack the zip file. The following command unzips the file in the current directory:
$ unzip openicf-zip-1.7.1.zip -
Change to the
openicfdirectory:$ cd path/to/openicf -
The Java Connector Server uses a
keyproperty to authenticate the connection. The default key value ischangeit. To change the value of the secret key, run a command similar to the following. This example sets the key value toPassw0rd:$ cd /path/to/openicf $ bin/ConnectorServer.sh /setkey Passw0rd Key has been successfully updated. -
Review the
ConnectorServer.propertiesfile in the/path/to/openicf/confdirectory, and make any required changes. By default, the configuration file has the following properties:connectorserver.port=8759 connectorserver.libDir=lib connectorserver.usessl=false connectorserver.bundleDir=bundles connectorserver.loggerClass=org.forgerock.openicf.common.logging.slf4j.SLF4JLog connectorserver.key=xOS4IeeE6eb/AhMbhxZEC37PgtE\=The
connectorserver.usesslparameter indicates whether client connections to the connector server should be over SSL. This property is set tofalseby default.To secure connections to the connector server, set this property to
trueand set the following properties before you start the connector server:java -Djavax.net.ssl.keyStore=mySrvKeystore -Djavax.net.ssl.keyStorePassword=Passw0rd -
Start the Java Connector Server:
$ bin/ConnectorServer.sh /runThe connector server is now running, and listening on port 8759, by default.
Log files are available in the
/path/to/openicf/logsdirectory.$ ls logs/ Connector.log ConnectorServer.log ConnectorServerTrace.log -
If required, stop the Java Connector Server by pressing CTRL-C.
-
Download the OpenICF Java Connector Server from the GitHub.
-
Change to the appropriate directory and unpack the zip file.
-
In a Command Prompt window, change to the
openicfdirectory:C:\>cd C:\path\to\openicf\bin -
If required, secure the communication between OpenIDM and the Java Connector Server. The Java Connector Server uses a
keyproperty to authenticate the connection. The default key value ischangeit.To change the value of the secret key, use the
bin\ConnectorServer.bat /setkeycommand. The following example sets the key toPassw0rd:c:\path\to\openicf>bin\ConnectorServer.bat /setkey Passw0rd lib\framework\connector-framework.jar;lib\framework\connector-framework-internal .jar;lib\framework\groovy-all.jar;lib\framework\icfl-over-slf4j.jar;lib\framework \slf4j-api.jar;lib\framework\logback-core.jar;lib\framework\logback-classic.jar -
Review the
ConnectorServer.propertiesfile in thepath\to\openicf\confdirectory, and make any required changes. By default, the configuration file has the following properties:connectorserver.port=8759 connectorserver.libDir=lib connectorserver.usessl=false connectorserver.bundleDir=bundles connectorserver.loggerClass=org.forgerock.openicf.common.logging.slf4j.SLF4JLog connectorserver.key=xOS4IeeE6eb/AhMbhxZEC37PgtE\= -
You can either run the Java Connector Server as a Windows service, or start and stop it from the command-line.
-
To install the Java Connector Server as a Windows service, run the following command:
c:\path\to\openicf>bin\ConnectorServer.bat /installIf you install the connector server as a Windows service you can use the Microsoft Services Console to start, stop and restart the service. The Java Connector Service is named
OpenICFConnectorServerJava.To uninstall the Java Connector Server as a Windows service, run the following command:
c:\path\to\openicf>bin\ConnectorServer.bat /uninstall
-
-
To start the Java Connector Server from the command line, enter the following command:
c:\path\to\openicf>bin\ConnectorServer.bat /runThe connector server is now running, and listening on port 8759, by default.
Log files are available in the
\path\to\openicf\logsdirectory. -
If required, stop the Java Connector Server by pressing
^C.
Connectors Supported With OpenIDM
OpenIDM 6.2 provides several connectors by default, in the path/to/openidm/connectors directory. The supported connectors that are not bundled with OpenIDM, and a number of additional connectors, can be downloaded from the OpenICF community site.
For details about the connectors that are supported for use with OpenIDM 6.2, see Connectors Guide.
Creating Default Connector Configurations
You have three ways to create provisioner files:
-
Start with the sample provisioner files in the
/path/to/openidm/samples/provisionersdirectory. For more information, see "Connectors Supported With OpenIDM". -
Set up connectors with the help of the Admin UI. To start this process, navigate to
https://localhost:8443/adminand log in to OpenIDM. Continue with "Adding New Connectors from the Admin UI". -
Use the service that OpenIDM exposes through the REST interface to create basic connector configuration files, or use the
cli.shorcli.batscripts to generate a basic connector configuration. To see how this works continue with "Adding New Connectors from the Command Line".
Adding New Connectors from the Admin UI
You can include several different connectors in an OpenIDM configuration. In the Admin UI, select Configure > Connector. Try some of the different connector types in the screen that appears. Observe as the Admin UI changes the configuration options to match the requirements of the connector type.
The list of connectors shown in the Admin UI does not include all supported connectors. For information and examples of how each supported connector is configured, see "Connectors Supported With OpenIDM".
When you have filled in all required text boxes, the Admin UI allows you to validate the connector configuration.
If you want to configure a different connector through the Admin UI, you could copy the provisioner file from the /path/to/openidm/samples/provisioners directory. However, additional configuration may be required, as described in "Connectors Supported With OpenIDM".
Alternatively, some connectors are included with the configuration of a specific sample. For example, if you want to build a ScriptedSQL connector, read "Sample 3 - Using the Custom Scripted Connector Bundler to Build a ScriptedSQL Connector" in the Samples Guide.
Adding New Connectors from the Command Line
This section describes how to create connector configurations over the REST interface. For instructions on how to create connector configurations from the command line, see "Using the configureconnector Subcommand". You create a new connector configuration file in three stages:
-
List the available connectors.
-
Generate the core configuration.
-
Connect to the target system and generate the final configuration.
List the available connectors by using the following command:
$ curl \
 --header "X-OpenIDM-Username: openidm-admin" \
 --header "X-OpenIDM-Password: openidm-admin" \
 --request POST \
 "http://localhost:8080/openidm/system?_action=availableConnectors"
Available connectors are installed in openidm/connectors. OpenIDM bundles the following connectors:
-
CSV File Connector
-
Database Table Connector
-
Scripted Groovy Connector Toolkit, which includes the following sample implementations:
-
Scripted SQL Connector
-
Scripted CREST Connector
-
Scripted REST Connector
-
-
LDAP Connector
-
XML Connector
-
GoogleApps Connector (OpenIDM Enterprise only)
-
Salesforce Connector (OpenIDM Enterprise only)
The preceding command therefore returns the following output:
{
  "connectorRef": [
    {
      "connectorName": "org.forgerock.openicf.connectors.xml.XMLConnector",
      "displayName": "XML Connector",
      "bundleName": "org.openidentityplatform.openicf.connectors.xml-connector",
      "systemType": "provisioner.openicf",
      "bundleVersion": "[1.1.0.3,2)"
    },
    {
      "connectorName": "org.identityconnectors.ldap.LdapConnector",
      "displayName": "LDAP Connector",
      "bundleName": "org.openidentityplatform.openicf.connectors.ldap-connector",
      "systemType": "provisioner.openicf",
      "bundleVersion": "[1.4.0.0,2)"
    },
    {
      "connectorName": "org.forgerock.openicf.connectors.scriptedsql.ScriptedSQLConnector",
      "displayName": "Scripted SQL Connector",
      "bundleName": "org.openidentityplatform.openicf.connectors.groovy-connector",
      "systemType": "provisioner.openicf",
      "bundleVersion": "[1.4.0.0,2)"
    },
    {
      "connectorName": "org.forgerock.openicf.connectors.scriptedrest.ScriptedRESTConnector",
      "displayName": "Scripted REST Connector",
      "bundleName": "org.openidentityplatform.openicf.connectors.groovy-connector",
      "systemType": "provisioner.openicf",
      "bundleVersion": "[1.4.0.0,2)"
    },
    {
      "connectorName": "org.forgerock.openicf.connectors.scriptedcrest.ScriptedCRESTConnector",
      "displayName": "Scripted CREST Connector",
      "bundleName": "org.openidentityplatform.openicf.connectors.groovy-connector",
      "systemType": "provisioner.openicf",
      "bundleVersion": "[1.4.0.0,2)"
    },
    {
      "connectorName": "org.forgerock.openicf.connectors.groovy.ScriptedPoolableConnector",
      "displayName": "Scripted Poolable Groovy Connector",
      "bundleName": "org.openidentityplatform.openicf.connectors.groovy-connector",
      "systemType": "provisioner.openicf",
      "bundleVersion": "[1.4.0.0,2)"
    },
    {
      "connectorName": "org.forgerock.openicf.connectors.groovy.ScriptedConnector",
      "displayName": "Scripted Groovy Connector",
      "bundleName": "org.openidentityplatform.openicf.connectors.groovy-connector",
      "systemType": "provisioner.openicf",
      "bundleVersion": "[1.4.0.0,2)"
    },
    {
      "connectorName": "org.identityconnectors.databasetable.DatabaseTableConnector",
      "displayName": "Database Table Connector",
      "bundleName": "org.openidentityplatform.openicf.connectors.databasetable-connector",
      "systemType": "provisioner.openicf",
      "bundleVersion": "[1.1.0.2,2)"
    },
    {
      "connectorName": "org.forgerock.openicf.csvfile.CSVFileConnector",
      "displayName": "CSV File Connector",
      "bundleName": "org.openidentityplatform.openicf.connectors.csvfile-connector",
      "systemType": "provisioner.openicf",
      "bundleVersion": "[1.5.1.4,2)"
    }
  ]
}
To generate the core configuration, choose one of the available connectors by copying one of the JSON objects from the generated list into the body of the REST command, as shown in the following command for the XML connector:
$ curl \
--header "X-OpenIDM-Username: openidm-admin" \
--header "X-OpenIDM-Password: openidm-admin" \
--header "Content-Type: application/json" \
--request POST \
--data '{"connectorRef":
    {"connectorName": "org.forgerock.openicf.connectors.xml.XMLConnector",
    "displayName": "XML Connector",
    "bundleName": "org.openidentityplatform.openicf.connectors.xml-connector",
    "bundleVersion": "[1.1.0.3,2)"}
 }' \
 "http//localhost:8080/openidm/system?_action=createCoreConfig"
This command returns a core connector configuration, similar to the following:
{
    "poolConfigOption": {
    "minIdle": 1,
    "minEvictableIdleTimeMillis": 120000,
    "maxWait": 150000,
    "maxIdle": 10,
    "maxObjects": 10
  },
    "resultsHandlerConfig": {
    "enableAttributesToGetSearchResultsHandler": true,
    "enableFilteredResultsHandler": true,
    "enableNormalizingResultsHandler": true
  },
  "operationTimeout": {
    "SCHEMA": -1,
    "SYNC": -1,
    "VALIDATE": -1,
    "SEARCH": -1,
    "AUTHENTICATE": -1,
    "CREATE": -1,
    "UPDATE": -1,
    "DELETE": -1,
    "TEST": -1,
    "SCRIPT_ON_CONNECTOR": -1,
    "SCRIPT_ON_RESOURCE": -1,
    "GET": -1,
    "RESOLVEUSERNAME": -1
  },
  "configurationProperties": {
    "xsdIcfFilePath": null,
    "xsdFilePath": null,
    "createFileIfNotExists": false,
    "xmlFilePath": null
  },
  "connectorRef": {
    "bundleVersion": "[1.1.0.3,2)",
    "bundleName": "org.openidentityplatform.openicf.connectors.xml-connector",
    "displayName": "XML Connector",
    "connectorName": "org.forgerock.openicf.connectors.xml.XMLConnector"
  }
}
The configuration that is returned is not yet functional. Notice that it does not contain the required system-specific configurationProperties, such as the host name and port, or the xmlFilePath for the XML file-based connector. In addition, the configuration does not include the complete list of objectTypes and operationOptions.
To generate the final configuration, add values for the configurationProperties to the core configuration, and use the updated configuration as the body for the next command:
$ curl \
--header "X-OpenIDM-Username: openidm-admin" \
--header "X-OpenIDM-Password: openidm-admin" \
--header "Content-Type: application/json" \
--request POST \
--data '{
  "configurationProperties":
    {
      "xsdIcfFilePath" : "samples/sample1/data/resource-schema-1.xsd",
      "xsdFilePath" : "samples/sample1/data/resource-schema-extension.xsd",
      "xmlFilePath" : "samples/sample1/data/xmlConnectorData.xml",
      "createFileIfNotExists": false
    },
    "operationTimeout": {
      "SCHEMA": -1,
      "SYNC": -1,
      "VALIDATE": -1,
      "SEARCH": -1,
      "AUTHENTICATE": -1,
      "CREATE": -1,
      "UPDATE": -1,
      "DELETE": -1,
      "TEST": -1,
      "SCRIPT_ON_CONNECTOR": -1,
      "SCRIPT_ON_RESOURCE": -1,
      "GET": -1,
      "RESOLVEUSERNAME": -1
    },
    "resultsHandlerConfig": {
      "enableAttributesToGetSearchResultsHandler": true,
      "enableFilteredResultsHandler": true,
      "enableNormalizingResultsHandler": true
    },
    "poolConfigOption": {
      "minIdle": 1,
      "minEvictableIdleTimeMillis": 120000,
      "maxWait": 150000,
      "maxIdle": 10,
      "maxObjects": 10
    },
    "connectorRef": {
      "bundleVersion": "[1.1.0.3,2)",
      "bundleName": "org.openidentityplatform.openicf.connectors.xml-connector",
      "displayName": "XML Connector",
      "connectorName": "org.forgerock.openicf.connectors.xml.XMLConnector"
    }
  }' \
"http://localhost:8080/openidm/system?_action=createFullConfig"|
Notice the single quotes around the argument to the |
OpenIDM attempts to read the schema, if available, from the external resource in order to generate output. OpenIDM then iterates through schema objects and attributes, creating JSON representations for objectTypes and operationOptions for supported objects and operations.
The output includes the basic --data input, along with operationOptions and objectTypes.
Because OpenIDM produces a full property set for all attributes and all object types in the schema from the external resource, the resulting configuration can be large. For an LDAP server, OpenIDM can generate a configuration containing several tens of thousands of lines, for example. You might therefore want to reduce the schema to a minimum on the external resource before you run the createFullConfig command.
When you have the complete connector configuration, save that configuration in a file named provisioner.openicf-name.json (where name corresponds to the name of the connector) and place it in the conf directory of your project. For more information, see "Configuring Connectors".
Checking the Status of External Systems Over REST
After a connection has been configured, external systems are accessible over the REST interface at the URL http://localhost:8080/openidm/system/connector-name. Aside from accessing the data objects within the external systems, you can test the availability of the systems themselves.
To list the external systems that are connected to an OpenIDM instance, use the test action on the URL http://localhost:8080/openidm/system/. The following example shows the connector configuration for an external LDAP system:
$ curl \
 --header "X-OpenIDM-Username: openidm-admin" \
 --header "X-OpenIDM-Password: openidm-admin" \
 --request POST \
 "http://localhost:8080/openidm/system?_action=test"
[
  {
    "ok": true,
    "displayName": "LDAP Connector",
    "connectorRef": {
      "bundleVersion": "[1.4.0.0,2)",
      "bundleName": "org.openidentityplatform.openicf.connectors.ldap-connector",
      "connectorName": "org.identityconnectors.ldap.LdapConnector"
    },
    "objectTypes": [
      "__ALL__",
      "group",
      "account"
    ],
    "config": "config/provisioner.openicf/ldap",
    "enabled": true,
    "name": "ldap"
  }
]
The status of the system is provided by the ok parameter. If the connection is available, the value of this parameter is true.
To obtain the status for a single system, include the name of the connector in the URL, for example:
$ curl \
 --header "X-OpenIDM-Username: openidm-admin" \
 --header "X-OpenIDM-Password: openidm-admin" \
 --request POST \
 "http://localhost:8080/openidm/system/ldap?_action=test"
{
  "ok": true,
  "displayName": "LDAP Connector",
  "connectorRef": {
    "bundleVersion": "[1.4.0.0,2)",
    "bundleName": "org.openidentityplatform.openicf.connectors.ldap-connector",
    "connectorName": "org.identityconnectors.ldap.LdapConnector"
  },
  "objectTypes": [
    "__ALL__",
    "group",
    "account"
  ],
  "config": "config/provisioner.openicf/ldap",
  "enabled": true,
  "name": "ldap"
}
If there is a problem with the connection, the ok parameter returns false, with an indication of the error. In the following example, the LDAP server named ldap, running on localhost:1389, is down:
$ curl \
 --header "X-OpenIDM-Username: openidm-admin" \
 --header "X-OpenIDM-Password: openidm-admin" \
 --request POST \
 "http://localhost:8080/openidm/system/ldap?_action=test"
{
  "ok": false,
  "error": "localhost:1389",
  "displayName": "LDAP Connector",
  "connectorRef": {
    "bundleVersion": "[1.4.0.0,2)",
    "bundleName": "org.openidentityplatform.openicf.connectors.ldap-connector",
    "connectorName": "org.identityconnectors.ldap.LdapConnector"
  },
  "objectTypes": [
    "__ALL__",
    "group",
    "account"
  ],
  "config": "config/provisioner.openicf/ldap",
  "enabled": true,
  "name": "ldap"
}
To test the validity of a connector configuration, use the testConfig action and include the configuration in the command. For example:
$ curl \
 --header "X-OpenIDM-Username: openidm-admin" \
 --header "X-OpenIDM-Password: openidm-admin" \
 --header "Content-Type: application/json" \
 --data '{
    "name" : "xmlfile",
    "connectorRef" : {
        "bundleName" : "org.openidentityplatform.openicf.connectors.xml-connector",
        "bundleVersion" : "[1.1.0.3,2)",
        "connectorName" : "org.forgerock.openicf.connectors.xml.XMLConnector"
    },
    "producerBufferSize" : 100,
    "connectorPoolingSupported" : true,
    "poolConfigOption" : {
        "maxObjects" : 10,
        "maxIdle" : 10,
        "maxWait" : 150000,
        "minEvictableIdleTimeMillis" : 120000,
        "minIdle" : 1
    },
    "operationTimeout" : {
        "CREATE" : -1,
        "TEST" : -1,
        "AUTHENTICATE" : -1,
        "SEARCH" : -1,
        "VALIDATE" : -1,
        "GET" : -1,
        "UPDATE" : -1,
        "DELETE" : -1,
        "SCRIPT_ON_CONNECTOR" : -1,
        "SCRIPT_ON_RESOURCE" : -1,
        "SYNC" : -1,
        "SCHEMA" : -1
    },
    "configurationProperties" : {
        "xsdIcfFilePath" : "samples/sample1/data/resource-schema-1.xsd",
        "xsdFilePath" : "samples/sample1/data/resource-schema-extension.xsd",
        "xmlFilePath" : "samples/sample1/data/xmlConnectorData.xml"
    },
    "syncFailureHandler" : {
        "maxRetries" : 5,
        "postRetryAction" : "logged-ignore"
    },
    "objectTypes" : {
        "account" : {
            "$schema" : "http://json-schema.org/draft-03/schema",
            "id" : "__ACCOUNT__",
            "type" : "object",
            "nativeType" : "__ACCOUNT__",
            "properties" : {
                "description" : {
                    "type" : "string",
                    "nativeName" : "__DESCRIPTION__",
                    "nativeType" : "string"
                },
                "firstname" : {
                    "type" : "string",
                    "nativeName" : "firstname",
                    "nativeType" : "string"
                },
                "email" : {
                    "type" : "string",
                    "nativeName" : "email",
                    "nativeType" : "string"
                },
                "_id" : {
                    "type" : "string",
                    "nativeName" : "__UID__"
                },
                "password" : {
                    "type" : "string",
                    "nativeName" : "password",
                    "nativeType" : "string"
                },
                "name" : {
                    "type" : "string",
                    "required" : true,
                    "nativeName" : "__NAME__",
                    "nativeType" : "string"
                },
                "lastname" : {
                    "type" : "string",
                    "required" : true,
                    "nativeName" : "lastname",
                    "nativeType" : "string"
                },
                "mobileTelephoneNumber" : {
                    "type" : "string",
                    "required" : true,
                    "nativeName" : "mobileTelephoneNumber",
                    "nativeType" : "string"
                },
                "securityQuestion" : {
                    "type" : "string",
                    "required" : true,
                    "nativeName" : "securityQuestion",
                    "nativeType" : "string"
                },
                "securityAnswer" : {
                    "type" : "string",
                    "required" : true,
                    "nativeName" : "securityAnswer",
                    "nativeType" : "string"
                },
                "roles" : {
                    "type" : "string",
                    "required" : false,
                    "nativeName" : "roles",
                    "nativeType" : "string"
                }
            }
        }
    },
    "operationOptions" : { }
}' \
 --request POST \
 "http://localhost:8080/openidm/system?_action=testConfig"
If the configuration is valid, the command returns "ok": true, for example:
{
   "ok": true,
   "name": "xmlfile"
}
If the configuration is not valid, the command returns an error, indicating the problem with the configuration. For example, the following result is returned when the LDAP connector configuration is missing a required property (in this case, the baseContexts to synchronize):
{
  "error": "org.identityconnectors.framework.common.exceptions.ConfigurationException:
           The list of base contexts cannot be empty",
  "name": "OpenDJ",
  "ok": false
}
The testConfig action requires a running OpenIDM instance, as it uses the REST API, but does not require an active connector instance for the connector whose configuration you want to test.
Adding Attributes to Connector Configurations
You can add the attributes of your choice to a connector configuration file. Specifically, if you want to set up "Extending the Property Type Configuration" to one of the objectTypes such as account, use the format shown under "Specifying the Supported Object Types".
You can configure connectors to enable provisioning of arbitrary property level extensions (such as image files) to system resources. For example, if you want to set up image files such as account avatars, open the appropriate provisioner file. Look for an account section similar to:
"account" : {
    "$schema" : "http://json-schema.org/draft-03/schema",
    "id" : "__ACCOUNT__",
    "type" : "object",
    "nativeType" : "__ACCOUNT__",
    "properties" : {...
Under properties, add one of the following code blocks. The first block works for a single photo encoded as a base64 string. The second block would address multiple photos encoded in the same way:
"attributeByteArray" : {
    "type" : "string",
    "nativeName" : "attributeByteArray",
    "nativeType" : "JAVA_TYPE_BYTE_ARRAY"
},
"attributeByteArrayMultivalue": {
"type": "array",
"items": {
"type": "string",
"nativeType": "JAVA_TYPE_BYTE_ARRAY"
},
"nativeName": "attributeByteArrayMultivalue"
},