LDAP Samples - Reconciling Data Between OpenIDM and One or More LDAP Directories
This chapter walks you through the LDAP samples (those samples labeled 2, 2b, 2c, 2d, 5, 5b and 6 in the openidm/samples directory). For a complete list of the samples provided with OpenIDM, and an overview of each sample, see "Overview of the OpenIDM Samples".
Sample 2 - LDAP One Way
Sample 2 resembles "First OpenIDM Sample - Reconciling an XML File Resource", but in sample 2 OpenIDM is connected to a local LDAP server. The sample has been tested with OpenDJ, but should work with any LDAPv3-compliant server.
Sample 2 demonstrates how OpenIDM can pick up new or changed objects from an external resource. The sample contains only one mapping, from the external LDAP server resource to the OpenIDM repository. The sample therefore does not push any changes made to OpenIDM managed user objects out to the LDAP server.
LDAP Server Configuration
Sample 2 expects the following configuration for the external LDAP server:
-
The LDAP server runs on the local host.
-
The LDAP server listens on port 1389.
-
A user with DN
cn=Directory Managerand passwordpasswordhas read access to the LDAP server. -
Directory data for that server is stored under base DN
dc=example,dc=com. -
User objects for that server are stored under base DN
ou=People,dc=example,dc=com. -
User objects have the object class
inetOrgPerson. -
User objects have the following attributes:
-
cn -
description -
givenName -
mail -
sn -
telephoneNumber -
uid -
userPassword
An example user object follows.
+
dn: uid=jdoe,ou=People,dc=example,dc=com objectClass: person objectClass: organizationalPerson objectClass: inetOrgPerson objectClass: top givenName: John uid: jdoe cn: John Doe telephoneNumber: 1-415-523-0772 sn: Doe mail: jdoe@example.com description: Created by OpenIDM userPassword: password -
The following steps provide setup instructions for an OpenDJ server. Adjust these instructions if you are using an alternative LDAP server.
-
Download OpenDJ from the GitHub and extract the zip archive.
The LDIF data for this sample is provided in the file
openidm/samples/sample2/data/Example.ldif. You will need to import this data during your OpenDJ setup. -
Install OpenDJ using the command-line setup.
Substitute the
--ldifFileargument with the path to theExample.ldiffile in your OpenIDM installation:$ cd /path/to/opendj $ ./setup --cli \ --hostname localhost \ --ldapPort 1389 \ --rootUserDN "cn=Directory Manager" \ --rootUserPassword password \ --adminConnectorPort 4444 \ --baseDN dc=com \ --ldifFile /path/to/openidm/samples/sample2/data/Example.ldif \ --acceptLicense \ --no-prompt ... Configuring Directory Server ..... Done. Importing LDIF file /path/to/openidm/samples/sample2/data/Example.ldif ...... Done. Starting Directory Server ...... Done.. ...
Install the Sample
Prepare OpenIDM as described in "Preparing OpenIDM", then start OpenIDM with the configuration for sample 2.
$ cd /path/to/openidm
$ ./startup.sh -p samples/sample2
Reconcile the Repository
The mapping configuration file (sync.json) for this sample includes the mapping systemLdapAccounts_managedUser, which synchronize users from the source LDAP server with the target OpenIDM repository.
You can run this part of the sample by using the curl command-line utility, or by using the OpenIDM Administration UI. This section provides instructions for both methods.
-
Reconcile the repository by running the following command:
$ curl \
 --header "X-OpenIDM-Username: openidm-admin" \
 --header "X-OpenIDM-Password: openidm-admin" \
 --request POST \
 "http://localhost:8080/openidm/recon?_action=recon&mapping=systemLdapAccounts_managedUser&waitForCompletion=true"
{
  "_id": "b1394d10-29b0-4ccf-81d8-c88948ea121c-4",
  "state": "SUCCESS"
}
The reconciliation operation creates the two users from the LDAP server in the OpenIDM repository, assigning the new objects random unique IDs.
-
To retrieve the users from the repository, query their IDs as follows:
$ curl \ --header "X-OpenIDM-Username: openidm-admin" \ --header "X-OpenIDM-Password: openidm-admin" \ --request GET \ "http://localhost:8080/openidm/managed/user?_queryId=query-all-ids" { "result": [ { "_id": "f52df646-7108-45e1-9342-1a17f257b497", "_rev": "1" }, { "_id": "f7fccf54-e76a-404c-93f0-7486d30f1dc3", "_rev": "1" } ], ... } -
To retrieve individual user objects, include the ID in the URL, for example:
$ curl \
 --header "X-OpenIDM-Username: openidm-admin" \
 --header "X-OpenIDM-Password: openidm-admin" \
 --request GET \
 "http://localhost:8080/openidm/managed/user/0a5546d6-149b-4f8b-b3be-4afa8a267d45"
{
  "_id": "f7fccf54-e76a-404c-93f0-7486d30f1dc3",
  "_rev": "1",
  "displayName": "Barbara Jensen",
  "description": "Created for OpenIDM",
  "givenName": "Barbara",
  "mail": "bjensen@example.com",
  "sn": "Jensen",
  "telephoneNumber": "1-360-229-7105",
  "userName": "bjensen",
  "accountStatus": "active",
  "effectiveRoles": [],
  "effectiveAssignments": []
}
-
Log in to the Admin UI at the URL
https://localhost:8443/adminas the default administrative user (openidm-admin) with passwordopenidm-admin.To protect your deployment in production, change the default administrative password. To do so, navigate to the Self-Service UI at
https://localhost:8443/and click Change Password. -
Click Configure > Mappings.
This page shows one configured mapping, from the
ldapserver to the OpenIDM repository (managed/user).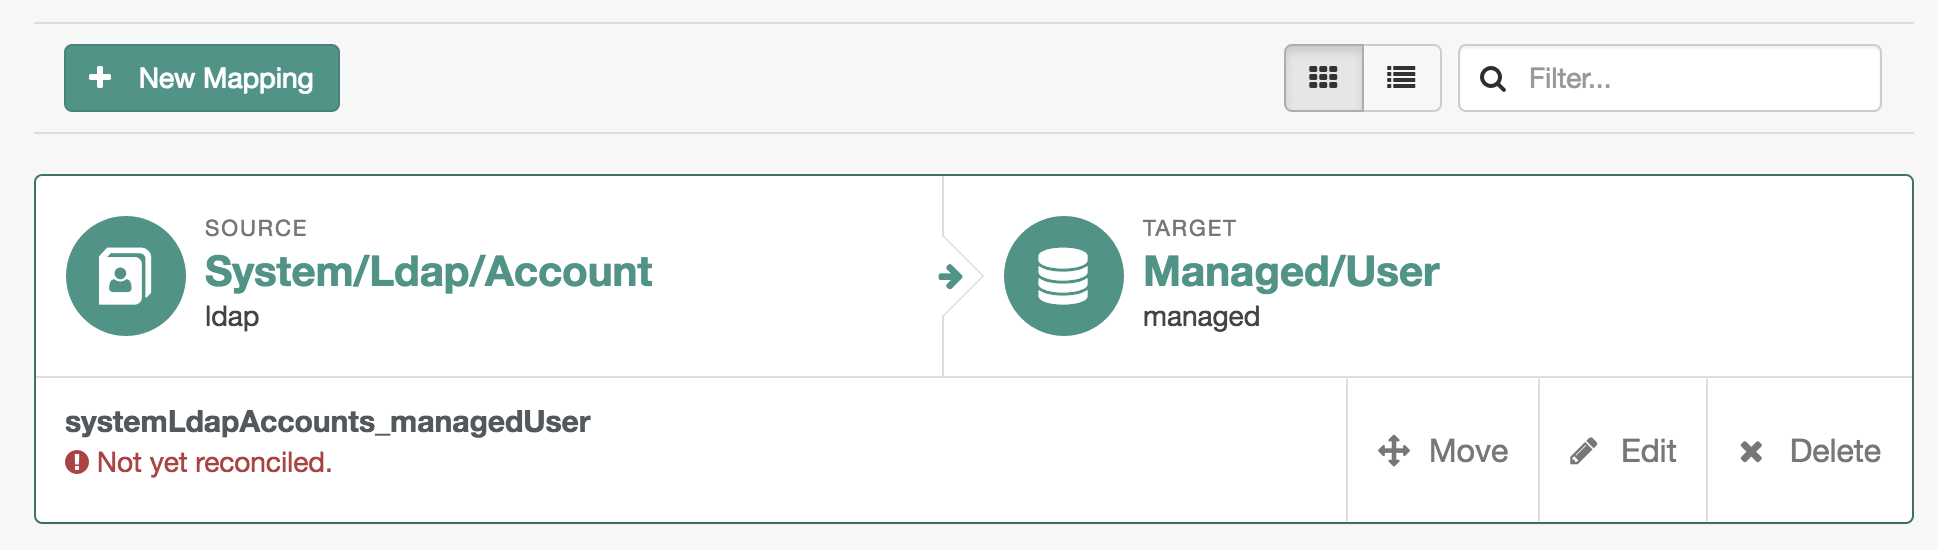
-
Click anywhere on the mapping and click Reconcile Now.
The reconciliation operation creates the two users from the LDAP server in the OpenIDM repository.
-
Retrieve the users in the repository. Click Manage > User.
You should now see two users from the LDAP server, reconciled to the OpenIDM repository.
-
When you click a username, you can view the details of that user account.
Sample 2b - LDAP Two Way
Like sample 2, sample 2b connects to an external LDAP server. However, sample 2b has two mappings configured, one from the LDAP server to the OpenIDM repository, and the other from the OpenIDM repository to the LDAP server.
External LDAP Configuration
As demonstrated for sample 2, you can use OpenDJ as an LDAP server. The LDIF data for this sample is provided in the file openidm/samples/sample2b/data/Example.ldif. You will need to import this data during your OpenDJ setup.
Configure the LDAP server as for sample 2, "LDAP Server Configuration", but import the LDIF file that is specific to Sample 2b during the setup. The LDAP user must have write access to create users from OpenIDM on the LDAP server.
Install the Sample
Prepare OpenIDM as described in "Preparing OpenIDM", then start OpenIDM with the configuration for sample 2b.
$ cd /path/to/openidm
$ ./startup.sh -p samples/sample2b
Run the Sample
The mapping configuration file (sync.json) for this sample includes two mappings, systemLdapAccounts_managedUser, which synchronizes users from the source LDAP server with the target OpenIDM repository, and managedUser_systemLdapAccounts, which synchronizes changes from the OpenIDM repository to the LDAP server.
You can run this part of the sample by using the curl command-line utility, or by using the OpenIDM Administration UI. This section provides instructions for both methods.
-
Reconcile the repository over the REST interface by running the following command:
$ curl \
 --header "X-OpenIDM-Username: openidm-admin" \
 --header "X-OpenIDM-Password: openidm-admin" \
 --request POST \
 "http://localhost:8080/openidm/recon?_action=recon&mapping=systemLdapAccounts_managedUser&waitForCompletion=true"
{
  "state": "SUCCESS",
  "_id": "027e25e3-7a33-4858-9080-161c2b40a6bf-2"
}
The reconciliation operation returns a reconciliation run ID and the status of the operation. Reconciliation creates user objects from LDAP in the OpenIDM repository, assigning the new objects random unique IDs.
-
To retrieve the users from the repository, query their IDs as follows:
$ curl \ --header "X-OpenIDM-Username: openidm-admin" \ --header "X-OpenIDM-Password: openidm-admin" \ --request GET \ "http://localhost:8080/openidm/managed/user?_queryId=query-all-ids" { "result": [ { "_id": "d460ed00-74f9-48fb-8cc1-7829be60ddac", "_rev": "1" }, { "_id": "74fe2d25-4eb1-4148-a3ae-ff80f194b3a6", "_rev": "1" } ], ... } -
To retrieve individual user objects, include the ID in the URL, for example:
$ curl \ --header "X-OpenIDM-Username: openidm-admin" \ --header "X-OpenIDM-Password: openidm-admin" \ --request GET \ "http://localhost:8080/openidm/managed/user/d460ed00-74f9-48fb-8cc1-7829be60ddac" { "_id": "d460ed00-74f9-48fb-8cc1-7829be60ddac", "_rev": "1", "displayName": "Barbara Jensen", "description": "Created for OpenIDM", "givenName": "Barbara", "mail": "bjensen@example.com", "telephoneNumber": "1-360-229-7105", "sn": "Jensen", "userName": "bjensen", "accountStatus": "active", "effectiveRoles": [], "effectiveAssignments": [] } -
Test the second mapping by creating a user in the OpenIDM repository.
$ curl \ --header "X-OpenIDM-Username: openidm-admin" \ --header "X-OpenIDM-Password: openidm-admin" \ --header "Content-Type: application/json" \ --request POST \ --data '{ "mail":"fdoe@example.com", "sn":"Doe", "telephoneNumber":"555-1234", "userName":"fdoe", "givenName":"Felicitas", "description":"Felicitas Doe", "displayName":"fdoe"}' \ "http://localhost:8080/openidm/managed/user?_action=create" { "_id": "90d1f388-d8c3-4438-893c-be4e498e7a1c", "_rev": "1", "mail": "fdoe@example.com", "sn": "Doe", "telephoneNumber": "555-1234", "userName": "fdoe", "givenName": "Felicitas", "description": "Felicitas Doe", "displayName": "fdoe", "accountStatus": "active", "effectiveRoles": [], "effectiveAssignments": [] } -
By default, implicit synchronization is enabled for mappings from the
managed/userrepository to any external resource. This means that when you update a managed object, any mappings defined in thesync.jsonfile that have the managed object as the source are automatically executed to update the target system. For more information, see "Mapping Source Objects to Target Objects" in the Integrator’s Guide.Test that the implicit synchronization has been successful by querying the users in the LDAP directory over REST, as follows:
$ curl \
 --header "X-OpenIDM-Username: openidm-admin" \
 --header "X-OpenIDM-Password: openidm-admin" \
 --request GET \
 "http://localhost:8080/openidm/system/ldap/account?_queryId=query-all-ids"
{
  "result": [
    {
      "_id": "uid=jdoe,ou=People,dc=example,dc=com",
      "dn": "uid=jdoe,ou=People,dc=example,dc=com"
    },
    {
      "_id": "uid=bjensen,ou=People,dc=example,dc=com",
      "dn": "uid=bjensen,ou=People,dc=example,dc=com"
    },
    {
      "_id": "uid=fdoe,ou=People,dc=example,dc=com",
      "dn": "uid=fdoe,ou=People,dc=example,dc=com"
    }
  ],
...
}
Note the new entry for user
fdoe. -
Query the complete entry by including `fdoe’s ID in the URL.
$ curl \
 --header "X-OpenIDM-Username: openidm-admin" \
 --header "X-OpenIDM-Password: openidm-admin" \
 --request GET \
 "http://localhost:8080/openidm/system/ldap/account/uid=fdoe,ou=People,dc=example,dc=com"
{
  "_id": "uid=fdoe,ou=People,dc=example,dc=com",
  "mail": "fdoe@example.com",
  "employeeType": null,
  "ldapGroups": [],
  "telephoneNumber": "555-1234",
  "givenName": "Felicitas",
  "cn": "fdoe",
  "dn": "uid=fdoe,ou=People,dc=example,dc=com",
  "uid": "fdoe",
  "sn": "Doe",
  "description": "Felicitas Doe"
}
-
Log in to the Admin UI at the URL
https://localhost:8443/adminas the default administrative user (openidm-admin) with passwordopenidm-admin.To protect your deployment in production, change the default administrative password. To do so, navigate to the Self-Service UI at
https://localhost:8443/and click Change Password. -
Click Configure > Mappings.
This tab shows two configured mappings, one from the
ldapserver to the OpenIDM repository (managed/user) and one from the OpenIDM repository to theldapserver. -
Click anywhere on the first mapping and click Reconcile Now.
The reconciliation operation creates the two users from the LDAP server in the OpenIDM repository.
-
Retrieve the users in the repository. Click Manage > User.
-
You should see two users from the LDAP server, reconciled to the OpenIDM repository.
-
To retrieve the details of a specific user, click that username in the User List page.
-
Add a new user in the OpenIDM repository by clicking New User in the User List page.
Complete the user details and click Save.
-
By default, implicit synchronization is enabled for mappings from the
managed/userrepository to any external resource. This means that when you update a managed object, any mappings defined in thesync.jsonfile that have the managed object as the source are automatically executed to update the target system. For more information, see "Mapping Source Objects to Target Objects" in the Integrator’s Guide.To test that the implicit synchronization has been successful, look at `fdoe’s record, and click the Linked Systems tab. The information under this tab includes the external resource to which this user entry is mapped.
Sample 2c - Synchronizing LDAP Group Membership
Like sample 2b, sample 2c connects to an external LDAP server and has mappings from the LDAP server to the OpenIDM repository, and from the OpenIDM repository to the LDAP server. However, in sample 2c, LDAP group memberships are synchronized, in addition to user entries.
As demonstrated for sample 2, you can use OpenDJ as an LDAP server. The LDIF data for this sample is provided in the file openidm/samples/sample2c/data/Example.ldif.
External LDAP Configuration
Configure the LDAP server as for sample 2, "LDAP Server Configuration". The LDAP user must have write access to create users from OpenIDM on the LDAP server. When you configure the LDAP server, import the LDIF file customized for this sample, openidm/samples/sample2c/data/Example.ldif. This file includes two LDAP groups:
dn: ou=Groups,dc=example,dc=com
ou: Groups
objectClass: organizationalUnit
objectClass: top

dn: cn=openidm,ou=Groups,dc=example,dc=com
uniqueMember: uid=jdoe,ou=People,dc=example,dc=com
cn: openidm
objectClass: groupOfUniqueNames
objectClass: top

dn: cn=openidm2,ou=Groups,dc=example,dc=com
uniqueMember: uid=bjensen,ou=People,dc=example,dc=com
cn: openidm2
objectClass: groupOfUniqueNames
objectClass: top
The users with DNs uid=jdoe,ou=People,dc=example,dc=com and uid=bjensen,ou=People,dc=example,dc=com are also imported with the Example.ldif file.
Install the Sample
Prepare OpenIDM as described in "Preparing OpenIDM", then start OpenIDM with the configuration for sample 2c.
$ cd /path/to/openidm
$ ./startup.sh -p samples/sample2c
Run the Sample
The mapping configuration file (sync.json) for this sample includes two mappings, systemLdapAccounts_managedUser, which synchronizes users from the source LDAP server with the target OpenIDM repository, and managedUser_systemLdapAccounts, which synchronizes changes from the OpenIDM repository to the LDAP server.
You can run this part of the sample by using the curl command-line utility, or by using the OpenIDM Administration UI. This section provides instructions for both methods.
-
Reconcile the repository over the REST interface by running the following command:
$ curl \
 --header "X-OpenIDM-Username: openidm-admin" \
 --header "X-OpenIDM-Password: openidm-admin" \
 --request POST \
 "http://localhost:8080/openidm/recon?_action=recon&mapping=systemLdapAccounts_managedUser&waitForCompletion=true"
{
  "_id": "6652c292-5309-40e5-b272-b74d67dd95c9-4",
  "state": "SUCCESS"
}
The reconciliation operation returns a reconciliation run ID and the status of the operation. Reconciliation creates user objects from LDAP in the OpenIDM repository, assigning the new objects random unique IDs.
-
To retrieve the users from the repository, query their IDs as follows:
$ curl \ --header "X-OpenIDM-Username: openidm-admin" \ --header "X-OpenIDM-Password: openidm-admin" \ --request GET \ "http://localhost:8080/openidm/managed/user?_queryId=query-all-ids" { "result": [ { "_id": "b63fb9a7-99bc-4eb4-8bfd-15f14a756e5b", "_rev": "1" }, { "_id": "8462fe0c-2ab2-459a-a25e-474474889c9e", "_rev": "1" } ], ... } -
To retrieve individual user objects, include the ID in the URL. The following request retrieves the user object for John Doe:
$ curl \
 --header "X-OpenIDM-Username: openidm-admin" \
 --header "X-OpenIDM-Password: openidm-admin" \
 --request GET \
 "http://localhost:8080/openidm/managed/user/8462fe0c-2ab2-459a-a25e-474474889c9e"
{
  "_id": "8462fe0c-2ab2-459a-a25e-474474889c9e",
  "_rev": "1",
  "displayName": "John Doe",
  "description": "Created for OpenIDM",
  "givenName": "John",
  "mail": "jdoe@example.com",
  "telephoneNumber": "1-415-599-1100",
  "sn": "Doe",
  "userName": "jdoe",
  "ldapGroups": [
    "cn=openidm,ou=Groups,dc=example,dc=com"
  ],
  "accountStatus": "active",
  "effectiveRoles": [],
  "effectiveAssignments": []
}
Note that John Doe’s user object contains an
ldapGroupsproperty, the value of which indicates his groups on the LDAP server:"ldapGroups":["cn=openidm,ou=Groups,dc=example,dc=com"] -
Update John Doe’s
ldapGroupsproperty, to change his membership from theopenidmgroup to theopenidm2group.$ curl \ --header "X-OpenIDM-Username: openidm-admin" \ --header "X-OpenIDM-Password: openidm-admin" \ --header "Content-Type: application/json" \ --request POST \ --data '[ { "operation":"replace", "field":"/ldapGroups", "value": ["cn=openidm2,ou=Groups,dc=example,dc=com"] } ]' \ "http://localhost:8080/openidm/managed/user?_action=patch&_queryId=for-userName&uid=jdoe" { "displayName": "John Doe", "description": "Created for OpenIDM", "givenName": "John", "mail": "jdoe@example.com", "telephoneNumber": "1-415-599-1100", "sn": "Doe", "userName": "jdoe", "accountStatus": "active", "effectiveRoles": [], "effectiveAssignments": [], "_id": "8462fe0c-2ab2-459a-a25e-474474889c9e", "_rev": "2", "ldapGroups": [ "cn=openidm2,ou=Groups,dc=example,dc=com" ] }This command changes John Doe’s
ldapGroupsproperty in the OpenIDM repository, from"cn=openidm,ou=Groups,dc=example,dc=com"to"cn=openidm2,ou=Groups,dc=example,dc=com". As a result of implicit synchronization, the change is propagated to the LDAP server. John Doe is removed from the first LDAP group and added to the second LDAP group in OpenDJ. -
You can verify this change by querying John Doe’s record on the LDAP server, as follows:
$ curl \
 --header "X-OpenIDM-Username: openidm-admin" \
 --header "X-OpenIDM-Password: openidm-admin" \
 --request GET \
 "http://localhost:8080/openidm/system/ldap/account/uid=jdoe,ou=People,dc=example,dc=com"
{
  "_id": "uid=jdoe,ou=People,dc=example,dc=com",
  "telephoneNumber": "1-415-599-1100",
  "description": "Created for OpenIDM",
  "sn": "Doe",
  "dn": "uid=jdoe,ou=People,dc=example,dc=com",
  "ldapGroups": [
    "cn=openidm2,ou=Groups,dc=example,dc=com"
  ],
  "uid": "jdoe",
  "cn": "John Doe",
  "givenName": "John",
  "mail": "jdoe@example.com"
}
-
Log in to the Admin UI at the URL
https://localhost:8443/adminas the default administrative user (openidm-admin) with passwordopenidm-admin.To protect your deployment in production, change the default administrative password. To do so, navigate to the Self-Service UI at
https://localhost:8443/and click Change Password. -
Click Configure > Mappings.
This window shows two configured mappings, one from the
ldapserver to the OpenIDM repository (managed/user) and one from the OpenIDM repository to theldapserver. -
Click anywhere on the first mapping and click Reconcile Now.
The reconciliation operation creates the two users from the LDAP server in the OpenIDM repository.
-
Click Manage > User. Examine the users reconciled from the LDAP server to the internal repository.
-
Examine the two users from the LDAP server that have been reconciled to the OpenIDM repository.
-
To retrieve the details of a specific user, click that username. In this case, click on user
jdoe.Examine the information stored for user
jdoe. Click the Linked Systems tab. The Linked Resource item indicates the external resource on which John Doe’s managed object is mapped, in this case,ldap account.In this linked resource, John Doe’s
ldapGroupsare displayed. Currently, John Doe is a member ofcn=openidm,ou=Groups,dc=example,dc=com. -
Update John Doe’s
ldapGroupsproperty to change his membership from theopenidmgroup to theopenidm2group. Currently, you can only do this over the REST interface, as follows:$ curl \ --header "X-OpenIDM-Username: openidm-admin" \ --header "X-OpenIDM-Password: openidm-admin" \ --header "Content-Type: application/json" \ --request POST \ --data '[ { "operation":"replace", "field":"/ldapGroups", "value": ["cn=openidm2,ou=Groups,dc=example,dc=com"] } ]' \ "http://localhost:8080/openidm/managed/user?_action=patch&_queryId=for-userName&uid=jdoe" { "displayName": "John Doe", "description": "Created for OpenIDM", "givenName": "John", "mail": "jdoe@example.com", "telephoneNumber": "1-415-599-1100", "sn": "Doe", "userName": "jdoe", "accountStatus": "active", "effectiveRoles": [], "effectiveAssignments": [], "_id": "8462fe0c-2ab2-459a-a25e-474474889c9e", "_rev": "2", "ldapGroups": [ "cn=openidm2,ou=Groups,dc=example,dc=com" ] }This command changes John Doe’s
ldapGroupsproperty in the OpenIDM repository, from"cn=openidm,ou=Groups,dc=example,dc=com"to"cn=openidm2,ou=Groups,dc=example,dc=com". As a result of implicit synchronization, the change is propagated to the LDAP server. John Doe is removed from the first LDAP group and added to the second LDAP group in OpenDJ. -
You can verify this change by reloading John Doe’s user information, clicking Linked Systems, and examining the value of his
ldapGroupsproperty.
Sample 2d - Synchronizing LDAP Groups
Sample 2d also connects to an external LDAP server. This sample focuses on LDAP Group synchronization.
As demonstrated for sample 2, you can use OpenDJ as an LDAP server. Before installing OpenDJ, you may need an LDIF file. The OpenIDM installation includes the following LDIF file, customized for this sample: openidm/samples/sample2d/data/Example.ldif. If you need a copy of this file, download and install OpenIDM as described in "To Install OpenIDM Services" in the Installation Guide.
External LDAP Configuration
Configure the LDAP server as for sample 2, "LDAP Server Configuration". The LDAP user must have write access to create users from OpenIDM on the LDAP server.
In addition, two LDAP Groups should be created, as found in the following LDIF file: openidm/samples/sample2d/data/Example.ldif (if they have not already been added through sample 2c):
dn: ou=Groups,dc=example,dc=com
ou: Groups
objectClass: organizationalUnit
objectClass: top

dn: cn=openidm,ou=Groups,dc=example,dc=com
uniqueMember: uid=jdoe,ou=People,dc=example,dc=com
cn: openidm
objectClass: groupOfUniqueNames
objectClass: top

dn: cn=openidm2,ou=Groups,dc=example,dc=com
uniqueMember: uid=bjensen,ou=People,dc=example,dc=com
cn: openidm2
objectClass: groupOfUniqueNames
objectClass: top
The user with dn uid=jdoe,ou=People,dc=example,dc=com is also imported with the Example.ldif file.
There is an additional user, bjensen in the sample LDIF file. This user is essentially a "dummy" user, provided for compliance with RFC 4519, which stipulates that every groupOfUniqueNames object must contain at least one uniqueMember. bjensen is not actually used in this sample.
Install the Sample
Prepare OpenIDM as described in "Preparing OpenIDM", then start OpenIDM with the configuration for sample 2d.
$ cd /path/to/openidm
$ ./startup.sh -p samples/sample2d
Running the Sample
The mapping configuration file (sync.json) for this sample includes three mappings:
-
systemLdapAccounts_managedUserSynchronizes users from the source LDAP server with the target OpenIDM repository,
-
managedUser_systemLdapAccountsSynchronizes changes from the OpenIDM repository to the LDAP server.
-
systemLdapGroups_managedGroupSynchronizes groups from the source LDAP server with the target OpenIDM repository.
Due to the similarity with other OpenIDM samples, especially samples 2b and 2c, the focus of this sample is on the mapping unique to this sample, systemLdapGroups_managedGroup.
You can run this part of the sample by using the curl command-line utility, or by using the OpenIDM Administration UI. This section provides instructions for both methods.
-
Reconcile the repository over the REST interface for the group mapping,
systemLdapGroups_managedGroupby running the following command:$ curl \ --header "X-OpenIDM-Username: openidm-admin" \ --header "X-OpenIDM-Password: openidm-admin" \ --request POST \ "http://localhost:8080/openidm/recon?_action=recon&mapping=systemLdapGroups_managedGroup&waitForCompletion=true"The reconciliation operation returns a reconciliation run ID, and the status of the operation.
-
With the configuration of sample 2d, OpenIDM creates group objects from LDAP in OpenIDM. To list group objects by ID, run a query over the REST interface.
$  curl \
 --header "X-OpenIDM-Username: openidm-admin" \
 --header "X-OpenIDM-Password: openidm-admin" \
 --request GET \
 "http://localhost:8080/openidm/managed/group?_queryFilter=true"
The resulting JSON object should include content similar to the following.
{
   "result" : [ {
      "dn" : "cn=openidm,ou=Groups,dc=example,dc=com",
      "_id" : "837df489-35d6-48d1-81a5-23792b49838a",
      "_rev" : "1",
      "description" : [ ],
      "uniqueMember" : [ "uid=jdoe,ou=People,dc=example,dc=com" ],
      "name" : [ "openidm" ]
   }, {
      "dn" : "cn=openidm2,ou=Groups,dc=example,dc=com",
      "_id" : "7575c1c7-86cf-43bc-bf1d-5c9cfc539124",
      "_rev" : "1",
      "description" : [ ],
      "uniqueMember" : [ "uid=bjensen,ou=People,dc=example,dc=com" ],
      "name" : [ "openidm2" ]
   } ],
...
 }
-
Log in to the Admin UI at the URL
https://localhost:8443/adminas the default administrative user (openidm-admin) with passwordopenidm-admin.To protect your deployment in production, change the default administrative password. To do so, navigate to the Self-Service UI at
https://localhost:8443/and click Change Password. -
Click Configure > Mappings.
This page shows three configured mappings, from the
ldapserver accounts repository to the OpenIDM repository (managed/user), from the OpenIDM repository back to theldapserver, and from theldapserver group accounts repository to the OpenIDMmanaged/grouprepository. -
Click anywhere on the third mapping and click Reconcile Now.
The reconciliation operation creates the two groups from the LDAP server in the OpenIDM repository.
-
Retrieve the groups in the repository by clicking the Association tab below the mapping. Scroll down to Data Association Management.
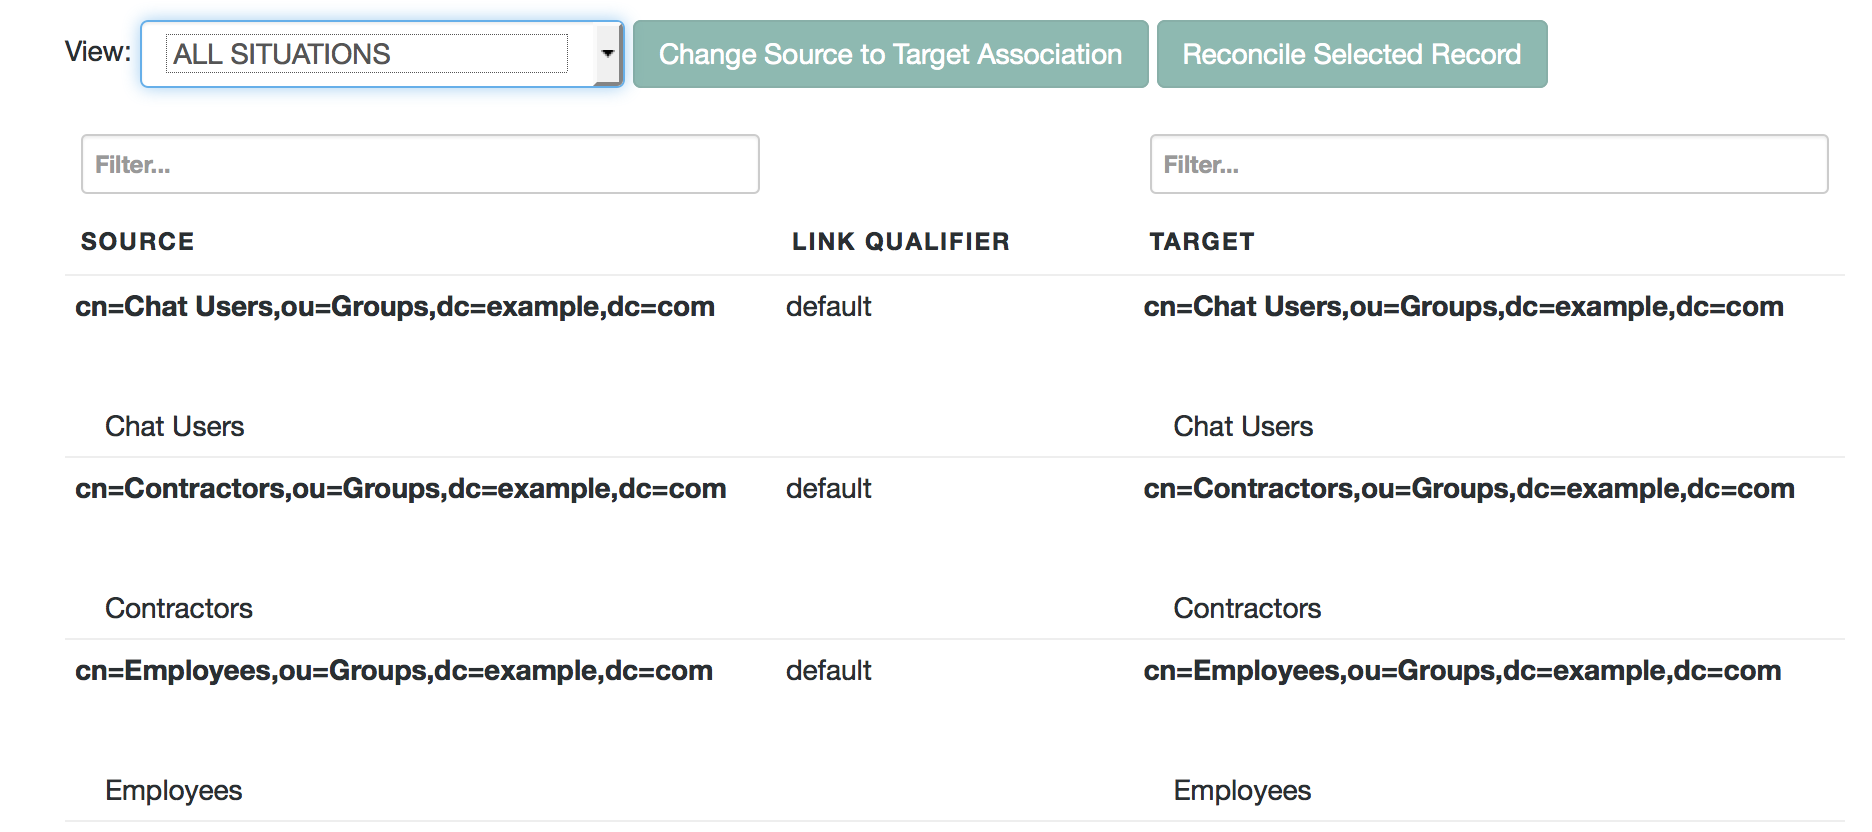
The three groups from the LDAP server (source) have been reconciled to the OpenIDM repository (target).
Sample 5 - Synchronization of Two LDAP Resources
Sample 5 demonstrates the flow of data from one external resource to another. The resources are named LDAP and AD but in the sample, both resources are simulated with XML files.
You can optionally configure an outbound email service, if you want to receive emailed reconciliation summaries, as described in the following section.
Configure Email for the Sample
If you do not configure the email service, the functionality of the sample does not change. However, you might see the following message in the OSGi console when you run a reconciliation operation:
Email service not configured; report not generated.To configure OpenIDM to send a reconciliation summary by email, follow these steps:
-
Copy the template
external.email.jsonfile from thesamples/miscdirectory to theconfdirectory of Sample 5:$ cd /path/to/openidm $ cp samples/misc/external.email.json samples/sample5/conf -
Edit the
external.email.jsonfile for outbound email, as described in "Sending Email" in the Integrator’s Guide. -
Edit the
reconStats.jsfile from thesample5/scriptdirectory. Near the start of the file, configure the OpenIDM email service to send statistics to the email addresses of your choice:var email = { //UPDATE THESE VALUES from : "openidm@example.com", to : "youremail@example.com", cc : "idmadmin2@example.com,idmadmin3@example.com", subject : "Recon stats for " + global.mappingName, type : "text/html" }, template, ...
Install the Sample
No external configuration is required for this sample. Prepare OpenIDM as described in "Preparing OpenIDM", then start OpenIDM with the configuration of sample 5.
$ cd /path/to/openidm
$ ./startup.sh -p samples/sample5
The XML files that simulate the resources are located in the openidm/samples/sample5/data/ folder. When you start OpenIDM with the sample 5 configuration, OpenIDM creates the xml_AD_Data.xml file, which does not contain users until you run reconciliation.
Run the Sample
Run a reconciliation operation, to synchronize the contents of the simulated LDAP resource to the OpenIDM repository.
$ curl \
 --header "X-OpenIDM-Username: openidm-admin" \
 --header "X-OpenIDM-Password: openidm-admin" \
 --request POST \
 "http://localhost:8080/openidm/recon?_action=recon&mapping=systemLdapAccounts_managedUser&waitForCompletion=true"
This command creates a user in the repository. It is not necessary to run a second reconciliation operation to synchronize the AD resource. Automatic synchronization propagates any change made to managed users in the OpenIDM repository to the simulated AD resource.
Review the contents of xml_AD_Data.xml. It should now contain information for the same user that was present in the startup version of the xml_LDAP_Data.xml file.
Alternatively, you can list users in the AD resource with the following command:
$ curl \
 --header "X-OpenIDM-Username: openidm-admin" \
 --header "X-OpenIDM-Password: openidm-admin" \
 --request GET \
 "http://localhost:8080/openidm/system/ad/account?_queryId=query-all-ids"

   {
  "result" : [ {
    "name" : "DDOE1",
    "__UID__" : "8dad9df3-820d-41ea-a3ab-a80c241bbc98",
    "_id" : "8dad9df3-820d-41ea-a3ab-a80c241bbc98"
  } ],
...
}
You can use the _id of the user to read the user information from the AD resource, for example:
$ curl \
 --header "X-OpenIDM-Username: openidm-admin" \
 --header "X-OpenIDM-Password: openidm-admin" \
 --request GET \
 "http://localhost:8080/openidm/system/ad/account/8dad9df3-820d-41ea-a3ab-a80c241bbc98"
{
  "email" : [ "mail1@example.com" ],
  "name" : "DDOE1",
  "__UID__" : "8dad9df3-820d-41ea-a3ab-a80c241bbc98",
  "firstname" : "Darth",
  "lastname" : "Doe",
  "_id" : "8dad9df3-820d-41ea-a3ab-a80c241bbc98"
}[
To verify that the sample is working, repeat the process. Set up a second user in the xml_LDAP_Data.xml file. An example of how that file might appear with a second user (GDOE1) is shown here:
<?xml version="1.0" encoding="UTF-8"?>
<icf:OpenICFContainer
    xmlns:icf="http://openidm.forgerock.com/xml/ns/public/resource/openicf/resource-schema-1.xsd"
    xmlns:ri="http://openidm.forgerock.com/xml/ns/public/resource/instances/resource-schema-extension"
    xmlns:xsi="http://www.w3.org/2001/XMLSchema-instance"
    xsi:schemaLocation="http://openidm.forgerock.com/xml/ns/public/resource/instances/resource-schema-extension
    /path/to/openidm/samples/sample5/data/resource-schema-extension.xsd
    http://openidm.forgerock.com/xml/ns/public/resource/openicf/resource-schema-1.xsd
    /path/to/openidm/samples/sample5/data/resource-schema-1.xsd">
    <ri:__ACCOUNT__>
       <icf:__UID__>1</icf:__UID__>
       <icf:__PASSWORD__>TestPassw0rd2</icf:__PASSWORD__>
       <ri:firstname>Darth</ri:firstname>
       <icf:__DESCRIPTION__>Created By XML1</icf:__DESCRIPTION__>
       <icf:__NAME__>DDOE1</icf:__NAME__>
       <ri:email>mail1@example.com</ri:email>
       <ri:lastname>Doe</ri:lastname>
    </ri:__ACCOUNT__>
    <ri:__ACCOUNT__>
       <icf:__UID__>2</icf:__UID__>
       <icf:__PASSWORD__>TestPassw0rd2</icf:__PASSWORD__>
       <ri:firstname>Garth</ri:firstname>
       <icf:__DESCRIPTION__>Created By XML1</icf:__DESCRIPTION__>
       <icf:__NAME__>GDOE1</icf:__NAME__>
       <ri:email>mail2@example.com</ri:email>
       <ri:lastname>Doe</ri:lastname>
    </ri:__ACCOUNT__>
</icf:OpenICFContainer>
Rerun the reconciliation and query REST commands shown previously. The reconciliation operation creates the new user from the simulated LDAP resource in the OpenIDM repository. An implicit synchronization operation then creates that user in the AD resource.
Sample 5b - Failure Compensation With Multiple Resources
The compensated synchronization mechanism depicted in this sample can help manage the risks associated with synchronizing data across multiple resources.
Typically, when a managed/user object is changed, implicit synchronization replays that change to all configured external resources. If synchronization fails for one target resource (for example, due to a policy validation failure on the target, or the target being unavailable), the synchronization operation stops at that point. The effect is that a record might be changed in the repository, and in the targets on which synchronization was successful, but not on the failed target, or any targets that would have been synchronized after the failure. This situation can result in disparate data sets across resources. While a reconciliation operation would eventually bring all targets back in sync, reconciliation can be an expensive operation with large data sets.
The compensated synchronization mechanism ensures that either all resources are synchronized successfully, or that the original change is rolled back. This mechanism uses an onSync script hook configured with a compensate.js script that can be used to "revert" the partial change to managed/user and to the corresponding external resources.
Sample 5b is similar to sample 5 in that it simulates two external resources with XML files (located in the sample5b/data directory). The xml_LDAP_Data.xml file simulates an LDAP data source. OpenIDM creates the xml_AD_Data.xml file when you start OpenIDM with the sample. Sample 5b adds the onSync script hook to the process, configured in the sample5b/conf/managed.json file.
The following excerpt of the managed.json file shows the onSync hook, which calls the compensate.js script, provided in the /path/to/openidm/bin/defaults/script directory.
...
},
"onSync" : {
   "type" : "text/javascript",
   "file" : "compensate.js"
},
You can use the onSync script hook to ensure that changes made in the repository are synchronized to all external resources, or that no changes are made. For more information about how implicit synchronization uses the onSync script hook, see "Configuring Synchronization Failure Compensation" in the Integrator’s Guide.
You can optionally configure an outbound email service for this sample, if you want to receive emailed reconciliation summaries. The email service configuration is identical to that of sample 5 ("Configure Email for the Sample").
Install the Sample
No external configuration is required for this sample. Prepare OpenIDM as described in "Preparing OpenIDM", then start OpenIDM with the configuration of sample 5b.
$ cd /path/to/openidm
$ ./startup.sh -p samples/sample5b
The XML files that simulate an external LDAP and AD resource are now located in the openidm/samples/sample5b/data/ directory. The simulated AD data store file, xml_AD_Data.xml, does not contain users until you run reconciliation.
Run the sample in exactly the same way that you did for Sample 5, following the steps in "Run the Sample". Those steps will reconcile a user to your internal managed user repository.
Unless you run the steps in "Run the Sample", you will not be able to run the steps in the next section.
Demonstrate onSync
To demonstrate integration of the samples with the OpenIDM UI, this sample uses the UI to view and make changes to user objects in the repository. However, you can also use the REST interface to make these changes, as shown in the previous section.
Log into the OpenIDM UI as the administrative user. On a local system, navigate to https://localhost:8443/admin. The default administrative account and password are both openidm-admin.
Select Manage > User. Make a change to the data of an existing user (DDOE1). As a result of the implicit synchronization from the managed object repository, that change is reflected almost immediately on the external resources. For sample 5b, you should see the changes in both XML files in the sample5b/data directory. Alternatively, you can query the external resources over REST, as described previously.
The synchronization is successful, across all configured external resources, so the updated user record can be seen in both the xml_LDAP_Data.xml and xml_AD_Data.xml files.
The next step is to simulate a problem connecting to the LDAP resource. One way to do so on the local system is to rename the LDAP data file so that it is unreadable. On a Linux system, the following command, as an administrative user, would serve that purpose:
$ cd /path/to/openidm/samples/sample5b/data
$ sudo mv xml_LDAP_Data.xml xml_LDAP_Data.xml.bak
In the UI, now try another update to user DDOE1. With the modified filename of the simulated LDAP resource, implicit synchronization cannot write to this resource. An error similar to the following is displayed in the log file, openidm0.log.0:
Data file does not exist:
/path/to/openidm/samples/sample5b/data/xml_LDAP_Data.xml
Although the AD resource is available, implicit synchronization will not reach this resource, because the mapping is specified after the managed/user to LDAP mapping in the sync.json file.
When the implicit synchronization operation fails for the LDAP resource, the onSync hook invokes the compensate.js script. This script attempts to revert the original change by performing another update to DDOE1 in the repository (managed/user). This change, in turn, triggers another automatic synchronization to the AD and LDAP resources.
Because the LDAP resource is still unreadable, the synchronization to LDAP fails again, which triggers the compensate.js script again. This time, however, the script recognizes that the change was originally called as a result of a compensation and aborts.
The original synchronization error from the first update is thrown from the script and the UI should display that error. If you refresh the UI, and view that user entry again, you will notice that the change to the entry has been reverted.
Note that if you change the name of the AD resource file (to make it unavailable), a change to a managed/user entry will be synchronized successfully with the LDAP resource (because that mapping appears first in sync.json). The synchronization will fail for the AD resource. In this case, the change will be reverted on both the managed/user entry, and the LDAP resource.
Sample 6 - LiveSync With an AD Server
Sample 6 resembles sample 5, but demonstrates LiveSync from an external resource. Sample 6 includes configuration files for two scenarios, depending on whether you have a live Active Directory (AD) service, or whether you need to simulate an AD service with an OpenDJ server. Each scenario is associated with a file in the sample6/alternatives directory. Depending on your scenario, copy the corresponding file to the sample6/conf directory.
- Active AD Deployment
-
If you have an actual AD deployment available, copy the
provisioner.openicf-realad.jsonfile to theconf/subdirectory. You can then configure synchronization between an OpenDJ Directory Server and an active AD deployment.As this sample demonstrates synchronization from the AD server to OpenDJ, data on the AD server is not changed.
- Simulated AD Deployment
-
If you need to simulate an AD deployment, copy the
provisioner.openicf-fakead.jsonfile to theconf/subdirectory. You can then configure synchronization between an OpenDJ Directory server and a simulated AD server.This sample simulates an AD server on the same instance of OpenDJ, using a different base DN.
The options shown in the associated configuration files can be easily modified to work with any standard LDAP server.
Sample 6 with an Active AD Deployment
If you have an existing, active instance of AD, set up OpenDJ, as described in the OpenDJ Installation Guide.
During installation, populate OpenDJ with the data in the Example.ldif file, available in the sample6/data directory.
The actions run in this sample should not change any data on the AD server.
Sample 6 with a Simulated AD Deployment
In this sample, an AD deployment is simulated with a different baseDN (dc=fakead,dc=com) on the same OpenDJ server instance. You can also simulate the AD server with a separate OpenDJ instance, running on the same host, as long as the two instances communicate on different ports. The data for the simulated AD instance is contained in the file AD.ldif. The data for the OpenDJ instance is contained in the file Example.ldif.
External Configuration
Prepare OpenDJ For LiveSync
This sample assumes a replicated OpenDJ server on the localhost system. When configured, OpenDJ replication includes an External Change Log (ECL), required to support LiveSync. LiveSync detects changes in OpenDJ by reading the ECL.
Follow these steps to install and configure an OpenDJ instance.
-
Download and extract the OpenDJ zip archive from the GitHub.
-
Install OpenDJ using the command-line setup, and import the data file for this sample, as follows:
$ cd /path/to/opendj
$ ./setup --cli \
--hostname localhost \
--ldapPort 1389 \
--rootUserDN "cn=Directory Manager" \
--rootUserPassword password \
--adminConnectorPort 4444 \
--baseDN dc=com \
--ldifFile /path/to/openidm/samples/sample6/data/Example.ldif \
--acceptLicense \
--no-prompt
...
Configuring Directory Server ..... Done.
Creating Base Entry dc=com ..... Done.
Starting Directory Server ....... Done.
...
The sample assumes the following configuration:
-
The OpenDJ server is installed on the localhost.
-
The server listens for LDAP connections on port 1389.
-
The administration connector port is 4444.
-
The root user DN is
cn=Directory Manager. -
The root user password is
password.
-
-
Configure the OpenDJ server for replication.
To enable liveSync, this server must be configured for replication, even if it does not actually participate in a replication topology. The following commands configure the server for replication.
$ ./dsconfig create-replication-server \
 --hostname localhost \
 --port 4444 \
 --bindDN "cn=Directory Manager" \
 --bindPassword password \
 --provider-name "Multimaster Synchronization" \
 --set replication-port:8989 \
 --set replication-server-id:2 \
 --type generic \
 --trustAll \
 --no-prompt

 $ ./dsconfig create-replication-domain \
 --hostname localhost \
 --port 4444 \
 --bindDN "cn=Directory Manager" \
 --bindPassword password \
 --provider-name "Multimaster Synchronization" \
 --domain-name fakead_com \
 --set base-dn:dc=fakead,dc=com \
 --set replication-server:localhost:8989 \
 --set server-id:3 \
 --type generic \
 --trustAll \
 --no-prompt
Once OpenDJ is configured, you can proceed with either an active or simulated AD deployment.
External Configuration for an Active AD Deployment
To configure an active AD deployment for sample 6, open the provisioner.openicf-realad.json file in a text editor. Update it as needed. At minimum, you should check and if needed update the following parameters in that file, as shown in the following table:
| Option | Description |
|---|---|
host |
The hostname/IP address of the AD server |
port |
The LDAP port; the default is 389. |
ssl |
By default, SSL is not used. |
principal |
The full DN of the account to bind with, such as "CN=Administrator,CN=Users,DC=example,DC=com" |
credentials |
If a password is used, replace null with that password. When OpenIDM starts, it encrypts that password in the |
baseContexts |
The DNs for account containers, such as ["CN=Users,DC=Example,DC=com"] |
baseContextsToSynchronize |
Set to the same value as |
accountSearchFilter |
Default searches for active user (not computer) accounts |
accountSynchronizationFilter |
Default synchronizes with active user (not computer) accounts |
If you do not want to filter out computer and disabled user accounts, set the accountSearchFilter and accountSynchronizationFilter to null.
External Configuration for a Simulated AD Deployment
Not everyone has a testable instance of AD readily available. For such administrators, you can use the AD.ldif file from the data/ subdirectory to simulate an AD deployment.
If you have not already done so, copy the provisioner.openicf-fakead.json file to the conf subdirectory.
As previously mentioned, you can use a separate OpenDJ instance to simulate the AD server. However, the following instructions assume that the simulated AD server runs on the same OpenDJ instance.
Open the provisioner.openicf-fakead.json file and note the following:
-
OpenDJ directory server uses port 1389 by default for users who cannot use privileged ports, so this is the port that is specified in the provisioner file. Adjust the port if your OpenDJ server is listening on a different port.
-
The simulated AD server uses the base DN
dc=fakead,dc=com.
To load the data for the simulated AD instance, launch the OpenDJ control panel, add the simulated AD baseDN (dc=fakead,dc=com), and then import the sample6/data/AD.ldif file. When you import the AD.ldif file, select "Append to Existing Data", not "Overwrite Existing Data". Otherwise, the data in the dc=example,dc=com baseDN will be overwritten.
Alternatively, you could run the following command:
$  cd /path/to/opendj/bin
$ ./ldapmodify \
--defaultAdd \
--bindDN "cn=Directory Manager" \
--bindPassword password \
--hostname localhost \
--port 1389 \
--filename /path/to/openidm/samples/sample6/data/AD.ldif
Start OpenIDM with Sample 6
Now that OpenDJ and a real or simulated AD database is configured, prepare OpenIDM as described in "Preparing OpenIDM". You can then start OpenIDM with the configuration for sample 6.
$ cd /path/to/openidm
$ ./startup.sh -p samples/sample6
Run the Sample
The following sections show how to run the sample with command-based reconciliation with a REST call, and to configure scheduled reconciliation with LiveSync.
Using Reconciliation
Now that OpenIDM is in operation, review the entries in the OpenDJ data store. When you run reconciliation, any entries that share the same uid with the AD data store will be updated with the contents from AD.
If you have set up the simulated AD data store as described in "External Configuration for a Simulated AD Deployment", compare the entries for uid=jdoe as shown in the AD.ldif and Example.ldif files. Note the different values of givenName for uid=jdoe.
Run reconciliation over the REST interface. If you have followed the instructions for the simulated AD data store, the following command takes the information for user jdoe imported from the AD.ldif file, with a givenName of Johnny, and synchronizes that information to the LDAP database, overwriting the givenName of John for that same user jdoe.
$ curl \
 --header "X-OpenIDM-Username: openidm-admin" \
 --header "X-OpenIDM-Password: openidm-admin" \
 --request POST \
 "http://localhost:8080/openidm/recon?_action=recon&mapping=systemAdAccounts_managedUser&waitForCompletion=true"
The reconciliation operation returns a reconciliation run ID, and the status of the operation.
{
  "state": "SUCCESS",
  "_id": "985ee939-fbe1-4607-a757-00b404b4ef77"
}
The reconciliation operation synchronizes the data in the AD server with the OpenIDM repository (managed/user). That information is then automatically synchronized to the OpenDJ server, as described in "Synchronization Situations and Actions" in the Integrator’s Guide.
After reconciliation, list all users in the OpenDJ server data store.
$ curl \
 --header "X-OpenIDM-Username: openidm-admin" \
 --header "X-OpenIDM-Password: openidm-admin" \
 --request GET \
 "http://localhost:8080/openidm/system/ldap/account?_queryId=query-all-ids"
The result should resemble the following JSON object.
{
  "result": [ {
     "dn" : "uid=jdoe,ou=People,dc=example,dc=com",
     "_id" : "uid=jdoe,ou=People,dc=example,dc=com"
     }, {
     "dn" : "uid=bjensen,ou=People,dc=example,dc=com",
     "_id" : "uid=bjensen,ou=People,dc=example,dc=com"
    } ],
...
}
You see only two entries, as the uid=jdoe entry from dc=fakead,dc=com overwrites the original LDAP entry for uid=jdoe in the reconciled LDAP data store.
To read the user object in the OpenDJ server, run the ldapsearch command. The following example returns the entry for user uid=jdoe:
$ ./ldapsearch \
 --port 1389 \
 --baseDN dc=example,dc=com \
 "(uid=jdoe)"
Using LiveSync
You can trigger a reconciliation operation by configuring a schedule, or by launching the operation directly over the REST interface. You can also launch a LiveSync operation over REST, but LiveSync requires a configured schedule to poll for changes. When this sample’s default LiveSync schedule (schedule-activeSynchroniser_systemAdAccount.json) is enabled, a LiveSync operation is launched every 15 seconds.
LiveSync pushes changes made in the AD data store to the OpenIDM repository, automatically.
The LiveSync schedule is disabled by default. To activate LiveSync, change the value of the "enabled" property from false to true.
{
    "enabled" : false,
    "type" : "cron",
    "schedule" : "0/15 * * * * ?",
    "invokeService" : "provisioner",
    "invokeContext" : {
        "action" : "liveSync",
        "source" : "system/ad/account"
    },
    "invokeLogLevel" : "debug"
}Now you can test LiveSync. This procedure assumes that you have configured OpenDJ using the parameters and commands described in this section.
-
Create an LDIF file with a new user entry (
uid=bsmith) that will be added to the simulated AD data store. -
The following is the contents of a sample
bsmith.ldiffile for demonstration purposes:dn: uid=bsmith,ou=People,dc=fakead,dc=com objectClass: person objectClass: inetOrgPerson objectClass: organizationalPerson objectClass: top givenName: Barry description: Created to see LiveSync work uid: bsmith cn: Barry sn: Smith mail: bsmith@example.com telephoneNumber: 1-415-523-0772 userPassword: passw0rd -
Navigate to the
/path/to/opendj/bindirectory. -
Use the
ldapmodifycommand to add thebsmith.ldiffile to the directory.$ ./ldapmodify \ --port 1389 \ --defaultAdd \ --bindDN "cn=Directory Manager" \ --bindPassword password \ --filename /path/to/bsmith.ldif -
Now you can test synchronization by viewing the new user in the OpenIDM repository. The easiest way to do this, is through OpenIDM UI. You should be able to log into the UI with any of the accounts in the AD data store. For this example, log into the UI as user
bsmith, with passwordpassw0rd. The fact that you can log into the UI as this new user indicates that LiveSync has synchronized the user from the AD data store to the managed/user repository. -
Implicit synchronization pushes this change out to the OpenDJ data store. To test this synchronization operation, search the OpenDJ baseDN for the new user entry.
$ ./ldapsearch \
 --port 1389 \
 --baseDN ou=people,dc=example,dc=com \
 "(uid=bsmith)"
Linking Historical Accounts
This sample demonstrates the retention of inactive (historical) LDAP accounts that have been linked to a corresponding managed user account. The sample builds on sample 2b and uses the LDAP connector to connect to an OpenDJ instance. You can use any LDAP-v3 compliant directory server.
In this sample, OpenIDM is the source resource. Managed users in the OpenIDM repository maintain a list of the accounts that they have been linked to on the local LDAP server. This list is stored in the historicalAccounts field of the managed user entry. The list contains a reference to all past and current LDAP accounts. Each LDAP account in the list is represented as a relationship and includes information about the date the accounts were linked or unlinked, and whether the account is currently active. For more information about relationship objects, see "Managing Relationships Between Objects" in the Integrator’s Guide.
This sample includes the following custom scripts, in its script directory:
-
onLink-managedUser_systemLdapAccounts.jsWhen a managed user object is linked to a target LDAP object, this script creates the relationship entry in the managed user’s
historicalAccountsproperty. The script adds two relationship properties:-
linkDate— specifies the date that the link was created. -
active— boolean true/false. When set to true, this property indicates that the target object is currently linked to the managed user account.
-
-
onUnlink-managedUser_systemLdapAccounts.jsWhen a managed user object is unlinked from a target LDAP object, this script updates that relationship entry’s properties with an
unlinkDatethat specifies when the target was unlinked, and sets theactiveproperty to false, indicating that the target object is no longer linked. -
check_account_state_change.jsDuring LiveSync or reconciliation, this script checks if the LDAP account state has changed. If the state has changed, the script updates the historical account properties to indicate the new state (enabled or disabled), and the date that the state was changed. This date can only be approximated and is set to the time that the change was detected by the script.
-
ldapBackCorrelationQuery.jsThis script correlates entries in the LDAP directory with managed user identities in OpenIDM.
Configuring the LDAP Server
This sample expects the configuration for the external LDAP server to be the same as described in "LDAP Server Configuration".
The following steps provide setup instructions for an OpenDJ server. Adjust these instructions if you are using an alternative LDAP server.
The LDIF data for this sample is provided in the file openidm/samples/historicalaccountlinking/data/Example.ldif. You will need to import this data during your OpenDJ setup.
Although there is only one LDAP server in this example, you must enable replication on that server, so that the server has an external change log. The change log is required for LiveSync between OpenDJ and OpenIDM.
-
Download OpenDJ from the GitHub and extract the zip archive.
-
Install OpenDJ, using either the UI or the command-line setup.
-
If you use the UI, make sure that you enable replication, and import the Example.ldif file during the installation.
-
If you use the command-line setup, import the Example.ldif file during the setup, then enable replication when the server has started:
$ cd /path/to/opendj
$ ./setup --cli \
--hostname localhost \
--ldapPort 1389 \
--rootUserDN "cn=Directory Manager" \
--rootUserPassword password \
--adminConnectorPort 4444 \
--baseDN dc=com \
--ldifFile /path/to/openidm/samples/historicalaccountlinking/data/Example.ldif \
--acceptLicense \
--no-prompt
...
Configuring Directory Server ..... Done.
Importing LDIF file /path/to/openidm/samples/sample2/data/Example.ldif ...... Done.
Starting Directory Server ...... Done..
...
$ bin/dsconfig create-replication-server \ --hostname localhost \ --port 4444 \ -D "cn=Directory Manager" \ -w password \ --trustAll \ --no-prompt \ --provider-name "Multimaster Synchronization" \ --set replication-port:8989 \ --set replication-server-id:2 \ --type generic $ bin/dsconfig create-replication-domain \ --hostname localhost \ --port 4444 \ -D "cn=Directory Manager" \ -w password \ --trustAll \ --no-prompt \ --provider-name "Multimaster Synchronization" \ --set base-dn:dc=example,dc=com \ --set replication-server:localhost:8989 \ --set server-id:3 \ --type generic \ --domain-name example_com
-
Running the Historical Accounts Sample
This section walks you through each step of the sample to demonstrate how historical accounts are stored.
-
Prepare OpenIDM as described in "Preparing OpenIDM", then start OpenIDM with the configuration for the historical accounts sample:
$ cd /path/to/openidm $ ./startup.sh -p samples/historicalaccountlinking/ Executing ./startup.sh... Using OPENIDM_HOME: /path/to/openidm Using PROJECT_HOME: /path/to/openidm/samples/historicalaccountlinking/ Using OPENIDM_OPTS: -Xmx1024m -Xms1024m Using LOGGING_CONFIG: -Djava.util.logging.config.file= /path/to/openidm/samples/historicalaccountlinking//conf/logging.properties Using boot properties at /path/to/openidm/samples/historicalaccountlinking/conf/boot/boot.properties -> OpenIDM ready -
Create a user, Joe Smith, in OpenIDM.
The following command creates the user over REST, and assigns the user the ID
joesmith:$ curl \ --header "X-OpenIDM-Username: openidm-admin" \ --header "X-OpenIDM-Password: openidm-admin" \ --header "Content-Type: application/json" \ --request POST \ --data '{ "userName": "joe.smith", "givenName": "Joe", "sn" : "Smith", "password" : "Passw0rd", "displayName" : "Joe Smith", "mail" : "joe.smith@example.com", "_id" : "joesmith" }' \ "http://localhost:8080/openidm/managed/user?_action=create" { "_id": "joesmith", "_rev": "1", "userName": "joe.smith", "givenName": "Joe", "sn": "Smith", "displayName": "Joe Smith", "mail": "joe.smith@example.com", "accountStatus": "active", "effectiveRoles": [], "effectiveAssignments": [] } -
Verify that the user Joe Smith was created in OpenDJ.
Because implicit synchronization is enabled by default, any change to the managed/user repository should be propagated to OpenDJ. For more information about implicit synchronization, see "Types of Synchronization" in the Integrator’s Guide.
The following command returns all IDs in OpenDJ and shows that user joesmith was created successfully:
$ curl \
 --header "X-OpenIDM-Username: openidm-admin" \
 --header "X-OpenIDM-Password: openidm-admin" \
 --request GET \
 "http://localhost:8080/openidm/system/ldap/account?_queryId=query-all-ids"
{
  "result": [
    {
      "_id": "uid=jdoe,ou=People,dc=example,dc=com",
      "dn": "uid=jdoe,ou=People,dc=example,dc=com"
    },
    {
      "_id": "uid=bjensen,ou=People,dc=example,dc=com",
      "dn": "uid=bjensen,ou=People,dc=example,dc=com"
    },
    {
      "_id": "uid=joe.smith0,ou=People,dc=example,dc=com",
      "dn": "uid=joe.smith0,ou=People,dc=example,dc=com"
    }
  ],
...
}
Note that Joe Smith’s
uidin OpenDJ is appended with a0. TheonCreatescript, defined in the mapping (sync.json), increments theuideach time a new OpenDJ entry is linked to the same managed user object. -
Verify that the historical account relationship object that corresponds to this linked LDAP account was created in the OpenIDM repository.
The following command returns all of the
historicalAccountsfor user joesmith:$ curl \ --header "X-OpenIDM-Username: openidm-admin" \ --header "X-OpenIDM-Password: openidm-admin" \ --request GET \ "http://localhost:8080/openidm/managed/user/joesmith/historicalAccounts?_queryId=query-all" { "result": [ { "_ref": "system/ldap/account/uid=joe.smith0,ou=People,dc=example,dc=com", "_refProperties": { "stateLastChanged": "Mon Nov 30 2015 14:45:22 GMT-0800 (PST)", "state": "enabled", "active": true, "linkDate": "Mon Nov 30 2015 14:45:22 GMT-0800 (PST)", "_id": "ff6913ce-a252-4dc9-a060-b8b56bb32bf4", "_rev": "1" } } ], ... }At this stage, Joe Smith has only one historical account link — the link to
uid=joe.smith0,ou=People,dc=example,dc=com. Note that the relationship properties (_refProperties) show the following information about the linked accounts:-
The date on which the accounts were linked
-
The fact that this link is currently active
-
The state of the account in OpenDJ (
enabled)
-
-
Enable the LiveSync schedule to propagate changes made in OpenDJ to the managed user repository.
To start LiveSync, set
enabledtotruein theconf/schedule-liveSync.jsonfile:$ cd /path/to/openidm $ more samples/historicalaccountlinking/conf/schedule-liveSync.json { "enabled" : true, "type" : "cron", "schedule" : "0/15 * * * * ?", ... -
Use the
manage-accountcommand in theopendj/bindirectory to disable Joe Smith’s account in OpenDJ:$ cd /path/to/opendj $ bin/manage-account set-account-is-disabled \ --port 4444 \ --bindDN "cn=Directory Manager" \ --bindPassword password \ --operationValue true \ --targetDN uid=joe.smith0,ou=people,dc=example,dc=com \ --trustAll Account Is Disabled: trueWithin 15 seconds, according to the configured schedule, LiveSync should pick up the change. OpenIDM should then adjust the
stateproperty in Joe Smith’s managed user account. -
Check Joe Smith’s historical accounts again, to make sure that the state of this linked account has changed:
$ curl \ --header "X-OpenIDM-Username: openidm-admin" \ --header "X-OpenIDM-Password: openidm-admin" \ --request GET \ "http://localhost:8080/openidm/managed/user/joesmith/historicalAccounts?_queryId=query-all" { "result": [ { "_ref": "system/ldap/account/uid=joe.smith0,ou=People,dc=example,dc=com", "_refProperties": { "stateLastChanged": "Mon Nov 30 2015 14:54:45 GMT-0800 (PST)", "state": "disabled", "active": true, "linkDate": "Mon Nov 30 2015 14:45:22 GMT-0800 (PST)", "_id": "ff6913ce-a252-4dc9-a060-b8b56bb32bf4", "_rev": "2" } } ], ... } -
Now, deactivate Joe Smith’s managed user account by setting his
accountStatusproperty to inactive.You can deactivate the account over the REST interface, or by using the Admin UI.
To use the Admin UI, simply select Manage > User, select Joe Smith’s account and change his Status to inactive, on his Details tab.
The following command deactivates Joe Smith’s account over REST:
$ curl \ --header "X-OpenIDM-Username: openidm-admin" \ --header "X-OpenIDM-Password: openidm-admin" \ --header "Content-Type: application/json" \ --request PATCH \ --data '[ { "operation" : "replace", "field" : "accountStatus", "value" : "inactive" } ]' \ "http://localhost:8080/openidm/managed/user/joesmith" { "_id": "joesmith", "_rev": "3", "userName": "joe.smith", ... "accountStatus": "inactive", ... } -
Request Joe Smith’s historical accounts again:
$ curl \ --header "X-OpenIDM-Username: openidm-admin" \ --header "X-OpenIDM-Password: openidm-admin" \ --request GET \ "http://localhost:8080/openidm/managed/user/joesmith/historicalAccounts?_queryId=query-all" { "result": [ { "_ref": "system/ldap/account/uid=joe.smith0,ou=People,dc=example,dc=com", "_refProperties": { "stateLastChanged": "Mon Nov 30 2015 14:54:45 GMT-0800 (PST)", "state": "disabled", "active": false, "linkDate": "Mon Nov 30 2015 14:45:22 GMT-0800 (PST)", "unlinkDate": "Mon Nov 30 2015 14:58:30 GMT-0800 (PST)", "_id": "ff6913ce-a252-4dc9-a060-b8b56bb32bf4", "_rev": "3" } } ], ... } -
Activate Joe Smith’s managed user account by setting his
accountStatusproperty to active. This action should create a new entry in OpenDJ (withuid=joe.smith1), and a new link from Joe Smith’s managed user object to that OpenDJ entry.You can activate the account over the REST interface, or by using the Admin UI, as described previously.
The following command activates Joe Smith’s account over REST:
$ curl \ --header "X-OpenIDM-Username: openidm-admin" \ --header "X-OpenIDM-Password: openidm-admin" \ --header "Content-Type: application/json" \ --request PATCH \ --data '[ { "operation" : "replace", "field" : "accountStatus", "value" : "active" } ]' \ "http://localhost:8080/openidm/managed/user/joesmith" { "_id": "joesmith", "_rev": "4", "userName": "joe.smith", ... "accountStatus": "active", ... } -
Verify that a new LDAP entry for user Joe Smith was created in OpenDJ.
The following command returns all IDs in OpenDJ and shows that two OpenDJ entries for Joe Smith
uid=joe.smith0anduid=joe.smith1.$ curl \ --header "X-OpenIDM-Username: openidm-admin" \ --header "X-OpenIDM-Password: openidm-admin" \ --request GET \ "http://localhost:8080/openidm/system/ldap/account?_queryId=query-all-ids" { "result": [ { "_id": "uid=jdoe,ou=People,dc=example,dc=com", "dn": "uid=jdoe,ou=People,dc=example,dc=com" }, { "_id": "uid=bjensen,ou=People,dc=example,dc=com", "dn": "uid=bjensen,ou=People,dc=example,dc=com" }, { "_id": "uid=joe.smith0,ou=People,dc=example,dc=com", "dn": "uid=joe.smith0,ou=People,dc=example,dc=com" }, { "_id": "uid=joe.smith1,ou=People,dc=example,dc=com", "dn": "uid=joe.smith1,ou=People,dc=example,dc=com" } ], ... } -
Request Joe Smith’s historical accounts again:
$ curl \
 --header "X-OpenIDM-Username: openidm-admin" \
 --header "X-OpenIDM-Password: openidm-admin" \
 --request GET \
 "http://localhost:8080/openidm/managed/user/joesmith/historicalAccounts?_queryId=query-all"
{
  "result": [
    {
      "_ref": "system/ldap/account/uid=joe.smith0,ou=People,dc=example,dc=com",
      "_refProperties": {
        "stateLastChanged": "Mon Nov 30 2015 14:54:45 GMT-0800 (PST)",
        "state": "disabled",
        "active": false,
        "linkDate": "Mon Nov 30 2015 14:45:22 GMT-0800 (PST)",
        "unlinkDate": "Mon Nov 30 2015 14:58:30 GMT-0800 (PST)",
        "_id": "ff6913ce-a252-4dc9-a060-b8b56bb32bf4",
        "_rev": "3"
      }
    },
    {
      "_ref": "system/ldap/account/uid=joe.smith1,ou=People,dc=example,dc=com",
      "_refProperties": {
        "stateLastChanged": "Mon Nov 30 2015 15:00:00 GMT-0800 (PST)",
        "state": "enabled",
        "active": true,
        "linkDate": "Mon Nov 30 2015 15:00:00 GMT-0800 (PST)",
        "_id": "08443775-7420-4994-bf86-9b29a986bfc9",
        "_rev": "1"
      }
    }
  ],
  ...
}
Note that Joe Smith’s entry now shows two OpenDJ accounts, but that only the link to
uid=joe.smith1isenabledandactive.
Storing Multiple Passwords For Managed Users
This sample demonstrates how to set up multiple passwords for managed users and how to synchronize separate passwords to different external resources. The sample assumes the following scenario:
-
The managed/user repository is the source system.
-
There are two target LDAP servers —
ldapandldap2.For the purposes of this sample, the two servers are represented by two separate organizational units on a single OpenDJ instance.
-
Managed user objects have two additional password fields, each mapped to one of the two LDAP servers.
-
The two LDAP servers have different requirements for password policy and encryption.
-
Both LDAP servers have a requirement for a password history policy, but the history size differs for the two policies.
The sample shows how to extend the password history policy, described in "Creating a Password History Policy" in the Integrator’s Guide, to apply to multiple password fields.
-
The value of a managed user’s
passwordfield is used by default for the additional passwords unless the CREATE, UPDATE, or PATCH requests on the managed user explicitly contain a value for these additional passwords.
The sample includes the following customized configuration files in the conf directory:
-
provisioner.openicf-ldap.jsonconfigures the first LDAP connection. -
conf/provisioner.openicf-ldap2.jsonconfigures the second LDAP connection. -
sync.jsonprovides the mappings from the OpenIDM managed user repository to the respective LDAP servers. -
managed.jsoncontains a customized schema for managed users that includes the additional password fields.
For details of the customizations to these configuration files, see the README provided with the sample.
The sample includes the following customized scripts in the script directory:
-
onCreate-onUpdate-sync.jsperforms custom mapping logic. Specifically, this script maps the pre-hashed password value and sets the target object DN on create events. -
storeFields.groovystores the pre-hashed values of fields in the context chain, on validate events. -
onCreate-user-custom.jsandonUpdate-user-custom.jsare used for validation of the password history policy when a user is created or updated. -
pwpolicy.jsis an additional policy script for the password history policy. -
set-additional-passwords.jspopulates the values of the additional password fields with the value of the mainpasswordfield if the additional fields are not included in the request content.
|
This sample does not support creation of new users in the Admin UI. |
Understanding the Password History Policy
The sample includes a custom password history policy. Although the sample is concerned only about the history of passwords, you can use this policy to enforce history validation on any managed object property.
The following configuration changes set up the password history policy:
-
A
fieldHistoryproperty is added to managed users. The value of this field is a map of field names to a list of historical values for that field. These lists of values are used by the policy to determine if a new value has previously been used. -
The
onCreate-user-custom.jsscript performs the standardonCreatetasks for a managed user object but also stores the initial value of each of the fields that OpenIDM must keep a history of. The script is passed the following configurable properties:-
historyFields— a list of the fields to store history on. -
historySize— the number of historical fields to store.
-
-
The
onUpdate-user-custom.jscompares the old and new values of the historical fields on update events, to determine if the values have changed. When a new value is detected, it is stored in the list of historical values for that field.This script also contains logic to deal with the comparison of encrypted or hashed field values. The script is passed the following configurable properties:
-
historyFields— a list of the fields to store history on. -
historySize— the number of historical fields to store.
-
-
The
pwpolicy.jsscript contains the additional policy definition for the historical password policy. This script compares the new field value with the values in the list of historical values for each field.The
policy.jsonconfiguration includes this script in itsadditionalFileslist, so that the policy service loads the new policy definition. The new policy takes ahistoryLengthparameter, which indicates the number of historical values to enforce the policy on. This number must not exceed thehistorySizespecified in theonCreateandonUpdatescripts. -
The
ldapPasswordandldap2Passwordfields in the managed user schema have been updated with the policy. For the purposes of this sample thehistorySizehas been set to 2 forldapPasswordand to 4 forldap2Password.
Configuring the LDAP Server
This sample expects the configuration for the external LDAP server to be the same as described in "LDAP Server Configuration".
The following steps provide setup instructions for an OpenDJ server. Adjust these instructions if you are using an alternative LDAP server.
The LDIF data for this sample is provided in the file openidm/samples/multiplepasswords/data/Example.ldif. You will need to import this data during your OpenDJ setup.
-
Download OpenDJ from the GitHub and extract the zip archive.
-
Install OpenDJ, using either the UI or the command-line setup.
If you use the UI, import the Example.ldif file during the installation.
If you use the command-line setup, import the Example.ldif file during the setup as follows:
$ cd /path/to/opendj $ ./setup --cli \ --hostname localhost \ --ldapPort 1389 \ --rootUserDN "cn=Directory Manager" \ --rootUserPassword password \ --adminConnectorPort 4444 \ --baseDN dc=com \ --ldifFile /path/to/openidm/samples/multiplepasswords/data/Example.ldif \ --acceptLicense \ --no-prompt ... Configuring Directory Server ..... Done. Importing LDIF file /path/to/openidm/samples/multiplepasswords/data/Example.ldif ...... Done. Starting Directory Server ...... Done. ... -
Run an
ldapsearchon the LDAP directory and look at the organizational units:$ cd /path/to/opendj $ bin/ldapsearch \ --hostname localhost \ --port 1389 \ --bindDN "cn=directory manager" \ --bindPassword password \ --baseDN "dc=example,dc=com" \ "ou=*" \ ou dn: ou=People,dc=example,dc=com ou: people dn: ou=Customers,dc=example,dc=com ou: people ou: CustomersThe organizational units,
ou=Peopleandou=Customers, represent the two different target LDAP systems that our mappings point to.
Demonstrating the Use of Multiple Accounts
This section starts OpenIDM with the sample configuration, then creates a user with multiple passwords, adhering to the different policies in the configured password policy. The section tests that the user was synchronized to two separate LDAP directories, with the different required passwords, and that the user can bind to each of these LDAP directories.
-
Prepare OpenIDM as described in "Preparing OpenIDM", then start OpenIDM with the configuration for the multiple passwords sample.
$ cd /path/to/openidm $ ./startup.sh -p samples/multiplepasswords -
Create a user in OpenIDM. Include a main
passwordfield but no additional password fields. The additional password fields (ldapPasswordandldap2Password) will be populated with the value of the mainpasswordfield as a result of the script described previously.For the purposes of this example, we will not use the Admin UI, so that the result of each command can be clearly seen. Create the user over REST, by running the following command:
$ curl \
 --header "X-OpenIDM-Username: openidm-admin" \
 --header "X-OpenIDM-Password: openidm-admin" \
 --header "Content-Type: application/json" \
 --request PUT \
 --data '{
   "userName": "jdoe",
   "givenName": "John",
   "sn" : "Doe",
   "displayName" : "John Doe",
   "mail" : "john.doe@example.com",
   "password" : "Passw0rd"
 }' \
 "http://localhost:8080/openidm/managed/user/jdoe"
{
  "code": 403,
  "reason": "Forbidden",
  "message": "Policy validation failed",
  "detail": {
    "result": false,
    "failedPolicyRequirements": [
      {
        "policyRequirements": [
          {
            "policyRequirement": "AT_LEAST_X_CAPITAL_LETTERS",
            "params": {
              "numCaps": 2
            }
          }
        ],
        "property": "ldapPassword"
      },
      {
        "policyRequirements": [
          {
            "policyRequirement": "AT_LEAST_X_NUMBERS",
            "params": {
              "numNums": 2
            }
          }
        ],
        "property": "ldap2Password"
      }
    ]
  }
}
Notice that the create request failed with a policy validation failure on the two new password fields. Although the password met the requirement for the main
passwordfield, the user could not be created because the password did not meet the requirements of theldapPasswordandldap2Passwordfields.You can fix this problem either by updating the
passwordfield to one that passes both of the new requirements, or by updating the individual password fields to specifically pass their individual validation requirements. -
Now, try to create user jdoe again, this time providing individual values for each of the different password fields, that comply with the three different password policies:
$ curl \
 --header "X-OpenIDM-Username: openidm-admin" \
 --header "X-OpenIDM-Password: openidm-admin" \
 --header "Content-Type: application/json" \
 --request PUT \
 --data '{
   "userName": "jdoe",
   "givenName": "John",
   "sn" : "Doe",
   "displayName" : "John Doe",
   "mail" : "john.doe@example.com",
   "password" : "Passw0rd",
   "ldapPassword" : "PPassw0rd",
   "ldap2Password" : "Passw00rd"
 }' \
 "http://localhost:8080/openidm/managed/user/jdoe"
{
  "_id": "jdoe",
  "_rev": "1",
  "userName": "jdoe",
  "givenName": "John",
  "sn": "Doe",
  "displayName": "John Doe",
  "mail": "john.doe@example.com",
  "ldapPassword": {
    "$crypto": {
      "value": {
        "algorithm": "SHA-256",
        "data": "CpbVZlXAEFL/LUqWyq9Bcks/tLVwJ0pHrc/smLWf8UmC/0BDtEKRo1o2IjB6mNFz"
      },
      "type": "salted-hash"
    }
  },
  "ldap2Password": {
    "$crypto": {
      "value": {
        "iv": "TbJlRF+cSFeOguclh8AZVg==",
        "data": "zQ250CXfR3QJ3cBKjpCQhQ==",
        "cipher": "AES/CBC/PKCS5Padding",
        "key": "openidm-sym-default"
      },
      "type": "x-simple-encryption"
    }
  },
...
}
The user has been created with three different passwords that comply with three distinct password policies. The passwords have been hashed or encrypted, as defined in the
managed.jsonfile. -
As a result of implicit synchronization, two separate LDAP accounts should have been created for user jdoe on our two simulated LDAP servers. For more information about implicit synchronization, see "Types of Synchronization" in the Integrator’s Guide.
-
Query the IDs in the LDAP directory as follows:
$ curl \
 --header "X-OpenIDM-Username: openidm-admin" \
 --header "X-OpenIDM-Password: openidm-admin" \
 --request GET \
 "http://localhost:8080/openidm/system/ldap/account?_queryId=query-all-ids"
{
  "result" : [ {
    "_id" : "uid=jdoe,ou=People,dc=example,dc=com",
    "dn" : "uid=jdoe,ou=People,dc=example,dc=com"
  }, {
    "_id" : "uid=jdoe,ou=Customers,dc=example,dc=com",
    "dn" : "uid=jdoe,ou=Customers,dc=example,dc=com"
  } ],
...
}
Note that jdoe has two entries - one in
ou=Peopleand one inou=Customers. -
Now, see if you can search each LDAP server, as user jdoe, with the separate passwords that you created for each directory.
This step will indicate that the passwords were propagated correctly to the separate LDAP servers.
$ cd /path/to/opendj $ bin/ldapsearch \ --hostname localhost \ --port 1389 \ --bindDN uid=jdoe,ou=People,dc=example,dc=com \ --bindPassword PPassw0rd \ --baseDN dc=example,dc=com \ uid=jdoe dn: uid=jdoe,ou=People,dc=example,dc=com objectClass: organizationalPerson objectClass: person objectClass: inetOrgPerson objectClass: top uid: jdoe mail: john.doe@example.com sn: Doe cn: John Doe userPassword: {SSHA}ot11NT7zidSxXEDtNE+8qQjyfIE3CDbywKGYmQ== givenName: John dn: uid=jdoe,ou=Customers,dc=example,dc=com objectClass: organizationalPerson objectClass: person objectClass: inetOrgPerson objectClass: top uid: jdoe mail: john.doe@example.com sn: Doe cn: John Doe givenName: John $ bin/ldapsearch \ --hostname localhost \ --port 1389 \ --bindDN uid=jdoe,ou=Customers,dc=example,dc=com \ --bindPassword Passw00rd \ --baseDN dc=example,dc=com \ uid=jdoe dn: uid=jdoe,ou=People,dc=example,dc=com objectClass: organizationalPerson objectClass: person objectClass: inetOrgPerson objectClass: top uid: jdoe mail: john.doe@example.com sn: Doe cn: John Doe userPassword: {SSHA}ot11NT7zidSxXEDtNE+8qQjyfIE3CDbywKGYmQ== givenName: John dn: uid=jdoe,ou=Customers,dc=example,dc=com objectClass: organizationalPerson objectClass: person objectClass: inetOrgPerson objectClass: top uid: jdoe mail: john.doe@example.com sn: Doe cn: John Doe givenName: John -
Patch jdoe’s managed user entry to change his
ldapPassword.$ curl \ --header "X-OpenIDM-Username: openidm-admin" \ --header "X-OpenIDM-Password: openidm-admin" \ --header "Content-Type: application/json" \ --request PATCH \ --data '[ { "operation" : "replace", "field" : "ldapPassword", "value" : "TTestw0rd" } ]' \ "http://localhost:8080/openidm/managed/user/jdoe" { "_id": "jdoe", "_rev": "2", "userName": "jdoe", "givenName": "John", "sn": "Doe", "displayName": "John Doe", ... "ldapPassword": { "$crypto": { "value": { "algorithm": "SHA-256", "data": "Vc6hvmzXaSSdG9WroqOTg3PQVdixhpg9tD/uKT610Z/H5iC6vsoOpE0/R5FaiDUg" }, "type": "salted-hash" } }, ... } -
Search the "first" LDAP server again, as user jdoe, with this new password to verify that the password change was propagated correctly to the LDAP server.
$ cd /path/to/opendj
$ bin/ldapsearch \
--hostname localhost \
--port 1389 \
--bindDN uid=jdoe,ou=People,dc=example,dc=com \
--bindPassword TTestw0rd \
--baseDN dc=example,dc=com \
uid=jdoe
dn: uid=jdoe,ou=People,dc=example,dc=com
objectClass: organizationalPerson
objectClass: person
objectClass: inetOrgPerson
objectClass: top
userPassword: {SSHA}pXV9/eZq6L30L/lGTsMV/39Dzjv/zHqIhWpLRw==
uid: jdoe
mail: john.doe@example.com
sn: Doe
givenName: John
cn: John Doe

dn: uid=jdoe,ou=Customers,dc=example,dc=com
objectClass: organizationalPerson
objectClass: person
objectClass: inetOrgPerson
objectClass: top
uid: jdoe
mail: john.doe@example.com
sn: Doe
cn: John Doe
givenName: John
Demonstrating the Use of the Password History Policy
This section patches managed user jdoe’s entry, changing his ldapPassword a number of times, to demonstrate the application of the password history policy.
-
Send the following patch requests, changing the value of jdoe’s
ldapPasswordeach time:$ curl \ --header "X-OpenIDM-Username: openidm-admin" \ --header "X-OpenIDM-Password: openidm-admin" \ --header "Content-Type: application/json" \ --request PATCH \ --data '[ { "operation" : "replace", "field" : "ldapPassword", "value" : "TTestw0rd1" } ]' \ "http://localhost:8080/openidm/managed/user/jdoe" { "_id": "jdoe", "_rev": "3", "userName": "jdoe", "givenName": "John", "sn": "Doe", "displayName": "John Doe", "mail": "john.doe@example.com", ... "ldapPassword": { "$crypto": { "value": { "algorithm": "SHA-256", "data": "uFacwvr8JsiDwlfI7I/5M+q6jTmQT8e5BaNqxLRcVR+8JxA+/fqyOc8Wo0GhzIz6" }, "type": "salted-hash" } }, } $ curl \ --header "X-OpenIDM-Username: openidm-admin" \ --header "X-OpenIDM-Password: openidm-admin" \ --header "Content-Type: application/json" \ --request PATCH \ --data '[ { "operation" : "replace", "field" : "ldapPassword", "value" : "TTestw0rd2" } ]' \ "http://localhost:8080/openidm/managed/user/jdoe" { "_id": "jdoe", "_rev": "4", "userName": "jdoe", "givenName": "John", "sn": "Doe", "displayName": "John Doe", ... "ldapPassword": { "$crypto": { "value": { "algorithm": "SHA-256", "data": "kzxz6Nc38srk28xhaBLNX1DDtVsauKnDERoXyVy/TSYtEiMWd2KitgTn7498lZs0" }, "type": "salted-hash" } } } $ curl \ --header "X-OpenIDM-Username: openidm-admin" \ --header "X-OpenIDM-Password: openidm-admin" \ --header "Content-Type: application/json" \ --request PATCH \ --data '[ { "operation" : "replace", "field" : "ldapPassword", "value" : "TTestw0rd3" } ]' \ "http://localhost:8080/openidm/managed/user/jdoe" { "_id": "jdoe", "_rev": "5", "userName": "jdoe", "givenName": "John", "sn": "Doe", "displayName": "John Doe", ... "ldapPassword": { "$crypto": { "value": { "algorithm": "SHA-256", "data": "5NEEkfSsUHFOyEHa/C6yXl9x8s3Q5yaLYJgF02Lp/hPQ8DBKmwUU0U37cqFlQLQX" }, "type": "salted-hash" } } }User jdoe now has a history of
ldapPasswordvalues, that containsTTestw0rd3,TTestw0rd2,TTestw0rd1, andTTestw0rd, in that order. You can see the four separate hashed values in thefieldHistoryproperty of the user:$ curl \ --header "X-OpenIDM-Username: openidm-admin" \ --header "X-OpenIDM-Password: openidm-admin" \ --request GET \ "http://localhost:8080/openidm/managed/user/jdoe?_fields=fieldHistory" { "_id": "jdoe", "_rev": "5", "fieldHistory": { ... "ldapPassword": [ { "$crypto": { "value": { "algorithm": "SHA-256", "data": "k1A1udvQo2gAW/5HxFFjs+IG2p34prv36UsVP89YAVv/bALQTAUJjBhml+qrlLBx" }, "type": "salted-hash" } }, { "$crypto": { "value": { "algorithm": "SHA-256", "data": "LWHaTZYSUp6hP1RChZElfHmfFBQQV+FGtZuHJxsdA/j8sOvjyqeGxk+17IFCX/Ol" }, "type": "salted-hash" } }, { "$crypto": { "value": { "algorithm": "SHA-256", "data": "I4nR+Kkh0sO53Sy2V7SUc6Hv3eETC9d0HWopgDTBc9FqRZCV2C9ML0kXGJk8FhfV" }, "type": "salted-hash" } }, { "$crypto": { "value": { "algorithm": "SHA-256", "data": "um9iNdwU7XEVArep2X5I0wr4rRy7nacKXNuzzOc7Oa1f+lINHKwZKxaTyBwGbpX2" }, "type": "salted-hash" } } ] } } -
The history size for the
ldapPasswordpolicy is set to 2. To demonstrate the history policy, attempt to patch jdoe’s entry with a password value that was used in his previous 2 password resets:TTestw0rd2:$ curl \ --header "X-OpenIDM-Username: openidm-admin" \ --header "X-OpenIDM-Password: openidm-admin" \ --header "Content-Type: application/json" \ --request PATCH \ --data '[ { "operation" : "replace", "field" : "ldapPassword", "value" : "TTestw0rd2" } ]' \ "http://localhost:8080/openidm/managed/user/jdoe" { "code": 403, "reason": "Forbidden", "message": "Failed policy validation", "detail": { "result": false, "failedPolicyRequirements": [ { "policyRequirements": [ { "policyRequirement": "IS_NEW" } ], "property": "ldapPassword" } ] } }The password reset fails the
IS_NEWpolicy requirement. -
Now, reset jdoe’s password to a value that was not used in the previous two updates:
$ curl \
 --header "X-OpenIDM-Username: openidm-admin" \
 --header "X-OpenIDM-Password: openidm-admin" \
 --header "Content-Type: application/json" \
 --request PATCH \
 --data '[ {
   "operation" : "replace",
   "field" : "ldapPassword",
   "value" : "TTestw0rd"
 } ]' \
 "http://localhost:8080/openidm/managed/user/jdoe"
{
  "_id": "jdoe",
  "_rev": "5",
  "userName": "jdoe",
  "givenName": "John",
  "sn": "Doe",
  "displayName": "John Doe",
 ...
  "ldapPassword": {
    "$crypto": {
      "value": {
        "algorithm": "SHA-256",
        "data": "5NEEkfSsUHFOyEHa/C6yXl9x8s3Q5yaLYJgF02Lp/hPQ8DBKmwUU0U37cqFlQLQX"
      },
      "type": "salted-hash"
    }
  }
}
This time, the password reset succeeds.