Transforming OpenID Connect ID Tokens Into SAML Assertions
OpenIG provides a token transformation filter to transform OpenID Connect ID tokens (id_tokens) issued by OpenAM into SAML 2.0 assertions. The implementation uses the REST Security Token Service (STS) APIs, where the subject confirmation method is Bearer.
Many enterprises use existing or legacy, SAML 2.0-based SSO, but many mobile and social applications are managed by OAuth 2.0/OpenID. Use the OpenIG token transformation filter to bridge OAuth 2.0 and SAML 2.0 frameworks.
About Token Transformation
The following figure illustrates the basic flow of information between a request, OpenIG, the OpenAM OAuth 2.0 and STS modules, and an application. For a more detailed view of the flow, see Flow of Events.
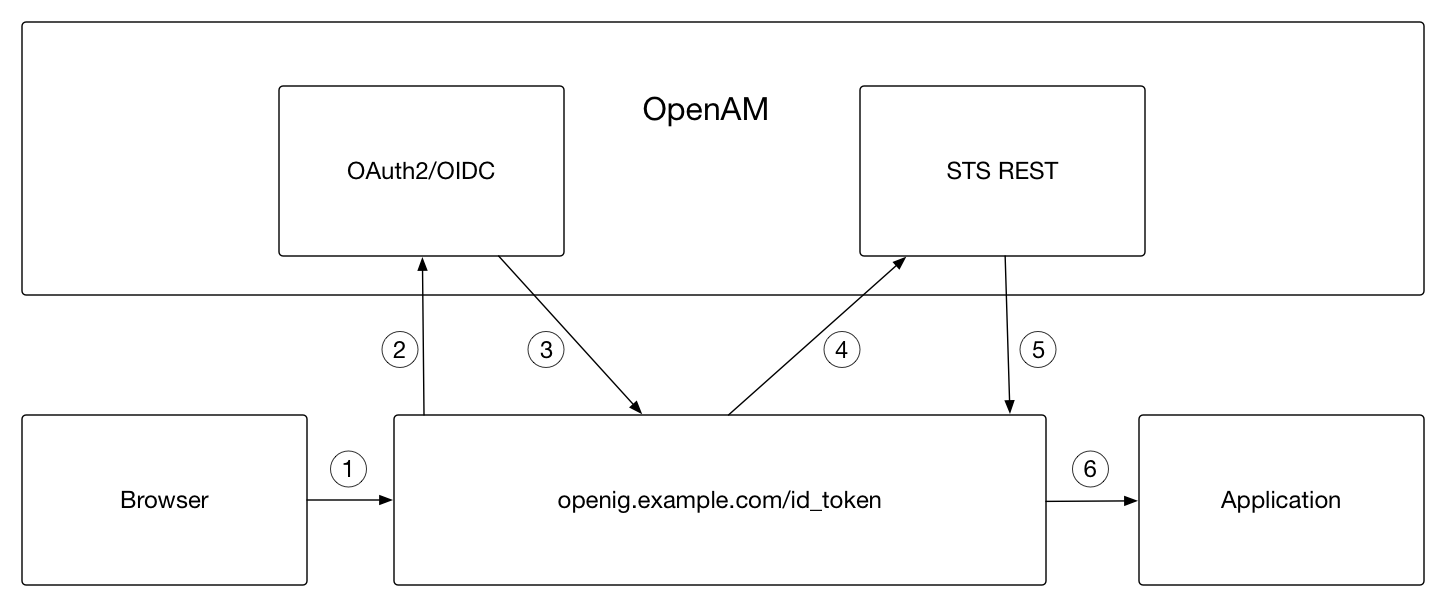
The basic process is as follows:
-
A user tries to access to a protected resource.
-
If the user is not authenticated, the
OAuth2ClientFilterredirects the request to OpenAM. After authentication, OpenAM asks for the user’s consent to give OpenIG access to private information. -
If the user consents, OpenAM returns an id_token to the
OAuth2ClientFilter. The filter opens the id_token JWT and makes it available inattributes.openid.id_tokenandattributes.openid.id_token_claimsfor downstream filters. -
The
TokenTransformationFilterredirects the request to the STS. The request includes the user’s credentials, the id_token to transform, and the location where the SAML 2.0 assertion is to be injected after successful transformation. -
The STS validates the signature, decodes the payload, and verifies that the user issued the transaction. The STS then issues a SAML assertion to OpenIG on behalf of the user.
-
The SAML assertion is now available to be used by an application.
Installation Overview
This tutorial takes you through the steps to set up OpenAM as an OAuth 2.0 provider and OpenIG as an OpenID Connect relying party.
When a user makes a request, the OAuth2ClientFilter returns an id_token. The TokenTransformationFilter references a REST STS instance that you set up in OpenAM to transform the id_token into a SAML 2.0 assertion.
You need to be logged in to OpenAM as administrator to set up the configuration for token transformation, but you do not need special privileges to request a token transformation. For more information, see TokenTransformationFilter(5) in the Configuration Reference.
This tutorial is tested on OpenAM 13 and later. Before you start this tutorial:
-
Prepare OpenIG as described in Getting Started.
-
Install and configure OpenAM on http://openam.example.com:8088/openam, with the default configuration. If you use a different configuration, make sure you substitute in the tutorial accordingly.
| Task | See Section(s) |
|---|---|
Create an OAuth 2.0 provider and OAuth 2.0/OpenID Connect Relying Party |
|
Create a Bearer authentication module to validate the id_token and OpenAM user. |
|
Create an STS REST instance to transform the id_token into a SAML assertion. |
|
Create the routes in OpenIG to send the requests and test the setup. |
Setting Up the OpenID Connect Provider and Client
In this part, you set up OpenAM as an OpenID Connect provider and OpenIG as an an OpenID Connect relying party. OpenIG authenticates with OpenAM and retrieves an OpenID Connect ID token (id_token) to be transformed by STS.
In you haven’t set up the user George Costanza in a previous tutorial, follow this procedure.
-
In the console for OpenAM 13 and later, select the top-level realm and browse to Subjects > User.
In the console for OpenAM 12 and earlier, browse to Access Control > / (Top Level Realm) > Subjects > User.
-
Click New and create a new user with the following values:
-
ID:
george -
Last Name:
george -
Full Name:
george costanza -
Password:
costanza
-
-
Click Save.
-
In the User window, select the new user and set Email Address:
costanza. -
Click Save.
-
Configure OpenAM as an OAuth 2.0 Authorization Server and OpenID Connect Provider.
-
In the OpenAM console, select the top-level realm and browse to Configure OAuth Provider > Configure OpenID Connect.
-
Accept the default values and click Create.
-
-
Register OpenIG as an OpenID Connect relying party. This step enables OpenIG to communicate as an OAuth 2.0 relying party with OpenAM.
-
In the OpenAM console, select the top-level realm and browse to Agents > OAuth 2.0/OpenID Connect Client.
-
In the Agent table, click New, enter the following values, and then click Create:
-
Name:
oidc_client_for_sts -
Password:
password
-
You use these values for
clientIdandclientSecretin Creating a Bearer Module .-
In the Agent table, select the
oidc_client_for_stsprofile and add the following values:-
Redirection URIs:
http://openig.example.com:8080/id_token/callback -
Scope(s):
openid,profile, andemail. -
ID Token Signing Algorithm:
HS256,HS384, orHS512.Because the algorithm must be HMAC, the default value of
RS256is not okay.
-
-
Click Save.
-
Creating a Bearer Module
The OpenID Connect ID token bearer module expects an id_token in an HTTP request header. It validates the id_token, and, if successful, looks up the OpenAM user profile corresponding to the end user for whom the id_token was issued. Assuming the id_token is valid and the profile is found, the module authenticates the OpenAM user.
You configure the token bearer module to specify how OpenAM gets the information to validate the id_token, which request header contains the id_token, the identifier for the provider who issued the id_token, and how to map the id_token claims to an OpenAM user profile.
|
If you are using OpenAM 13.0, create the bearer with a |
-
In a terminal window, use a
curlcommand similar to the following to retrieve the SSO token for your OpenAM installation.$ curl \ --request POST \ --header "Content-Type: application/json" \ --header "X-OpenAM-Username: amadmin" \ --header "X-OpenAM-Password: password" \ --data "{}" \ http://openam.example.com:8088/openam/json/authenticate "tokenId": "AQIC5w...NTcy*", "successUrl": "/openam/console" . . .For more information about using
curlfor OpenAM authentication, see the OpenAM Developer’s Guide. -
Replace <tokenId> in the following command with the tokenId returned by the previous step, and then run the command:
$ curl -X POST -H "Content-Type: application/json" \
    -H "iplanetDirectoryPro: <tokenId>" \
    -d \
    '{
        "cryptoContextValue": "password",
        "jwtToLdapAttributeMappings": ["sub=uid", "email=mail"],
        "principalMapperClass": "org.forgerock.openam.authentication.modules.oidc.JwtAttributeMapper",
        "acceptedAuthorizedParties": ["oidc_client_for_sts"],
        "idTokenHeaderName": "oidc_id_token",
        "accountProviderClass": "org.forgerock.openam.authentication.modules.common.mapping.DefaultAccountProvider",
        "idTokenIssuer": "http://openam.example.com:8088/openam/oauth2",
        "cryptoContextType": "client_secret",
        "audienceName": "oidc_client_for_sts",
        "_id": "oidc"
    }' \
    http://openam.example.com:8088/openam/json/realm-config/authentication/modules/openidconnect?_action=create


http://openam.example.com:8088/openam/json/realm-config/authentication/modules/openidconnect?_action=create
{"principalMapperClass":"org.forgerock.openam.authentication.modules.oidc.JwtAttributeMapper", . . .
The Bearer module is created in OpenAM. On the console of OpenAM 13.0, the module is displayed in Authentication > Modules but you cannot access its configuration page.
-
In the OpenAM console, select the top-level realm and browse to Authentication > Modules.
-
Select Add Module and create a new bearer module with the following characteristics:
-
Module name:
oidc -
Type:
OpenID Connect id_token bearer
-
-
In the configuration page, enter the following values and leave the other fields with the default values:
-
Audience name:
oidc_client_for_sts, the name OAuth 2.0/OpenID Connect client. -
List of accepted authorized parties:
oidc_client_for_sts. -
OpenID Connect validation configuration type:
client_secret -
OpenID Connect validation configuration value:
password.This is the password of the OAuth 2.0/OpenID Connect client.
-
Name of OpenID Connect ID Token Issuer:
http://openam.example.com:8088/openam/oauth2
-
-
Select Save Changes.
Creating an Instance of STS REST
The REST STS instance exposes a preconfigured transformation under a specific REST endpoint. See the OpenAM documentation for more information about setting up a REST STS instance.
-
In the OpenAM console, select the top-level realm and browse to STS.
-
In Rest STS Instances, select Add, and then create a new instance with the following characteristics:
-
Deployment Configuration
-
Deployment Url Element:
openigThis value identifies the STS instance and is used by the
instanceparameter in theTokenTransformationFilter.
-
-
Issued SAML2 Token Configuration
-
SAML2 issuer Id:
OpenAM -
Service Provider Entity Id:
openig_sp -
NameIdFormat: Select
nameid:format:transient -
Attribute Mappings: Add
password=mailanduserName=uid.
For STS, it isn’t necessary to create a SAML SP configuration in OpenAM.
-
-
OpenIdConnect Token Configuration
-
The id of the OpenIdConnect Token Provider:
oidc -
Token signature algorithm: The value must be consistent with the one you selected in To Set Up OpenID Connect Provider and Client ,
HMAC SHA 256 -
Client secret (for HMAC-signed-tokens):
password -
The audience for issued tokens:
oidc_client_for_sts.
-
-
-
Select Create.
-
Log out of OpenAM.
Setting Up the Routes on OpenIG
The following sequence diagram shows what happens when you set up and access these routes.
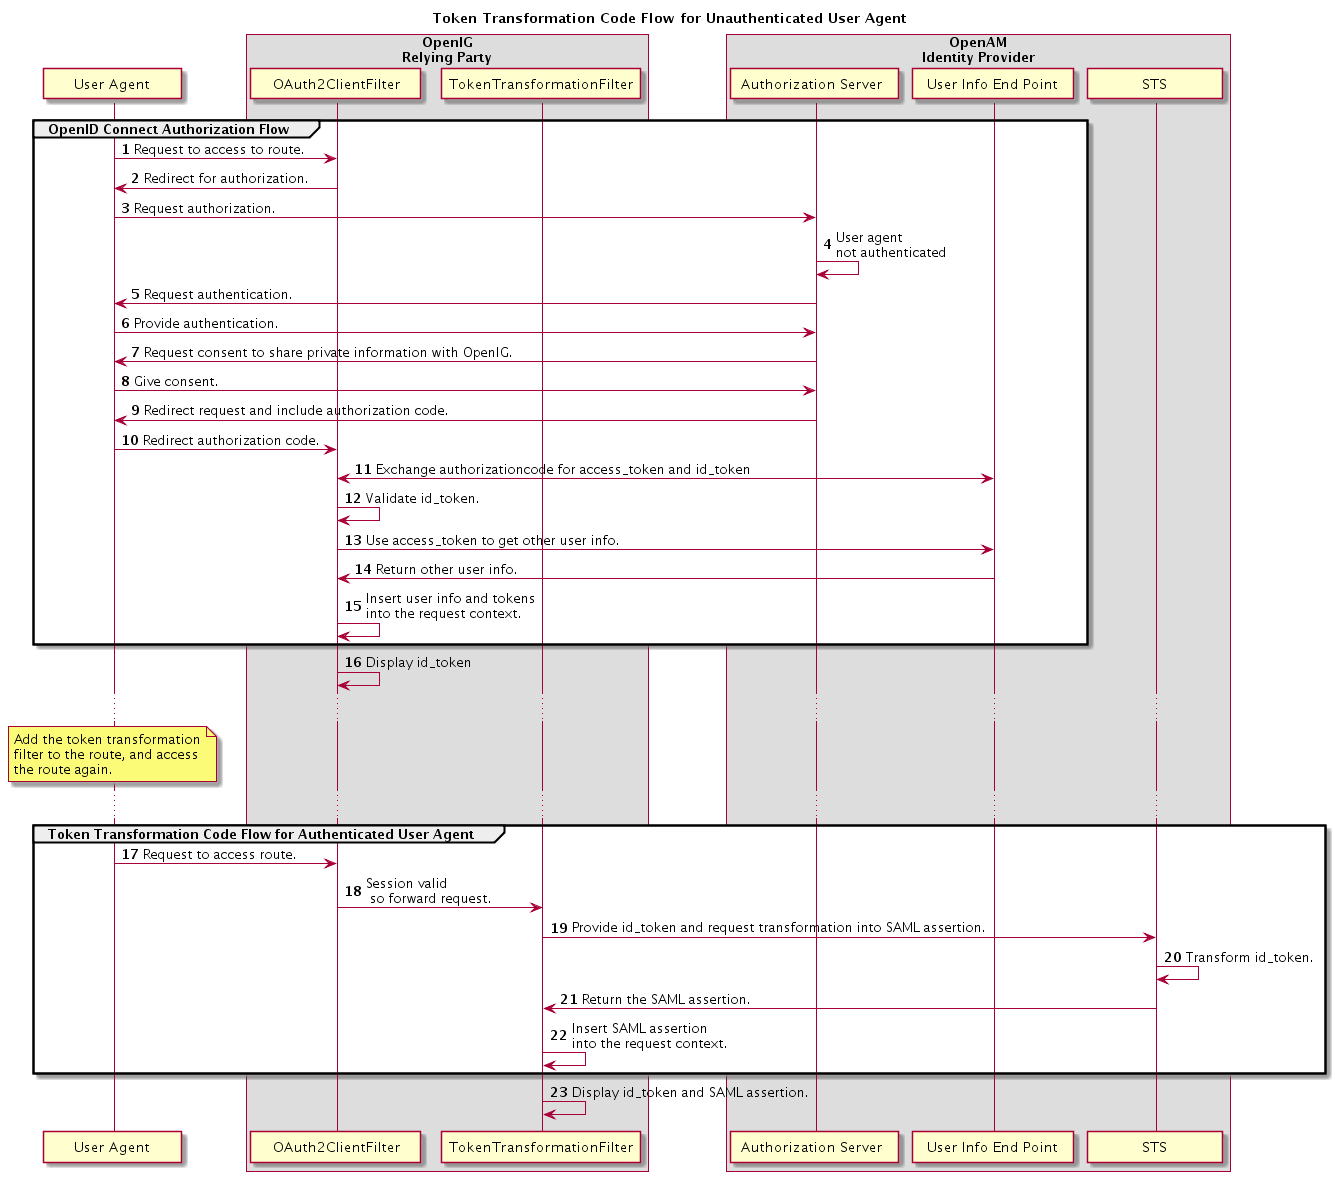
Any errors that occur during the token transformation cause an error response to be returned to the client and an error message to be logged for the OpenIG administrator.
-
Edit
config.jsonto comment the baseURI in the top-level handler. The handler declaration appears as follows:{ "handler": { "type": "Router", "audit": "global", "_baseURI": "http://app.example.com:8081", "capture": "all" } }Restart OpenIG for the changes to take effect.
-
Add the following route to the OpenIG configuration as
$HOME/.openig/config/routes/50-id-token.jsonOn Windows, add the route as
%appdata%$OpenIG\config\routes\50-id-token.json.{ "handler": { "type": "Chain", "config": { "filters": [ { "type": "OAuth2ClientFilter", "config": { "clientEndpoint": "/id_token", "requireHttps": false, "requireLogin": true, "registrations": { "name": "openam", "type": "ClientRegistration", "config": { "clientId": "oidc_client_for_sts", "clientSecret": "password", "issuer": { "type": "Issuer", "config": { "wellKnownEndpoint": "http://openam.example.com:8088/openam/oauth2/.well-known/openid-configuration" } }, "scopes": [ "openid", "profile", "email" ] } }, "target": "${attributes.openid}", "failureHandler": { "type": "StaticResponseHandler", "config": { "entity": "OAuth2ClientFilter failed...", "reason": "NotFound", "status": 500 } } } } ], "handler": { "type": "StaticResponseHandler", "config": { "entity": "{\"id_token\":\n\"${attributes.openid.id_token}\"} \n\n\n{\"saml_assertions\":\n\"${attributes.saml_assertions}\"}", "reason": "Found", "status": 200 } } } }, "condition": "${matches(request.uri.path, '^/id_token')}" }Notice the following features of the route:
-
The route matches requests to
/id_token. -
The
OAuth2ClientFilterenables OpenIG to act as an OpenID Connect relying party.-
The client endpoint is set to
/id_token, so the service URIs for this filter on the OpenIG server are/openid/login,/openid/logout, and/openid/callback. -
For convenience in this test,
"requireHttps"is false. In production environments, set it to true. So that you see the delegated authorization process when you make a request,"requireLogin"is true. -
The registration parameter holds configuration parameters provided during To Set Up OpenID Connect Provider and Client . OpenIG uses these parameters to connect with OpenAM.
-
The target for storing authorization state information is
${attributes.openid}. This is where subsequent filters and handlers can find access tokens and user information.
-
-
When the request succeeds, a
StaticResponseHandlerdisplays the id_token and a placeholder for the SAML assertion.
-
-
With OpenIG running, access http://openig.example.com:8080/id_token.
The OpenAM login screen is displayed.
-
Log in to OpenAM with the username
georgeand passwordcostanza.An OpenID Connect request to access private information is displayed.
-
Select Allow.
The id_token is displayed above an empty placeholder for the SAML assertion.
{"id_token":
"eyAidHlwIjogIkpXVCIsICJhbGciOiAiSFMyNTYiIH0.eyAiYXRfaGFzaCI6ICJ . . ."}

{"saml_assertions":
""}
-
Add the following filter at the end of chain in
50-id-token.json. An example of the edited route is at the end of this procedure.{ "type": "TokenTransformationFilter", "config": { "openamUri": "http://openam.example.com:8088/openam", "username": "george", "password": "costanza", "idToken": "${attributes.openid.id_token}", "target": "${attributes.saml_assertions}", "instance": "openig", "ssoTokenHeader": "iPlanetDirectoryPro" } }Notice the following features of the new filter:
-
Requests from this filter are made to
http://openam.example.com:8088/openam. -
The username and password are for OpenAM subject set up in To Set Up OpenID Connect Provider and Client .
-
The
id_tokenparameter defines where this filter gets the id_token created by theOAuth2ClientFilter. -
The
targetparameter defines where this filter injects the SAML 2.0 assertion after transforming the id_token. -
The
instanceparameter must match theDeployment URL Elementfor the REST STS instance.
-
-
With OpenIG running, access http://openig.example.com:8080/id_token.
The SAML assertion is displayed under the id_token.
{"id_token":
"eyAidHlwIjogIkpXVCIsICJhbGciOiAiSFMyNTYiIH0.eyAiYXRfaGFzaCI6ICJ . . ."}

{"saml_assertions":
<"saml:Assertion xmlns:saml="urn:oasis:names:tc:SAML:2.0:assertion" Version= . . ."}
Example of the final id_token.json:
{
  "handler": {
    "type": "Chain",
    "config": {
      "filters": [
        {
          "type": "OAuth2ClientFilter",
          "config": {
            "clientEndpoint": "/id_token",
            "requireHttps": false,
            "requireLogin": true,
            "registrations": {
              "name": "openam",
              "type": "ClientRegistration",
              "config": {
                "clientId": "oidc_client_for_sts",
                "clientSecret": "password",
                "issuer": {
                  "type": "Issuer",
                  "config": {
                    "wellKnownEndpoint": "http://openam.example.com:8088/openam/oauth2/.well-known/openid-configuration"
                  }
                },
                "scopes": [
                  "openid",
                  "profile",
                  "email"
                ]
              }
            },
            "target": "${attributes.openid}",
            "failureHandler": {
              "type": "StaticResponseHandler",
              "config": {
                "entity": "OAuth2ClientFilter failed...",
                "reason": "NotFound",
                "status": 500
              }
            }
          }
        },
        {
          "type": "TokenTransformationFilter",
          "config": {
            "openamUri": "http://openam.example.com:8088/openam",
            "username": "george",
            "password": "costanza",
            "idToken": "${attributes.openid.id_token}",
            "target": "${attributes.saml_assertions}",
            "instance": "openig",
            "amHandler": {
              "type": "ClientHandler"
            },
            "ssoTokenHeader": "iPlanetDirectoryPro"
          }
        }
      ],
      "handler": {
        "type": "StaticResponseHandler",
        "config": {
          "entity": "{\"id_token\":\n\"${attributes.openid.id_token}\"} \n\n\n{\"saml_assertions\":\n\"${attributes.saml_assertions}\"}",
          "reason": "Found",
          "status": 200
        }
      }
    }
  },
  "condition": "${matches(request.uri.path, '^/id_token')}"
}